Documents
The Documents page is the central store for every file in your organization — employee paperwork like passports and Emirates IDs, company-wide files, and your own personal documents. You can upload files, organize them into folders, track expiry dates, and share them.
What you can do here:
- Browse documents across three scopes — all employees, the company, and your own
- Search and filter documents by type, employee, and expiry status
- Organize files into folders
- Upload documents and assign them to employees
- Preview, download, share, edit, archive, or delete a document
- Keep an eye on documents that are expiring or already expired
The header has four actions available throughout the page — Storage (view storage usage), New folder (create a folder), Request a Document (generate a document for an employee), and Upload (add a document).
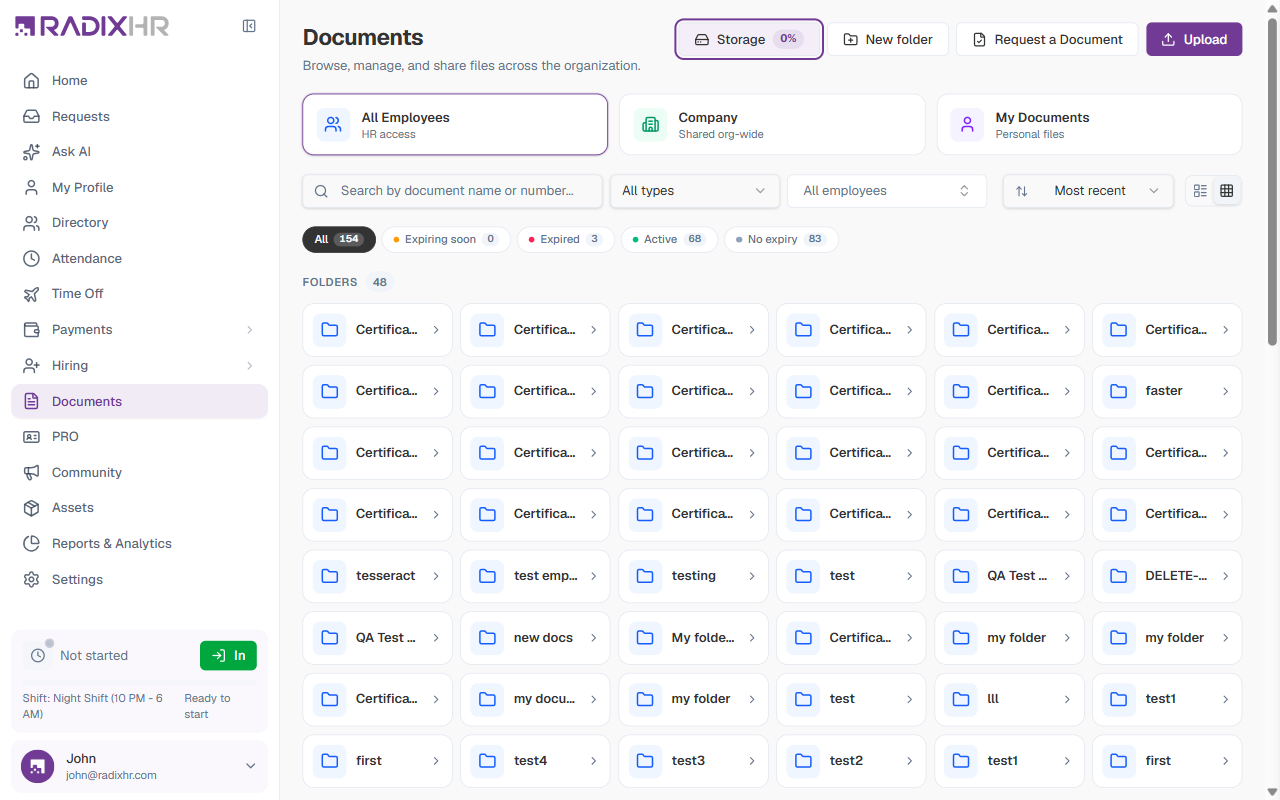
The Three Scopes
Three large buttons at the top of the page switch between the three document scopes. Each scope shows a different set of documents.
| Scope | Who it’s for | What it shows |
|---|---|---|
| All Employees | HR | Every employee’s documents across the organization — the HR master view |
| Company | Everyone | Company-wide documents shared with the whole organization |
| My Documents | You | Your own personal files |
Company
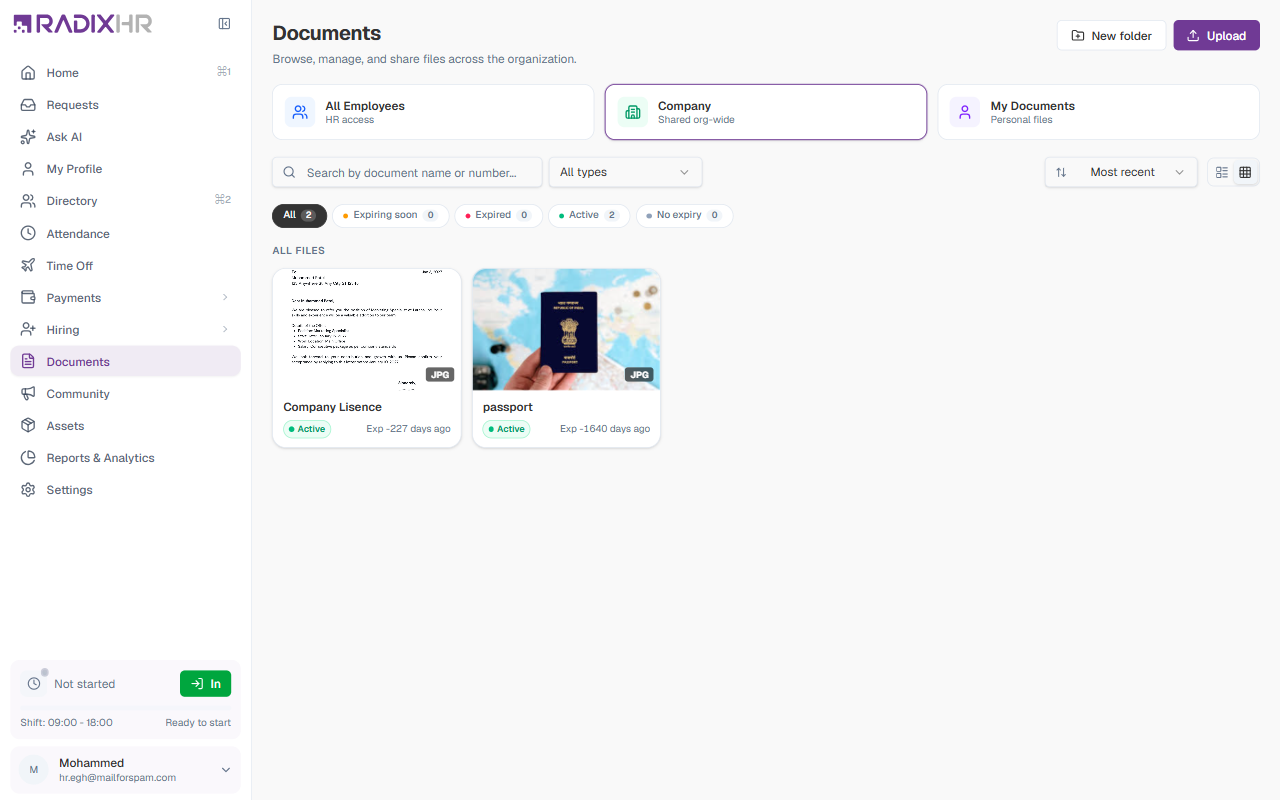
The Company scope holds files that apply to the whole organization rather than to a single employee.
My Documents
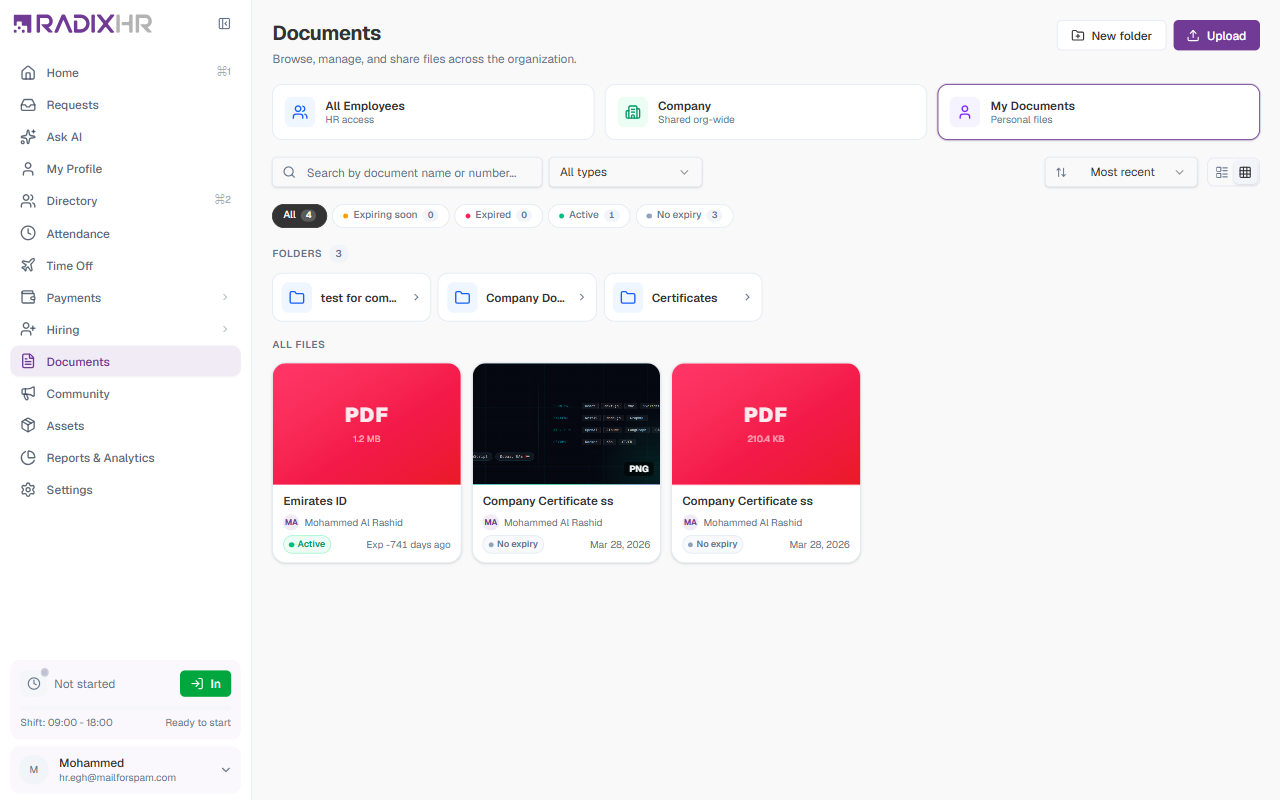
My Documents shows the files that belong to you — the documents HR has uploaded for you and shared, plus any folders within your space.
Filtering and Sorting
A toolbar above the file list helps you find documents.
| Control | What it does |
|---|---|
| Search | Finds documents by name or document number |
| All types | Filters by document type — for example Emirates ID, Passport, Visa, Salary certificate, Company insurance |
| All employees | Filters to a specific employee’s documents (shown in the All Employees scope) |
| Sort | Orders the list — Most recent, Oldest first, Name (A → Z), or Expiring soonest |
| View toggle | Switches the file list between grid view and list view |
Status Tabs
Below the toolbar, a row of tabs filters documents by their expiry status. Each tab shows a count.
| Tab | What it shows |
|---|---|
| All | Every document, regardless of status |
| Expiring soon | Documents whose expiry date is approaching |
| Expired | Documents whose expiry date has already passed |
| Active | Documents that are valid and not near expiry |
| No expiry | Documents that don’t track an expiry date |
Check the Expired and Expiring soon tabs regularly. Documents like passports, visas, and Emirates IDs need to be renewed on time, and these tabs surface the ones that need attention.
Folders
The Folders section lists the folders in the current scope. Click a folder to open it — the page shows a breadcrumb trail so you can navigate back, and you can upload files directly into the open folder.
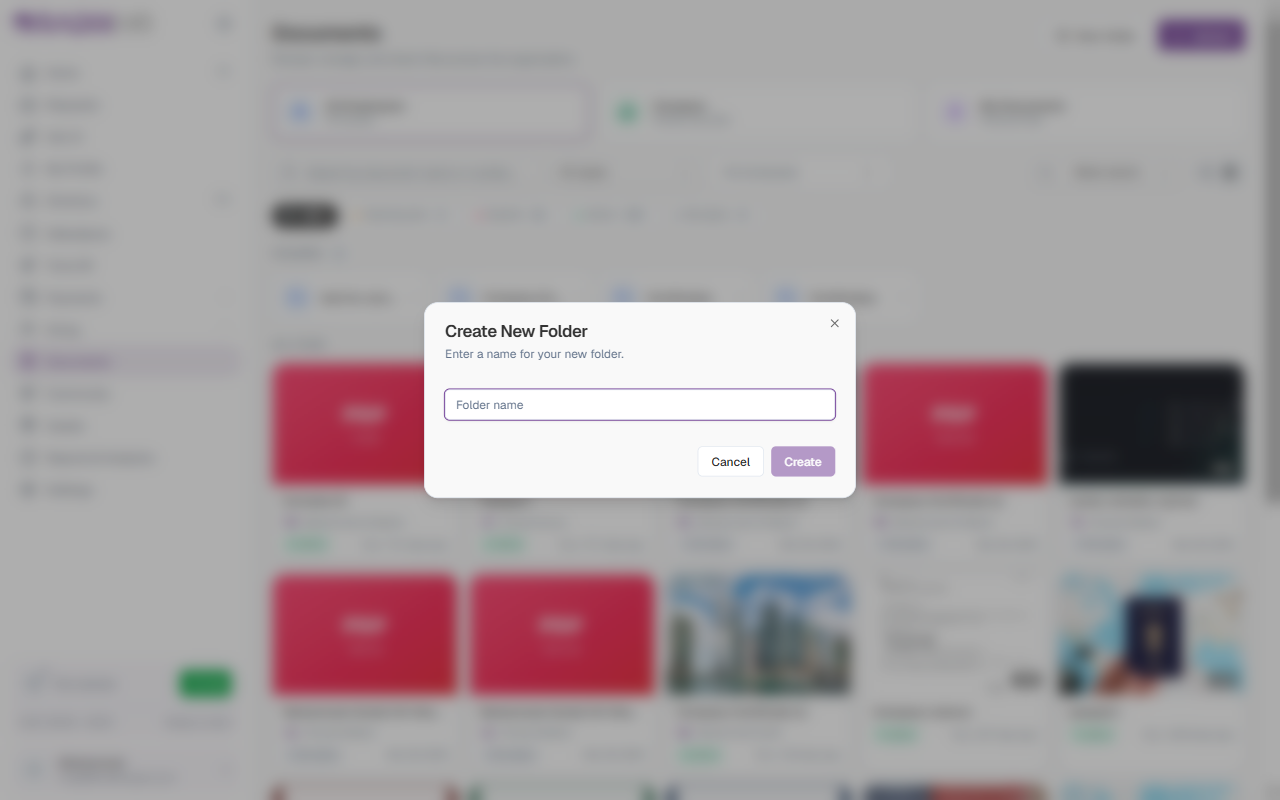
How to Create a Folder
- Click New folder in the top-right corner
- Enter a name for the folder
- Click Create
The File List
Below the folders, the All files section shows the documents themselves. Each file appears as a card with:
| Element | Description |
|---|---|
| Preview / type | A thumbnail for images, or a coloured badge showing the file type (PDF, PNG, JPG, SVG) |
| File size | How large the file is |
| Name | The document’s name |
| Owner | The employee the document belongs to, with their avatar |
| Status | A badge — Active, Expired, or No expiry — with the expiry date or how long ago it expired |
If there are more documents than fit on screen, a Load more button at the bottom loads the next batch.
File Actions
Hovering over a file card reveals three quick actions:
| Action | Description |
|---|---|
| Preview (eye icon) | Opens the document to view it |
| Download | Saves the file to your computer |
| More (⋯) | Opens a menu with further actions — see below |
The More (⋯) menu has these options:
| Option | Description |
|---|---|
| Share | Share the document with other employees |
| Edit Details | Update the document’s name, type, description, and dates |
| Archive | Move the document out of the active list while keeping it on record |
| Delete | Permanently remove the document |
Delete is permanent. If you only want to take a document out of the active list but keep it for records, use Archive instead.
Viewing a Document
Click a file card to open its detail view. It shows a preview of the file alongside its information:
- Document Details — the description
- File Info — file type, size, and category
- Employee — the employee the document belongs to, with their ID
- Upload Info — when it was uploaded and the original filename
- A Download button to save the file
How to Upload a Document
- Click Upload in the top-right corner
- Fill in the form (see the fields below)
- Click Upload
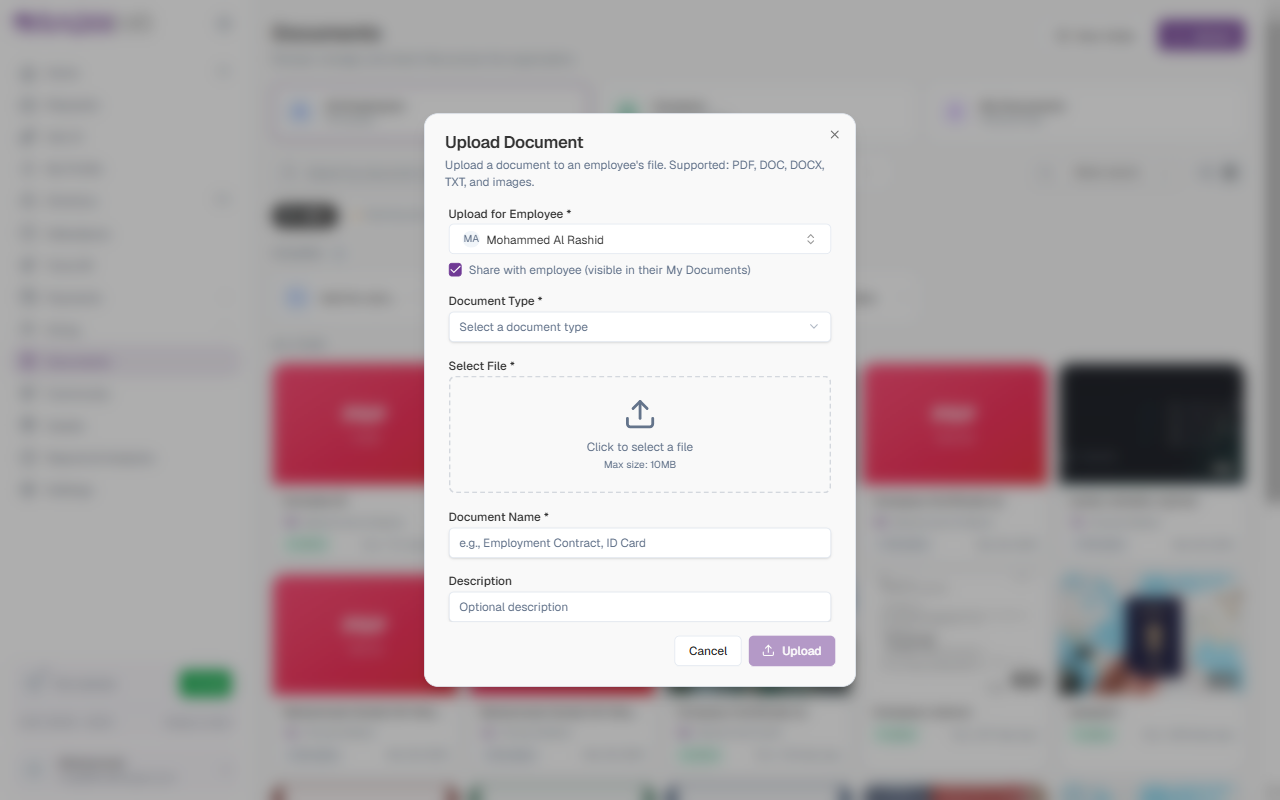
Upload Form Fields
| Field | Description | Required |
|---|---|---|
| Upload for Employee | The employee this document belongs to. | Yes |
| Share with employee | When ticked, the document is visible to the employee in their My Documents. Ticked by default. | No |
| Document Type | The category of document — for example Emirates ID, Passport, Employee certificate, or Salary certificate. Some types (like Emirates ID and Passport) also track an expiry date. | Yes |
| Select File | The file to upload. Supported formats: PDF, DOC, DOCX, TXT, and images. Maximum size: 10 MB. | Yes |
| Document Name | A clear name for the document (e.g., “Employment Contract”, “ID Card”). | Yes |
| Description | Optional notes giving more context about the document. | No |
Choose the right Document Type when uploading. Types that track expiry (such as Emirates ID, Passport, and Visa) feed the Expiring soon and Expired tabs automatically, so the document is monitored for you.
Requesting a Document
Instead of uploading a file, you can have the system generate a document for an employee from their existing data — useful for letters like a salary certificate. Click Request a Document in the top-right corner.
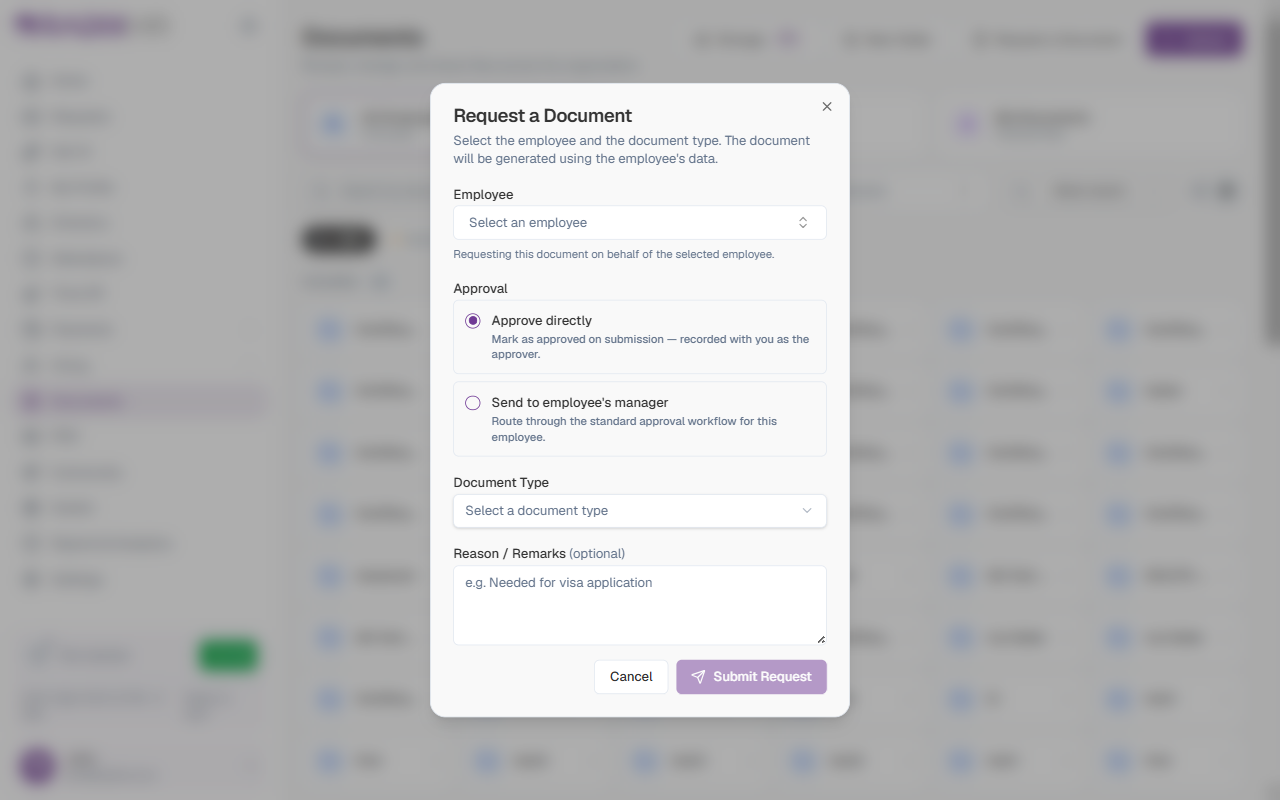
| Field | Description | Required |
|---|---|---|
| Employee | The employee the document is requested for. The document is generated using their data. | Yes |
| Approval | Approve directly marks it as approved on submission (recorded with you as the approver), or Send to employee’s manager routes it through the standard approval workflow. | Yes |
| Document Type | The type of document to generate. | Yes |
| Reason / Remarks | An optional note about why the document is needed (e.g., “Needed for visa application”). | No |
Click Submit Request to generate the document.
Storage Usage
Click Storage in the top-right corner to see how much document storage your workspace is using.
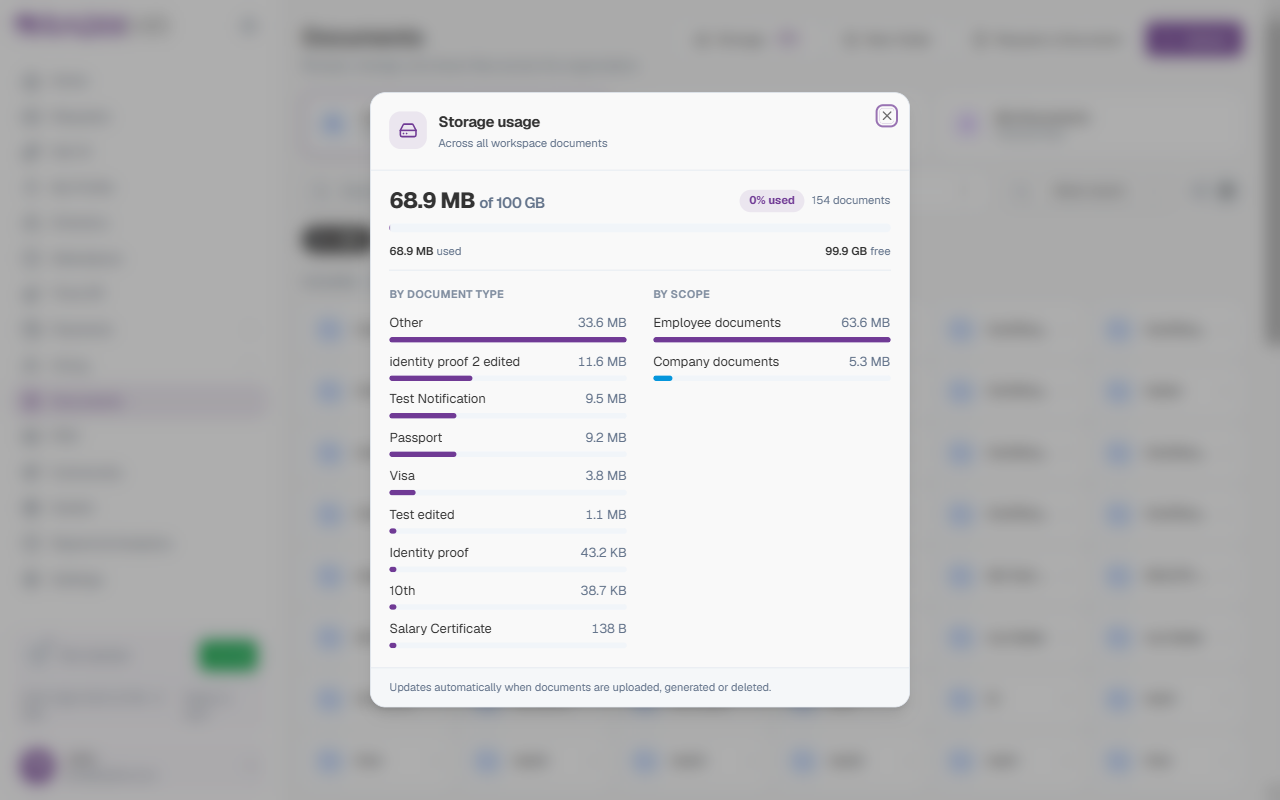
The Storage usage panel shows the total space used out of the workspace limit, the number of documents, and how much is free. It also breaks the usage down by document type (Passport, Visa, Salary Certificate, etc.) and by scope (Employee documents vs. Company documents). It updates automatically as documents are uploaded, generated, or deleted.