Approval Chains
Approval chains define the step-by-step approval process for requests across the platform — leave, attendance corrections, expenses, salary advances, payroll runs, document approvals, hiring requests, and exit clearances. Each chain specifies who approves at every step, how escalations work, and any conditions that automatically skip or auto-approve a step.
What you can do here:
- Create approval workflows for each module (Leave, Attendance, Expense, etc.)
- Define multi-step sequences with different approver types per step
- Configure escalations and periodic reminders for pending approvers
- Add conditions that automatically skip or auto-approve a step based on request data
- Mark a workflow as the Default when no other rules match
- Publish workflows to make them active for new requests

Understanding Approval Chains
An approval chain (also called a workflow) is the route a request takes from submission to final decision. Each chain belongs to one module + entity type — for example, a “Leave Approval” chain handles Leave Requests, while a separate chain handles Hiring Requests.
Key concepts:
| Concept | Description |
|---|---|
| Steps | The ordered list of approvers a request must pass through. Each step has its own approver type and rules. |
| Approver type | Who approves at a step — Reporting Manager, Department Head, HR Head, etc. |
| Priority | When more than one chain could match, the highest-priority chain wins (1–100, higher number = higher priority). |
| Default Workflow | The fallback chain used when no priority-based match applies. |
| Status | Draft (still being configured, not yet active) or Published (active for new requests). |
A workflow = automated sequence of approval steps. The terms “approval chain” and “workflow” are used interchangeably throughout the UI.
Workflows Table
The main page lists every workflow in your workspace.
| Column | Description |
|---|---|
| Workflow Name | The display name of the chain (e.g., “Leave approval”, “ATS Approval flow”) |
| Module | Lowercase module tag (leave, hiring, attendance, etc.) |
| Entity Type | The specific request type within the module (e.g., “Leave Request”, “Hiring Request”) |
| Steps | Number of approval steps in the chain |
| Status | Published (green check) or Draft (grey clock) badge |
| Priority | The priority value (1–100) used to break ties when multiple chains match |
| Chevron (›) | Click to open the chain’s detail page |
Use the Search workflows… box to filter by name, and the All dropdown to filter by module or status.
Workflow States
| State | What it means |
|---|---|
| Draft | The chain is being built. You can freely add, edit, and reorder steps. New requests do not route through draft chains. |
| Published | The chain is live and used to route incoming requests. Direct edits are blocked; use Duplicate or revert to draft to make changes. |
How to Create a Workflow
- Go to Settings > Workflows > Approval Chains
- Click + New Workflow in the top-right
- Fill in the workflow details
- Click Create Workflow
The new chain opens in Draft status with no steps. Add steps and then publish when ready.
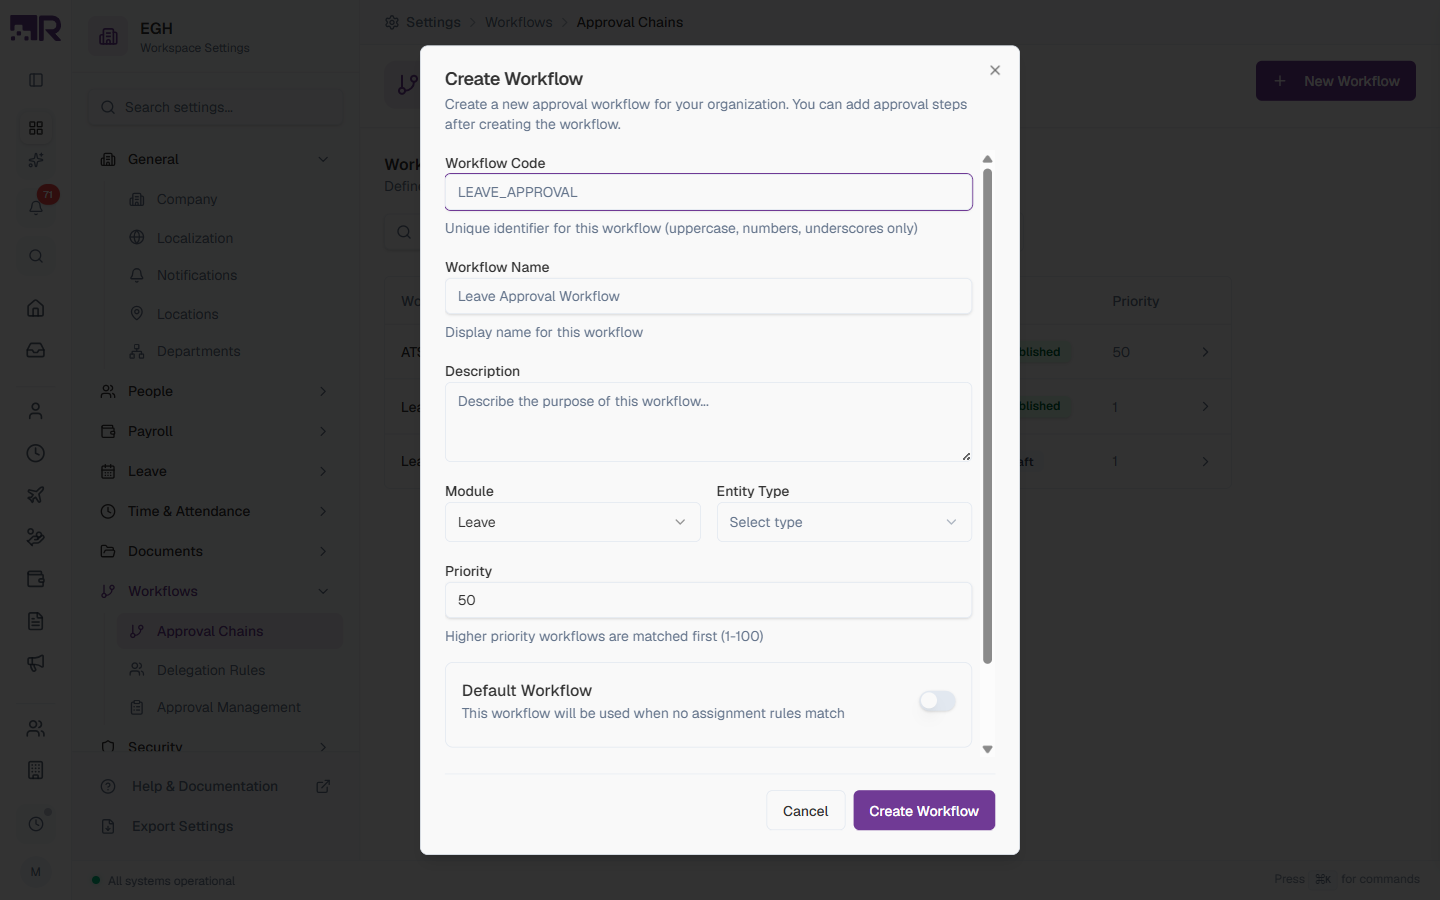
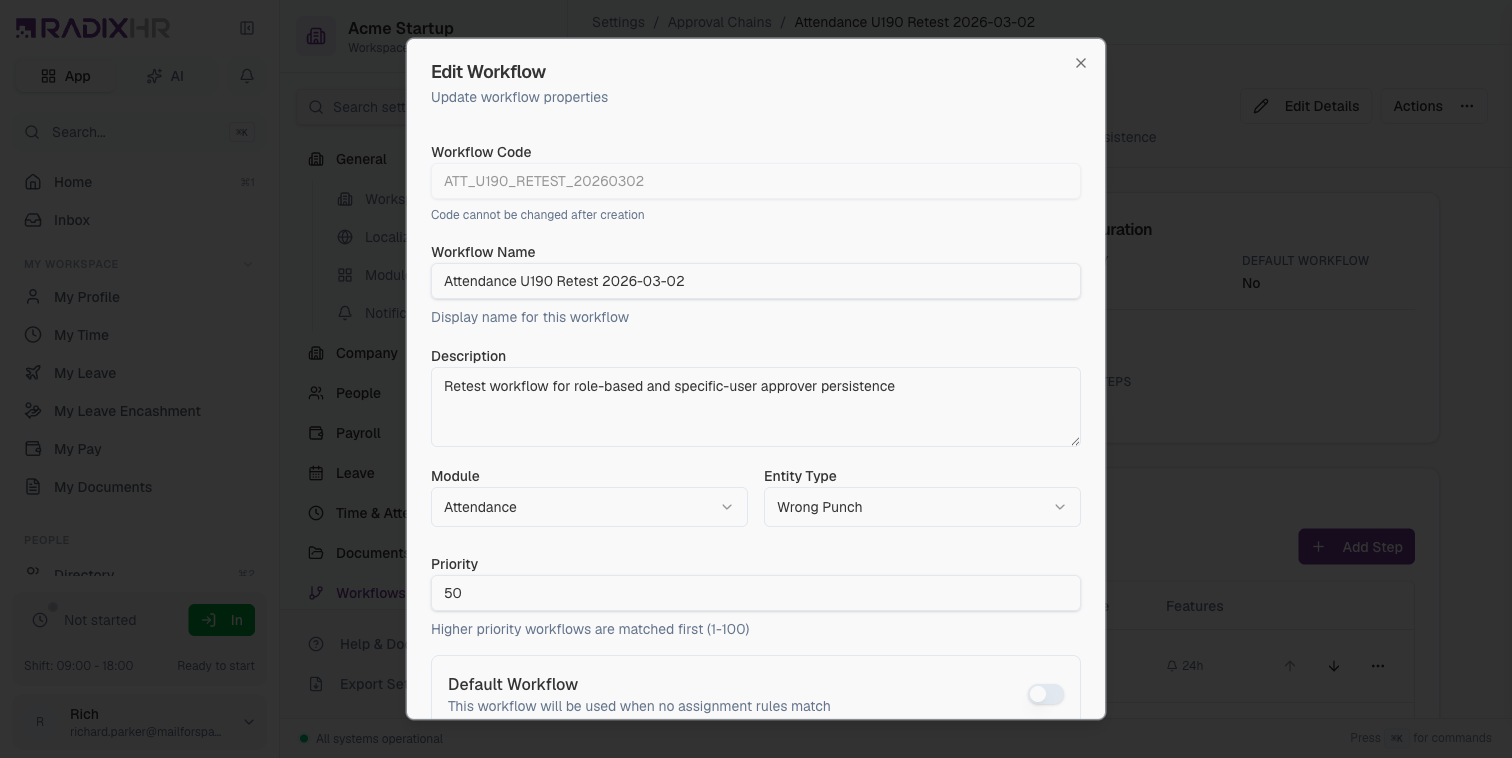
Workflow Form Fields
| Field | Description | Required |
|---|---|---|
| Workflow Code | Unique uppercase identifier with underscores. Used in reports and integrations (e.g., LEAVE_APPROVAL, EXPENSE_FAST_TRACK). Cannot be changed after creation. | Yes |
| Workflow Name | Display name shown in the table and on detail pages (e.g., “Leave Approval Workflow”). | Yes |
| Description | Free-form note about when this chain is used. | No |
| Module | Module the chain belongs to. Options: Attendance, Leave, Expense, Advance, Payroll, Document, Hiring, Exit. Default: Leave. | Yes |
| Entity Type | Specific request type within the chosen module (populates after picking a module). | Yes |
| Priority | Higher-priority chains are matched first when multiple chains apply (1–100). Default: 50. | Yes |
| Default Workflow | ON: This chain is used when no other rules match for this entity type. OFF: Only used when its priority and assignment rules match. Default: OFF. | No |
| Active | ON: The workflow can be used. OFF: It’s disabled even if published. | No |
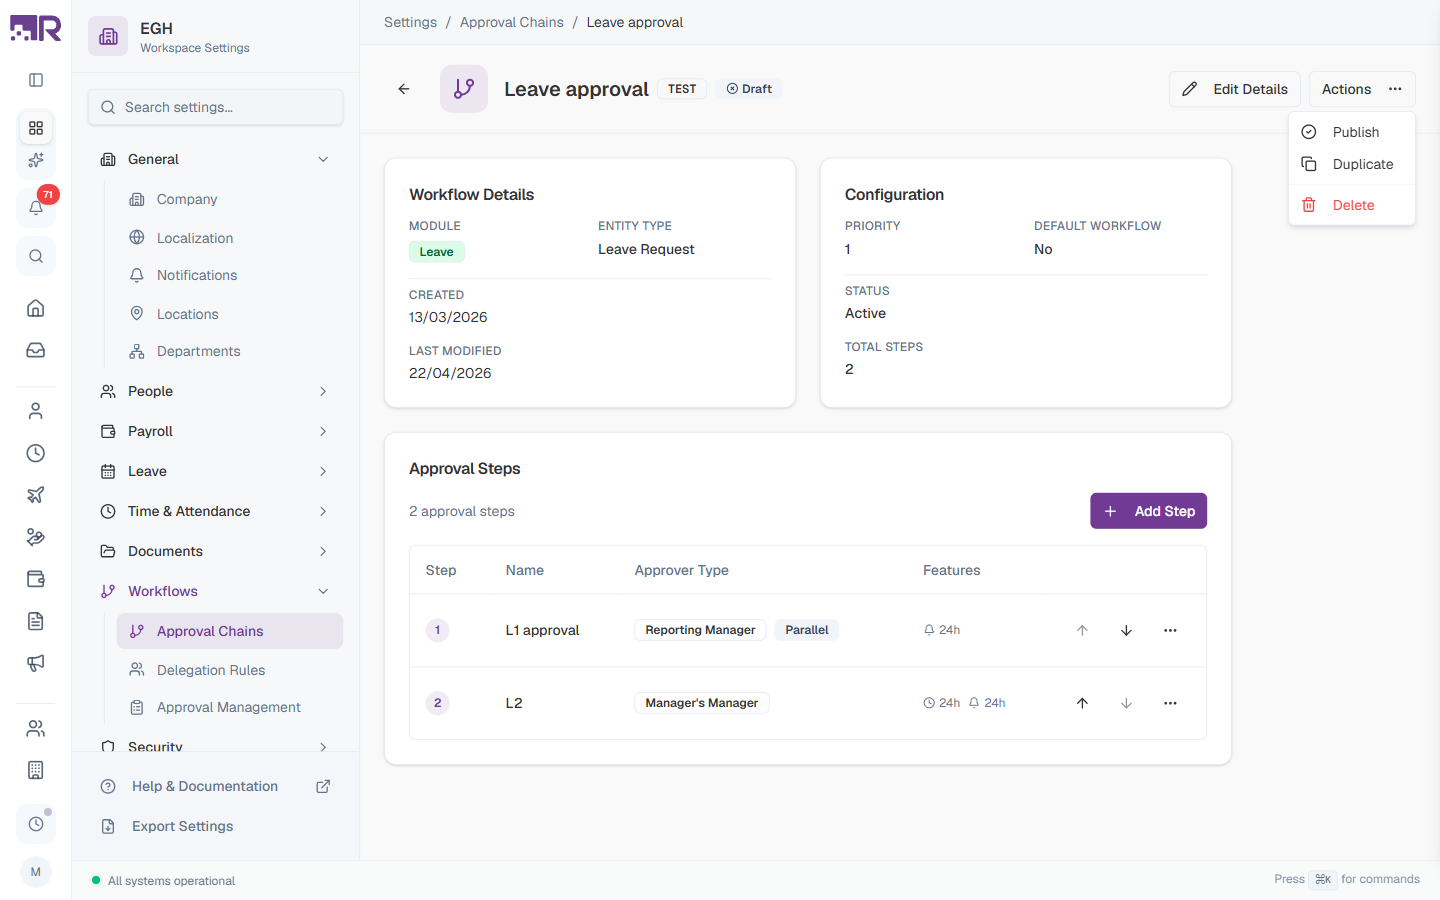
Workflow Detail Page
Clicking a row opens the workflow’s detail page with three areas:
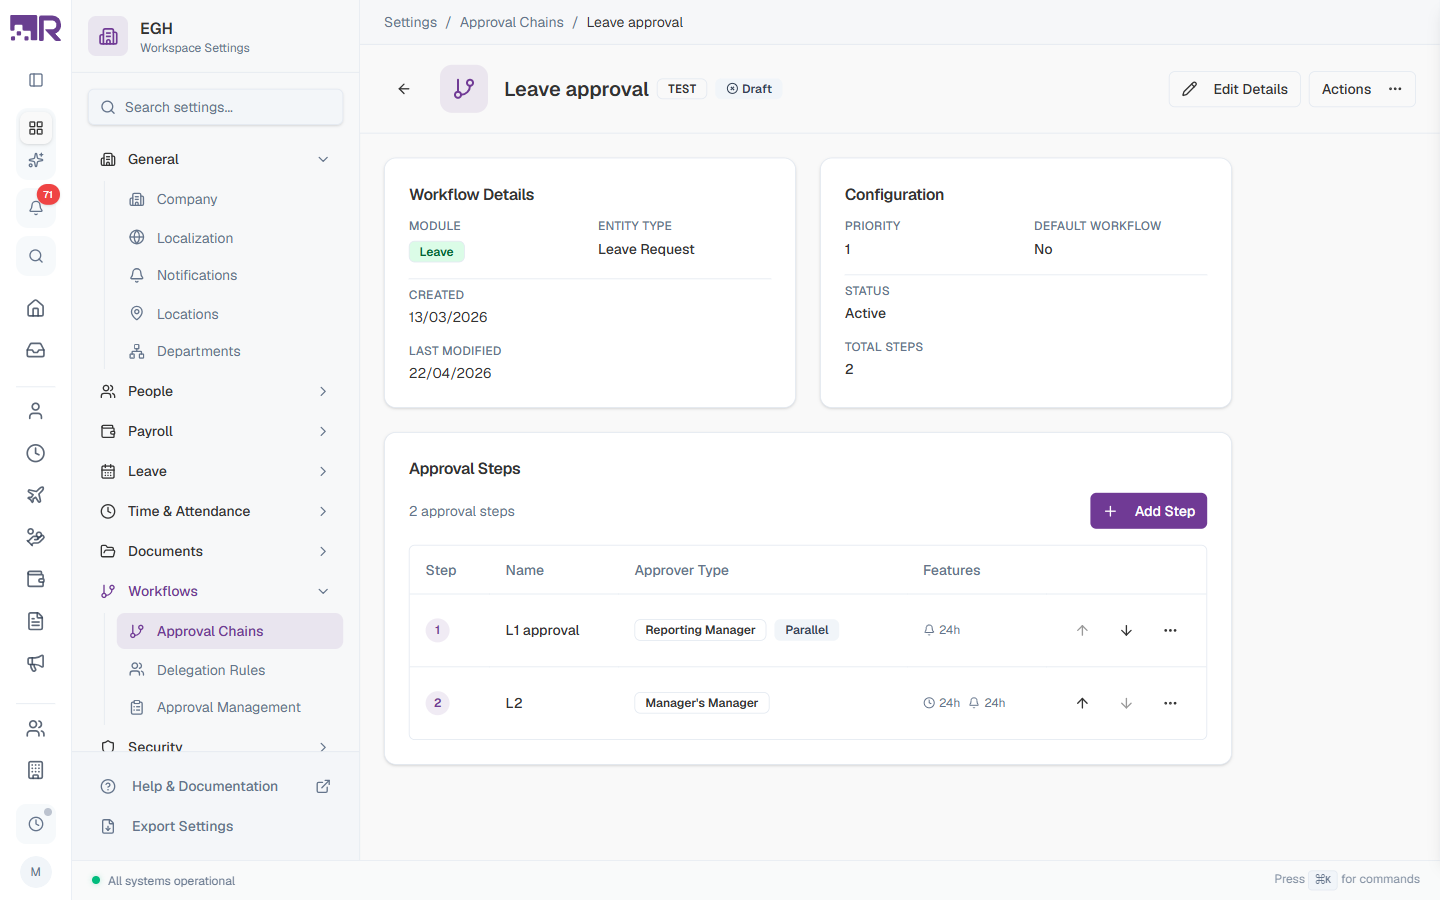
Page Header
| Element | Description |
|---|---|
| Title | Workflow name with the module/entity type label and a status badge (Draft or Published) |
| Edit Details | Open the dialog to change name, description, priority, default flag, etc. (the Workflow Code is locked after creation) |
| Actions ⋯ | Menu with Publish, Duplicate, Delete actions |
Workflow Details Card
Read-only summary of the chain’s metadata:
| Field | Description |
|---|---|
| Module | The module badge (e.g., Leave) |
| Entity Type | The request type (e.g., Leave Request) |
| Created | Date the workflow was created |
| Last Modified | Date of the most recent edit |
Configuration Card
Read-only summary of routing settings:
| Field | Description |
|---|---|
| Priority | The priority number |
| Default Workflow | Yes or No |
| Status | Active or Inactive |
| Total Steps | Count of steps configured |
Approval Steps
The Approval Steps card lists steps in execution order. Each row shows:
| Column | Description |
|---|---|
| Step | The step number (1, 2, 3 …) |
| Name | Step display name |
| Approver Type | Who approves at this step (badge) |
| Features | Quick badges showing enabled features (e.g., Parallel) and timing (reminder/escalation hours) |
| ↑ ↓ | Arrow buttons to reorder the step |
| ⋯ | Edit / Delete the step |
Click + Add Step in the top-right of the card to add a new step.
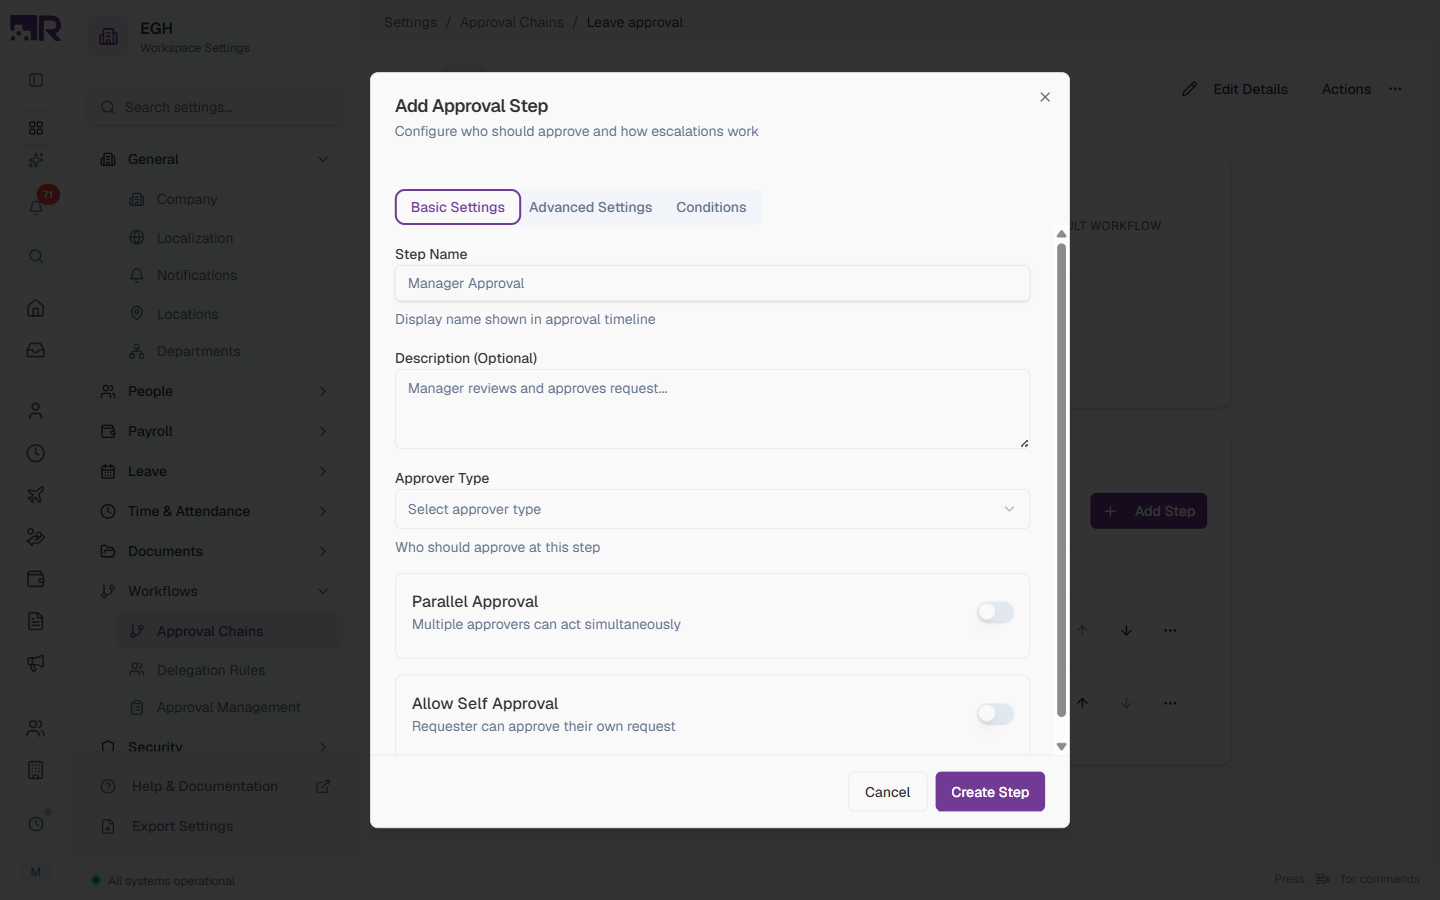
How to Add an Approval Step
- On the workflow detail page, click + Add Step
- Fill out the Basic Settings tab
- Optionally configure Advanced Settings (escalation, reminders)
- Optionally configure Conditions (skip / auto-approve based on request data)
- Click Create Step
Basic Settings
| Field | Description | Required |
|---|---|---|
| Step Name | Display name shown in the approval timeline (e.g., “Manager Approval”, “L1 Approval”). | Yes |
| Description (Optional) | A short note about the step’s purpose. | No |
| Approver Type | Who approves at this step. See full list below. | Yes |
| Parallel Approval | ON: Multiple approvers can act simultaneously; the step completes when any one approves. OFF: Approvers act sequentially. Default: OFF. | No |
| Allow Self Approval | ON: The requester can approve their own request at this step (useful for manager self-service). OFF: Self-approval is blocked. Default: OFF. | No |
Approver Types
The Approver Type dropdown offers seven options:
| Type | Description |
|---|---|
| Reporting Manager | The requester’s direct manager from the org structure |
| Manager’s Manager | The requester’s manager’s direct manager (one level up) |
| Skip-Level Manager | The requester’s manager’s manager (two levels up) |
| Department Head | The head of the requester’s department (set in Settings > General > Departments) |
| HR Head | The designated HR head for the workspace |
| Finance Head | The designated finance head for the workspace |
| Specific User | A particular employee — pick from the employee list |
Reporting Manager is the most common first-level approver. Use Department Head or HR Head for second-level approvals, and Specific User for executive-level requests where a particular person must always sign off.
Advanced Settings — Escalation & Reminders
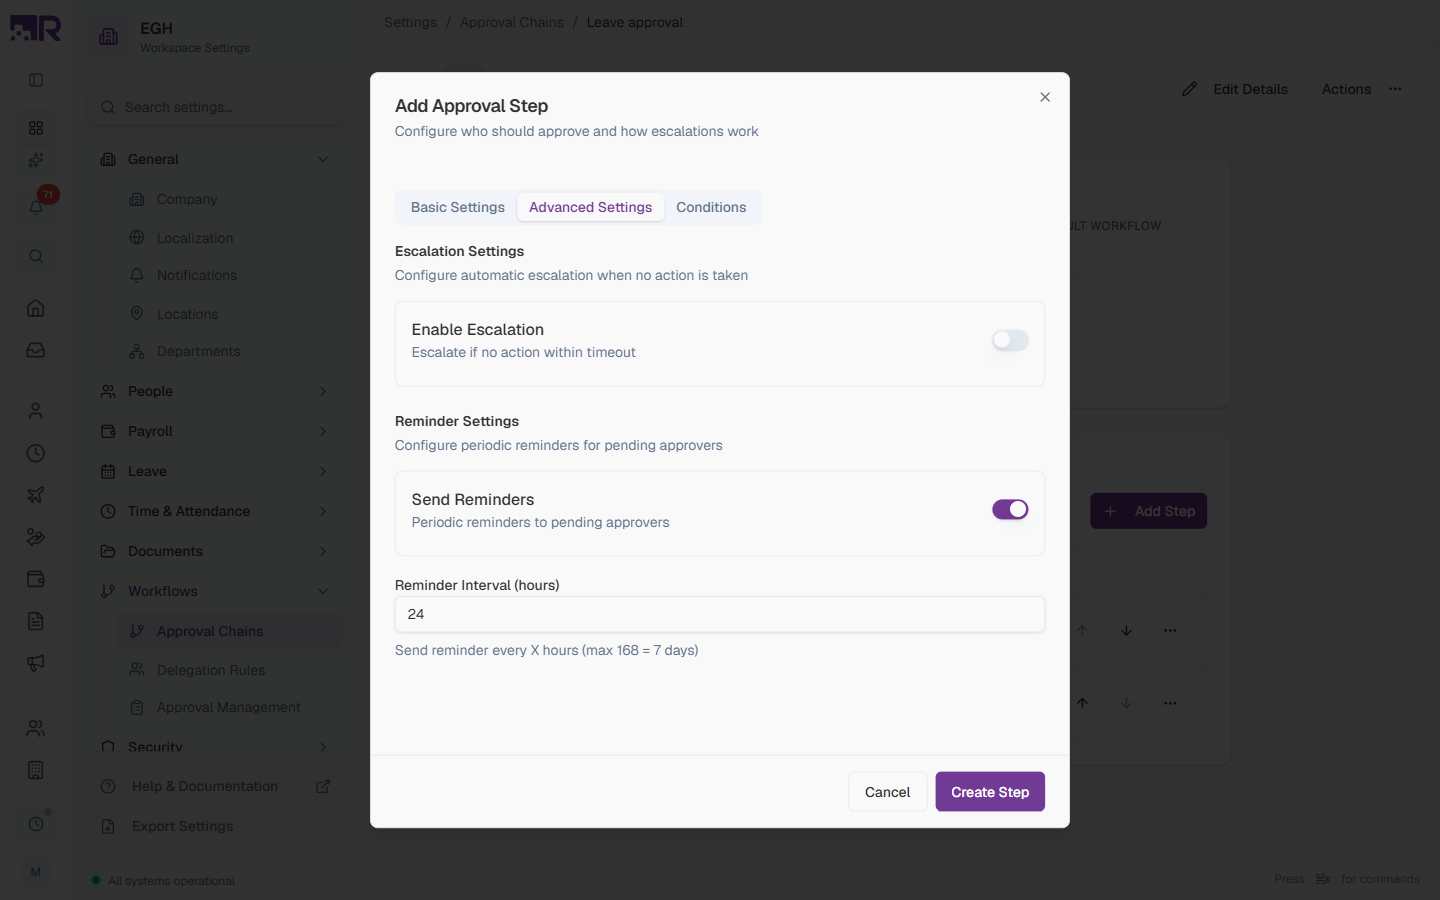
Escalation Settings
Decides what happens when an approver doesn’t act in time.
| Setting | Description | Default |
|---|---|---|
| Enable Escalation | ON: Reveals timeout and “escalate to” fields. The request is automatically routed to a different approver if no action is taken within the timeout. OFF: The request waits indefinitely. | OFF |
| Escalation Timeout (hours) | How long to wait before escalating (1–720 hours). Visible only when Enable Escalation is ON. | 24 |
| Escalate To | The approver type the request escalates to (same options as Approver Type). | — |
Reminder Settings
| Setting | Description | Default |
|---|---|---|
| Send Reminders | ON: Periodic reminders are sent to pending approvers. OFF: No reminders. | ON |
| Reminder Interval (hours) | Send a reminder every X hours (max 168 = 7 days). | 24 |
Combine Send Reminders (24 h) with Enable Escalation (72 h) so that approvers get two nudges before the request escalates to their manager.
Conditions — Skip / Auto-Approve
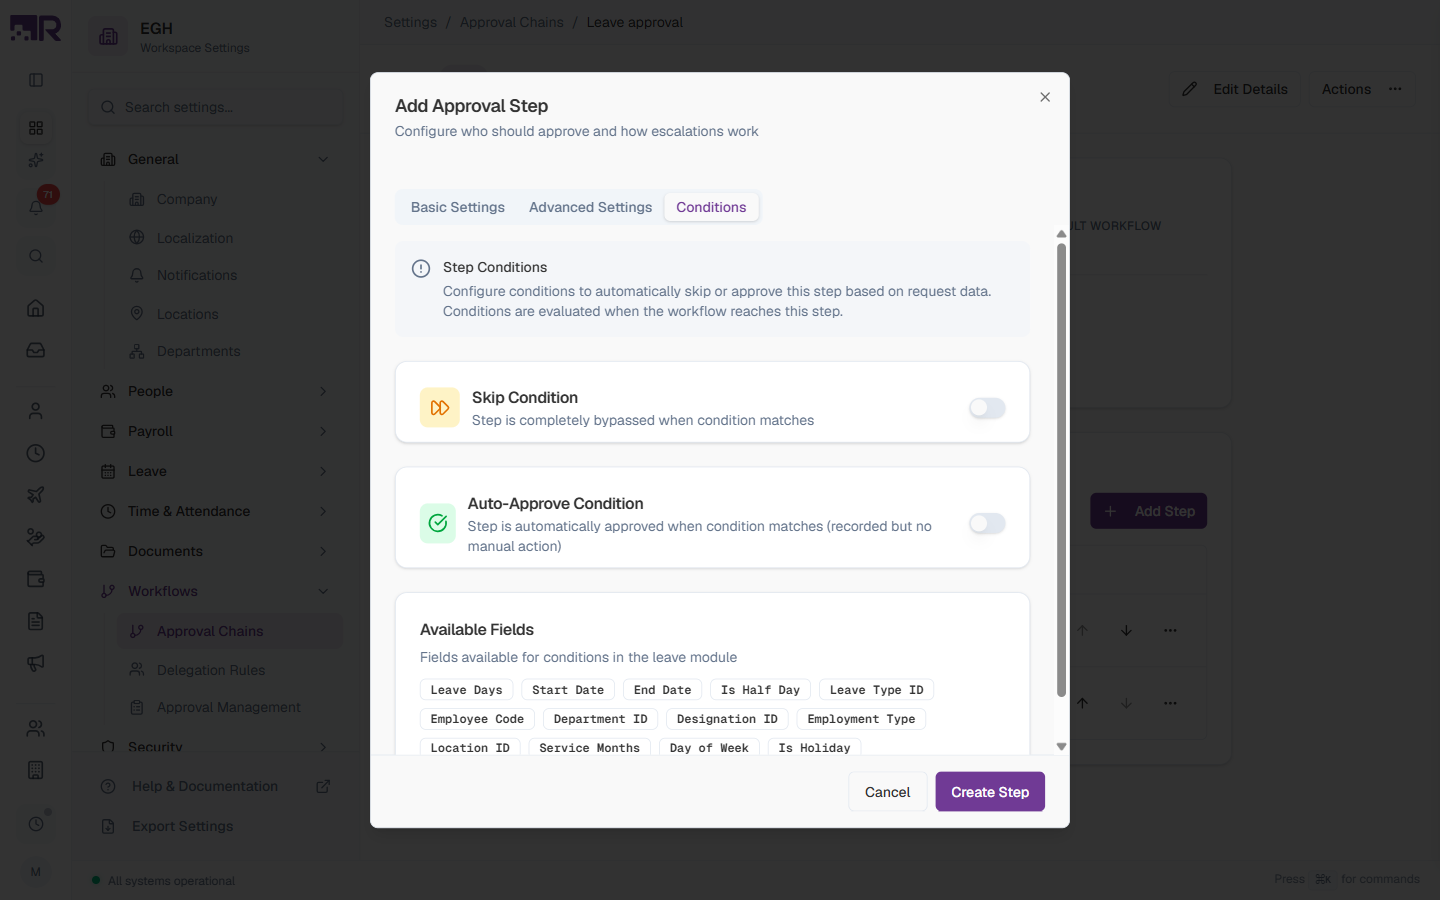
Conditions are evaluated when the workflow reaches this step.
| Toggle | Description |
|---|---|
| Skip Condition | When the condition matches, the step is completely bypassed and the workflow proceeds to the next step. |
| Auto-Approve Condition | When the condition matches, the step is automatically approved (recorded in the timeline but no manual action required). |
Available Fields
The fields you can use in conditions depend on the workflow’s module. For example, the Leave module exposes:
Leave Days, Start Date, End Date, Is Half Day, Leave Type ID, Employee Code, Department ID, Designation ID, Employment Type, Location ID, Service Months, Day of Week, Is Holiday
Other modules expose their own field set (e.g., Attendance offers Late Minutes, Early Out Minutes, Request Hours).
Example use cases:
- Skip the Department Head step if the leave is less than 1 day (
Leave Days < 1) - Auto-approve sick leave for non-probationary employees (
Service Months >= 6) - Skip the Manager step on weekends (
Day of Week IN [Saturday, Sunday])
Editing a Workflow
While a workflow is in Draft, you can:
- Click Edit Details to update name, description, module, entity type, priority, default flag, or active flag
- Click + Add Step to add new steps
- Use ↑ ↓ arrows to reorder steps
- Use the ⋯ menu on a step row to edit or delete it
| Field | Editable |
|---|---|
| Workflow Code | No (locked after creation — duplicate to a new workflow if you need a different code) |
| Workflow Name | Yes |
| Description | Yes |
| Module | Yes |
| Entity Type | Yes |
| Priority | Yes |
| Default Workflow | Yes |
| Active | Yes |
Once a workflow is Published, the Edit Details button and step modifications are blocked. Use the Duplicate action to create a new draft, edit it, and publish the duplicate.
Publishing a Workflow
A workflow only routes new requests after it’s been published.
- On the workflow detail page, click Actions (top-right)
- Choose Publish
- Confirm
Once published:
- Status changes from Draft to Published
- The chain becomes active for new matching requests
- Direct edits are blocked
Other Actions
| Action | Description |
|---|---|
| Publish | Make a draft chain live |
| Duplicate | Create a new draft from this chain — useful for variations or to edit a published chain |
| Delete | Permanently remove the chain. Available for drafts; use carefully on published chains since in-flight requests may be affected |
Best Practices
-
Keep it simple — start with one or two steps. Add complexity (escalation, conditions) only when you’ve validated that the basic flow works.
-
Pick the right approver type — Reporting Manager for personal requests, Department Head or HR Head for cross-team or compliance-driven requests, Specific User only for executive-only steps.
-
Always set escalation on long-tenure steps — if a step’s approver might be on leave, an escalation timeout (e.g., 48 h) prevents requests from getting stuck.
-
Reminders should be longer than the typical SLA — 24–48 h works well. Hourly reminders cause notification fatigue.
-
Use conditions to short-circuit the chain — auto-approve trivial requests (e.g., 0.5-day sick leave) so managers spend approval cycles on the requests that actually need attention.
-
Test before publishing — submit a test request as a non-admin employee to confirm the chain routes correctly before going live.
-
One default per entity type — set exactly one workflow as Default for each entity type. Use higher-priority workflows for special cases (specific departments, request thresholds).