Document Types
Document Types define the categories of documents employees and admins can upload to the platform. Each type lays out whether the document is required, whether the system tracks expiry, who can upload it, and the scope (employee vs company-level documents).
What you can do here:
- Create and manage document categories (Passport, Visa, Company License, etc.)
- Mark documents as Mandatory or Optional
- Track expiry dates with reminder notifications and tiered alerts
- Control who can upload and view each document type
- Enable employee self-service requests for specific documents
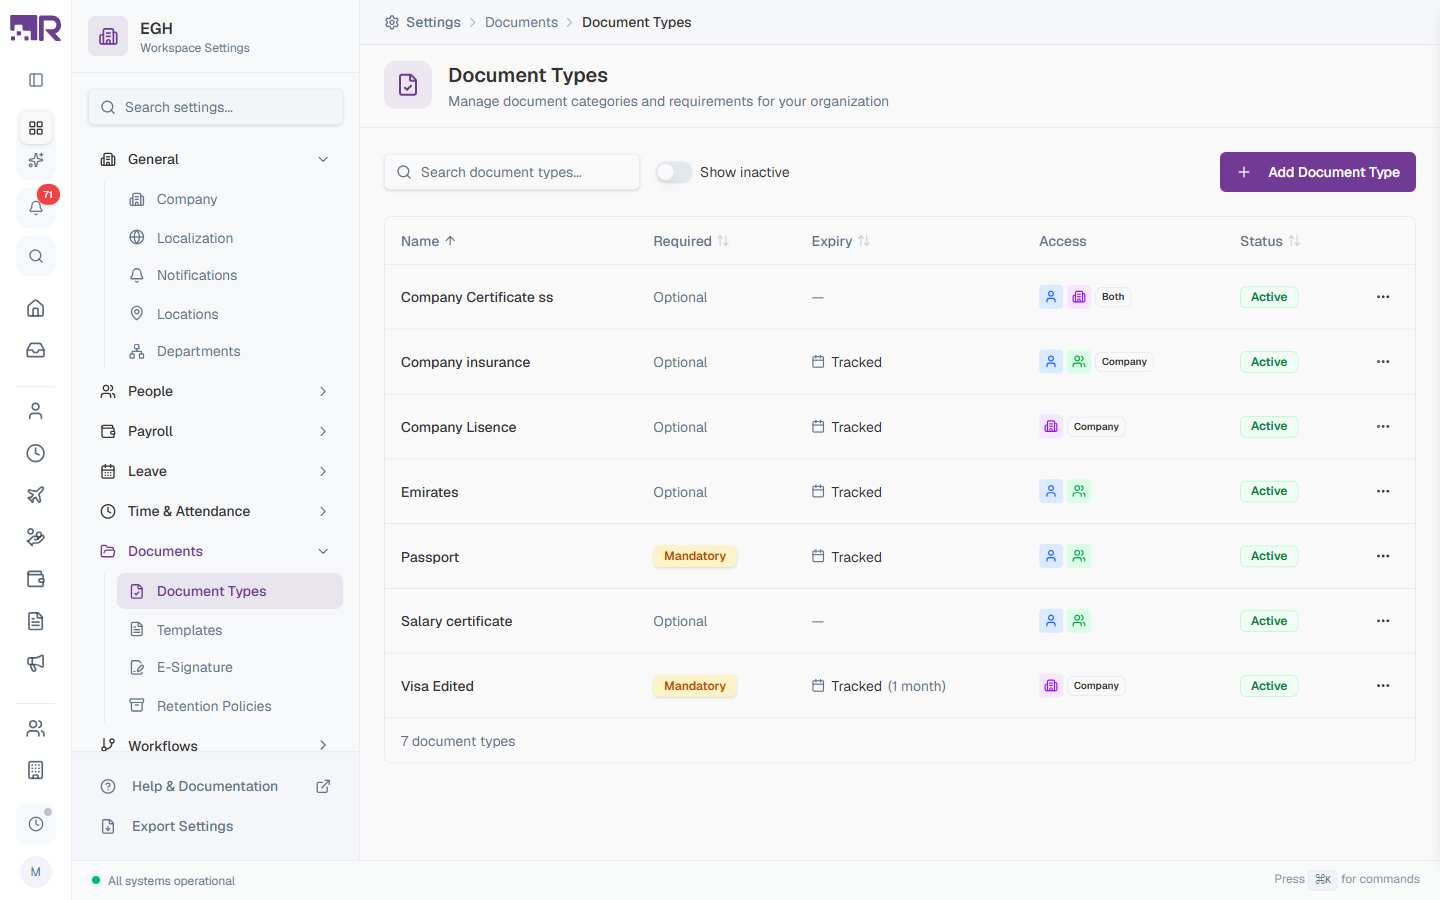
Understanding the Document Types Table
The table lists every document type in your workspace. The total count is shown at the bottom (e.g., “7 document types”).
| Column | Description |
|---|---|
| Name | The display name of the document type. Sortable. |
| Required | Mandatory badge for required documents, Optional otherwise. Sortable. |
| Expiry | Tracked if the system monitors expiry dates (with the validity period shown next to it, e.g., “(1 month)”); — if not tracked. Sortable. |
| Access | A row of icons + a scope badge (e.g., Both, Company) showing who can upload/view the document and where it applies. |
| Status | Active or Inactive. Sortable. |
| ⋯ | Row menu — Edit, Deactivate, or Delete. |
Use the Search document types… box to filter by name. Toggle Show inactive to include deactivated types in the list.
Access Icons
The Access column shows small icons that summarise who can do what:
| Icon | Meaning |
|---|---|
| Person with up-arrow | Employees can upload documents of this type |
| Person with check / eye | Employees (and managers) can view documents of this type |
| Building icon | Company-scope document |
| Lock icon (when present) | HR-only access — restricted from employees |
A scope badge (Employee, Company, or Both) appears next to the icons when a scope is set on the type.
How to Add a Document Type
- Go to Settings > Documents > Document Types
- Click Add Document Type in the top-right
- Fill in the basic details
- Configure Requirements, Access Control, Scope, and Document Request Settings
- Click Create
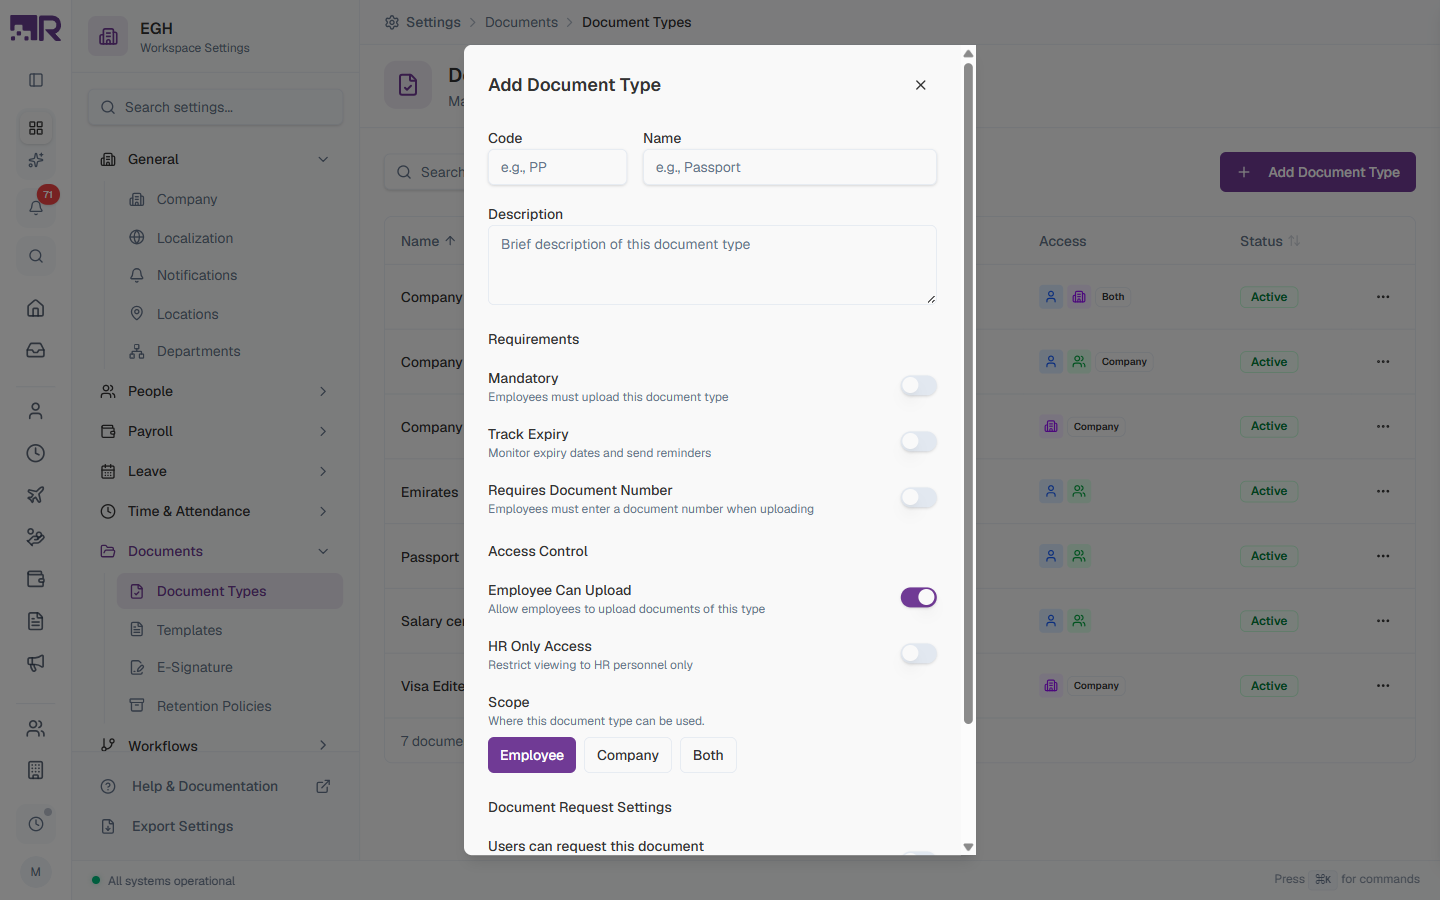
Basic Information
| Field | Description | Required |
|---|---|---|
| Code | A short unique identifier for the document type. Used in reports, exports, and integrations. Examples: PP, VISA, EID. | Yes |
| Name | The display name shown to users (e.g., “Passport”, “Emirates ID”, “Company License”). | Yes |
| Description | A brief explanation of what documents belong to this type and any special instructions. | No |
Requirements
| Setting | Description | Default |
|---|---|---|
| Mandatory | ON: Employees must upload this document type. The system flags employees who are missing mandatory documents. OFF: The document is optional. | OFF |
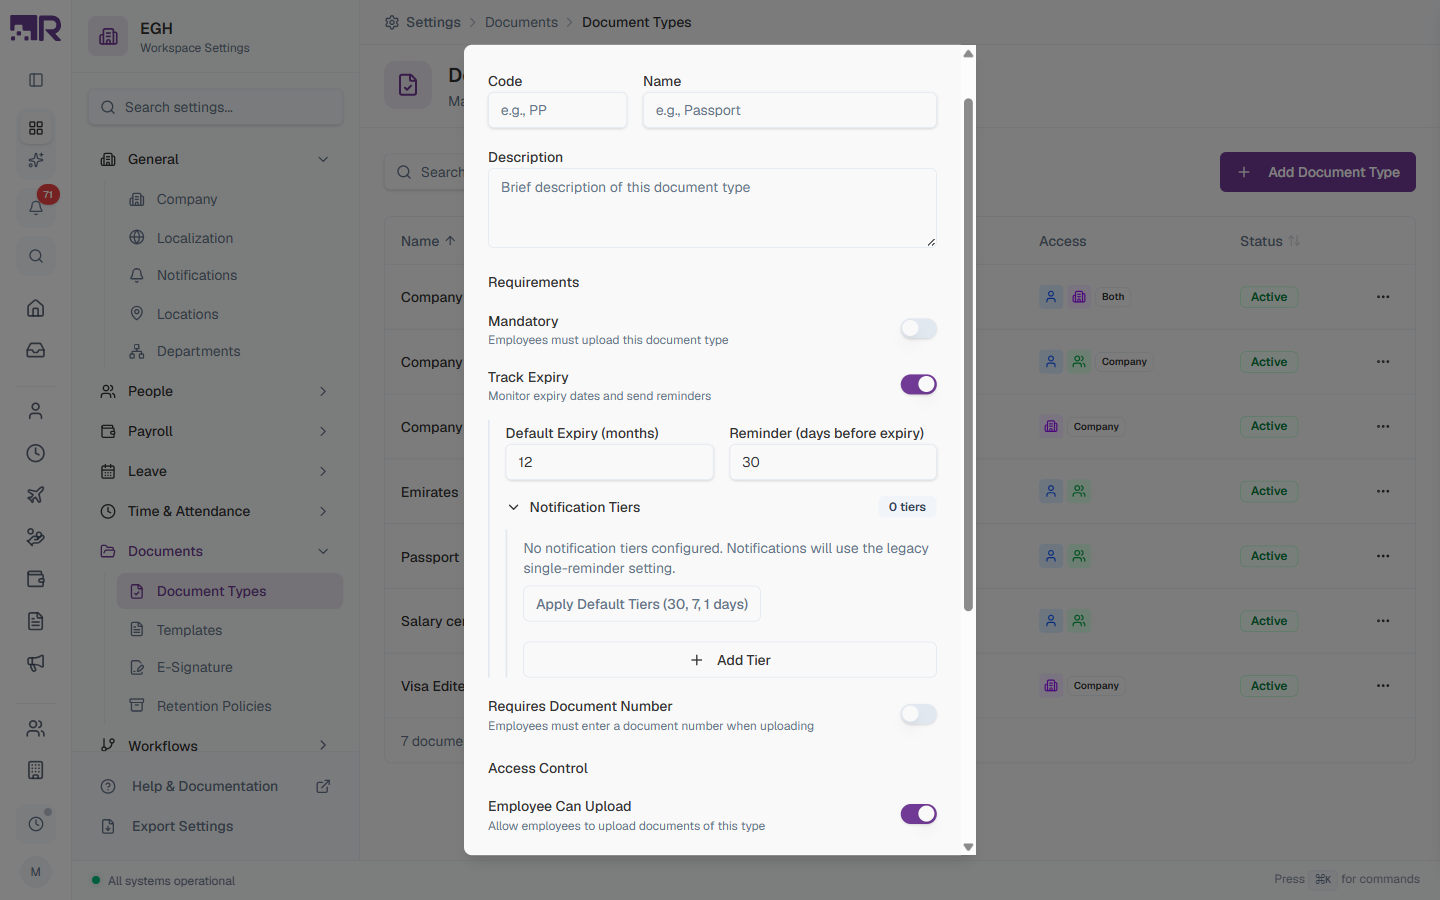
| Track Expiry | ON: The system monitors expiration dates and sends reminders before the document expires. Reveals additional expiry settings (see below). OFF: No expiry tracking. | OFF |
| Requires Document Number | ON: Employees must enter a document number (e.g., passport number) when uploading. OFF: Document number is not collected. | OFF |
Expiry Settings
When Track Expiry is ON, three additional controls appear:
| Field | Description | Default |
|---|---|---|
| Default Expiry (months) | The default validity period in months. When uploading a document, the system pre-calculates the expiry date based on this value. | 12 |
| Reminder (days before expiry) | Number of days before expiry when a reminder notification is sent (legacy single-reminder setting — used when no notification tiers are configured). | 30 |
| Notification Tiers | A series of advance-notice reminders. With multiple tiers, you can warn employees 30, 7, and 1 day(s) before expiry instead of a single reminder. Click Apply Default Tiers (30, 7, 1 days) to use the recommended tiers, or + Add Tier to create a custom one. | No tiers (uses the legacy reminder above) |
For documents like passports, visas, and licenses with finite validity, enable expiry tracking and apply the default notification tiers — this gives employees plenty of advance notice to renew.
Access Control
| Setting | Description | Default |
|---|---|---|
| Employee Can Upload | ON: Employees can upload documents of this type to their own profile via self-service. OFF: Only HR can upload on their behalf. | ON |
| HR Only Access | ON: Only HR personnel can view documents of this type. Employees cannot see them, even on their own profile. OFF: Employees and managers can view per their permissions. | OFF |
Use HR Only Access for sensitive documents like background-check reports, disciplinary records, or confidential HR correspondence.
Scope
The Scope setting decides where the document type is available — there are three options shown as button cards:
| Option | Description |
|---|---|
| Employee | Personal documents that live on each employee’s profile (e.g., Passport, Visa, Tax ID). Default. |
| Company | Organisation-wide documents (e.g., Trade License, Insurance Certificate). |
| Both | The type can be attached to either an employee or the company. |
Document Request Settings
| Setting | Description |
|---|---|
| Users can request this document | ON: Employees can submit requests for this document type through self-service (e.g., to ask HR to issue a Salary Certificate). OFF: Self-service requests are not accepted for this type. |
How to Edit a Document Type
- Find the document type in the table
- Click the ⋯ menu at the end of its row
- Select Edit
- Update the fields you want to change
- Click Save Changes
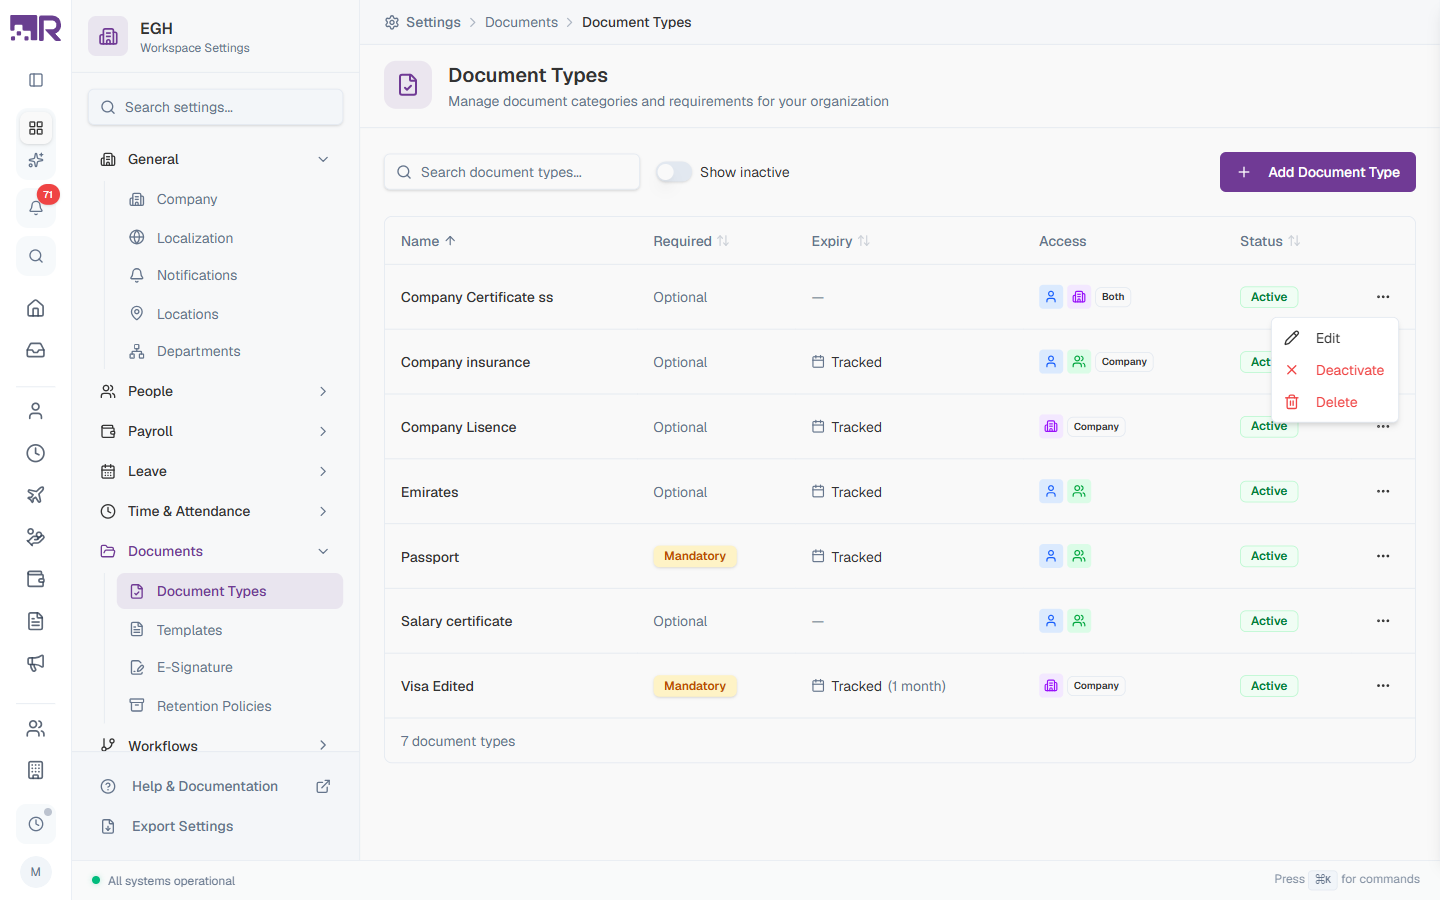
How to Deactivate a Document Type
If a document type is no longer needed but you want to keep existing uploads:
- Click the ⋯ menu on the row
- Select Deactivate
When deactivated, no new documents of this type can be uploaded, but existing documents remain in employee profiles. Toggle the Show inactive switch above the table to see deactivated types and reactivate them later.
Deactivating doesn’t delete existing documents — it just stops new uploads. Use this when phasing out a category instead of deleting it.
How to Delete a Document Type
- Click the ⋯ menu on the row
- Select Delete
- Confirm in the dialog
Deleting a document type may affect existing documents of that type. Consider Deactivate if you want to preserve historical records.
Common Document Types
Examples of how organisations typically configure document types:
Identification Documents
| Document | Required | Track Expiry | Default Expiry | Scope |
|---|---|---|---|---|
| Passport | Mandatory | Yes | 120 months (10 years) | Employee |
| Emirates ID | Mandatory | Yes | 24 months | Employee |
| Driver’s License | Optional | Yes | 60 months | Employee |
Employment Documents
| Document | Required | Track Expiry | Scope |
|---|---|---|---|
| Employment Contract | Mandatory | No | Employee |
| Offer Letter | Mandatory | No | Employee |
| NDA | Mandatory | No | Employee |
| Salary Certificate | Optional (request-enabled) | No | Employee |
Company Documents
| Document | Required | Track Expiry | Scope |
|---|---|---|---|
| Trade License | Mandatory | Yes (12 months) | Company |
| Company Insurance | Mandatory | Yes (12 months) | Company |
| Tax Registration | Mandatory | No | Company |
Work Authorisation
| Document | Required | Track Expiry | Default Expiry | Scope |
|---|---|---|---|---|
| Work Visa | Optional | Yes | 36 months | Employee |
| Work Permit | Optional | Yes | 24 months | Employee |
Best Practices
-
Use clear names — employees should be able to identify the right type at a glance. Avoid abbreviations in the Name field; use the Code for short identifiers.
-
Apply expiry tiers — for any document with finite validity, enable Track Expiry and click Apply Default Tiers (30, 7, 1 days). This is more reliable than a single reminder.
-
Set the right scope — pick Employee for personal documents (passport, ID, certifications) and Company for licenses or registrations that apply to the whole organisation. Both is rarely needed.
-
Restrict sensitive documents — turn on HR Only Access for confidential records (disciplinary, performance, legal correspondence).
-
Enable self-service requests for letters HR commonly issues (Salary Certificate, Employment Letter, NOC) so employees can submit requests instead of emailing.
-
Audit regularly — review document types annually and Deactivate ones that are no longer in use rather than deleting them.