My Profile
My Profile is your personal hub where you can view and manage your own employee information. It brings together your personal details, employment history, compensation, dependents, emergency contacts, and work settings — all in one place.
What you can do here:
- View and edit your personal information (preferred name, marital status, blood group, contact details, and addresses)
- View your employment details, designations, and reporting manager
- Manage your dependents (spouse, children, parents)
- View your salary breakdown and bank account details
- Check your leave balances, requests, transactions, and year-end forecast
- Add and update your emergency contacts
- View your attendance schedule and leave settings
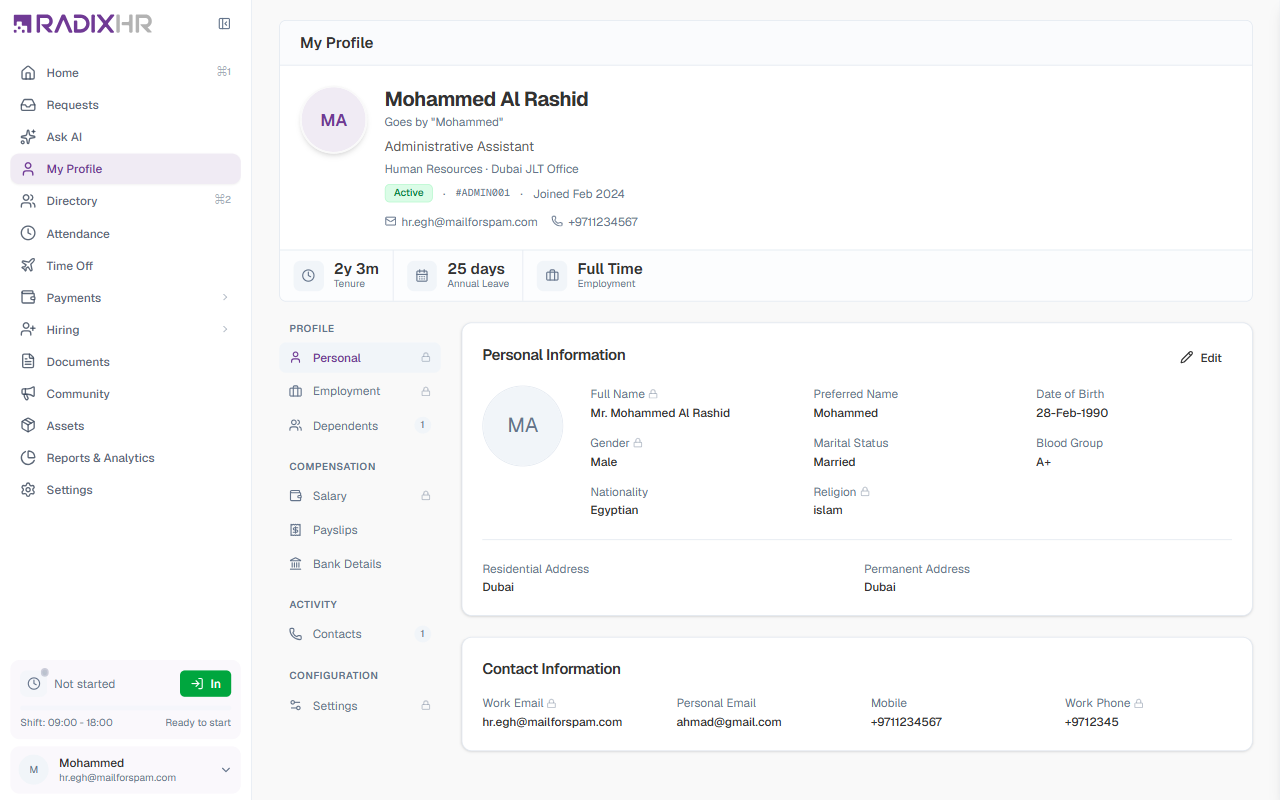
Profile Header
The header at the top of your profile shows a summary of your key information at a glance.
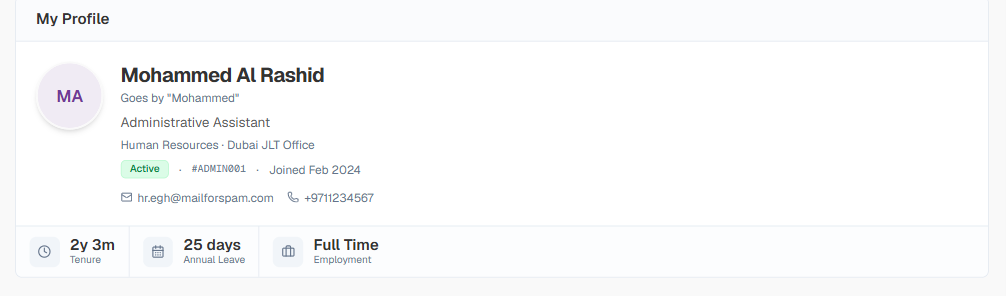
| Item | Description |
|---|---|
| Profile Photo | Your profile picture or initials avatar. You can change this from the Personal section. |
| Full Name | Your full name as recorded in the system. If you have a preferred name, it shows below as Goes by "[name]". |
| Job Title | Your current designation (for example, Administrative Assistant). |
| Department & Location | Your department and work location (for example, Human Resources · Dubai JLT Office). |
| Status Badge | Your current employment status — Active, On Leave, Probation, Notice Period, etc. |
| Employee ID | Your unique employee code (for example, #ADMIN001). |
| Joining Date | The month and year you joined the organization. |
| Email & Phone | Quick-access links to your work email and mobile number. |
Quick Stats
Below the header, three summary cards give you a snapshot of key information:
| Stat | Description |
|---|---|
| Tenure | How long you have been with the organization, shown in years and months (for example, “2y 3m”). Less than a month shows as “Less than a month”. |
| Annual Leave | Your remaining annual leave balance in days for the current year. Shown only when your organization has the Leave module enabled. |
| Employment | Your employment type — Full Time, Part Time, Contract, Intern, or Consultant. |
Profile Navigation
The section menu organizes your profile into areas grouped by category. Select any item to open that section.
| Group | Section | Description |
|---|---|---|
| Profile | Personal | Your personal details — name, date of birth, gender, marital status, contact details, and addresses |
| Profile | Employment | Your job details, designations, and reporting manager history |
| Profile | Dependents | Your dependents such as spouse, children, or parents |
| Compensation | Salary | Your current salary breakdown and salary components |
| Compensation | Bank Details | Your bank account information for salary payments |
| Activity | Leave | Your leave balances, requests, transaction history, and year-end forecast |
| Activity | Contacts | Your emergency contacts |
| Configuration | Settings | Your attendance schedule and leave settings |
Sections marked with a small lock icon in the menu (Personal, Employment, Salary, Settings) are maintained by HR — you can view them, and in Personal you can edit a few of your own fields, but the core data is locked. Sections with a number badge (Dependents, Contacts) show how many entries you have.
Some sections may not be visible depending on which modules your organization has enabled. For example, Salary and Bank Details appear only if the Payroll module is active, and Leave only if the Leave module is active. Payslips are no longer a profile section — find them under Payments → Payroll in the main sidebar.
Personal Section
The Personal section displays your personal information and contact details. You can edit some of these fields yourself, while others are managed by HR (shown with a lock icon).
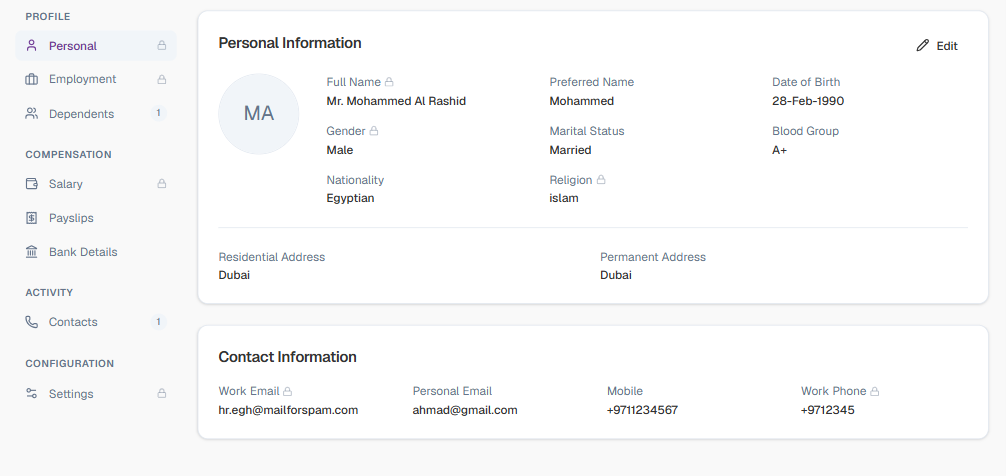
Personal Information Fields
| Field | Description | Editable |
|---|---|---|
| Full Name | Your official name including salutation (for example, Mr. Mohammed Al Rashid). Name changes require HR approval. | No (HR managed) |
| Preferred Name | The name you would like to be called by colleagues. This appears as Goes by "[name]" in the header. | Yes |
| Date of Birth | Your date of birth as recorded in the system. | No (HR managed) |
| Gender | Your gender as recorded in the system. | No (HR managed) |
| Marital Status | Your current marital status. Options: Single, Married, Divorced, Widowed. | Yes |
| Blood Group | Your blood group. Options: A+, A−, B+, B−, AB+, AB−, O+, O−. | Yes |
| Nationality | Your nationality / country of citizenship. | Yes |
| Religion | Your religion. Options: Islam, Christianity, Hinduism, Buddhism, Sikhism, Judaism, Other, Prefer not to say. | Yes |
| Residential Address | Your current home address. | Yes |
| Permanent Address | Your permanent address, if different from your residential address. | Yes |
Contact Information
| Field | Description | Editable |
|---|---|---|
| Work Email | Your official work email address. | No (HR managed) |
| Personal Email | Your personal email address. | Yes |
| Mobile | Your mobile phone number. | Yes |
| Work Phone | Your office or work phone number. | No (HR managed) |
How to Edit Your Personal Information
- Open the Personal section
- Click the Edit button in the top-right corner of the Personal Information card — the card switches to edit mode in place (no pop-up)
- Update the editable fields — type into text fields and choose from the dropdowns. Locked fields stay greyed out
- Click Save to apply your changes, or Cancel to discard them
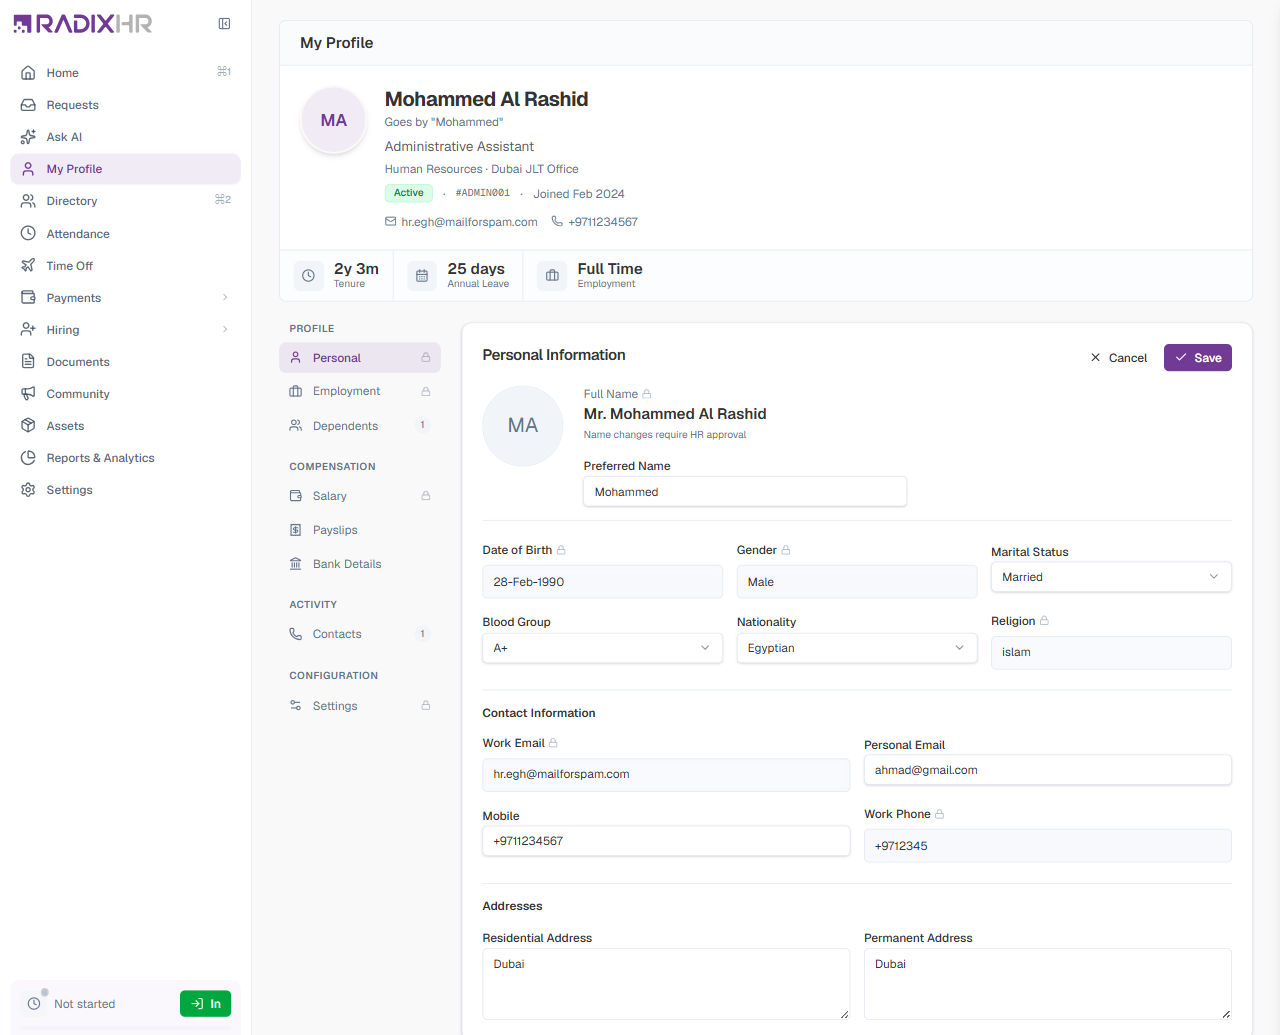
Fields with a lock icon (Full Name, Date of Birth, Gender, Work Email, and Work Phone) are managed by HR and cannot be edited directly. Contact your HR department if these need to be updated.
How to Change Your Profile Photo
- In the Personal section, hover over your profile photo (or initials avatar)
- Click the Change profile photo button (camera icon)
- Select an image file from your computer
- The photo uploads automatically
Use a clear, front-facing photo so colleagues can recognize you easily across the platform.
Employment Section
The Employment section shows your job details, organizational information, designation history, and reporting manager. All information in this section is read-only and managed by HR.
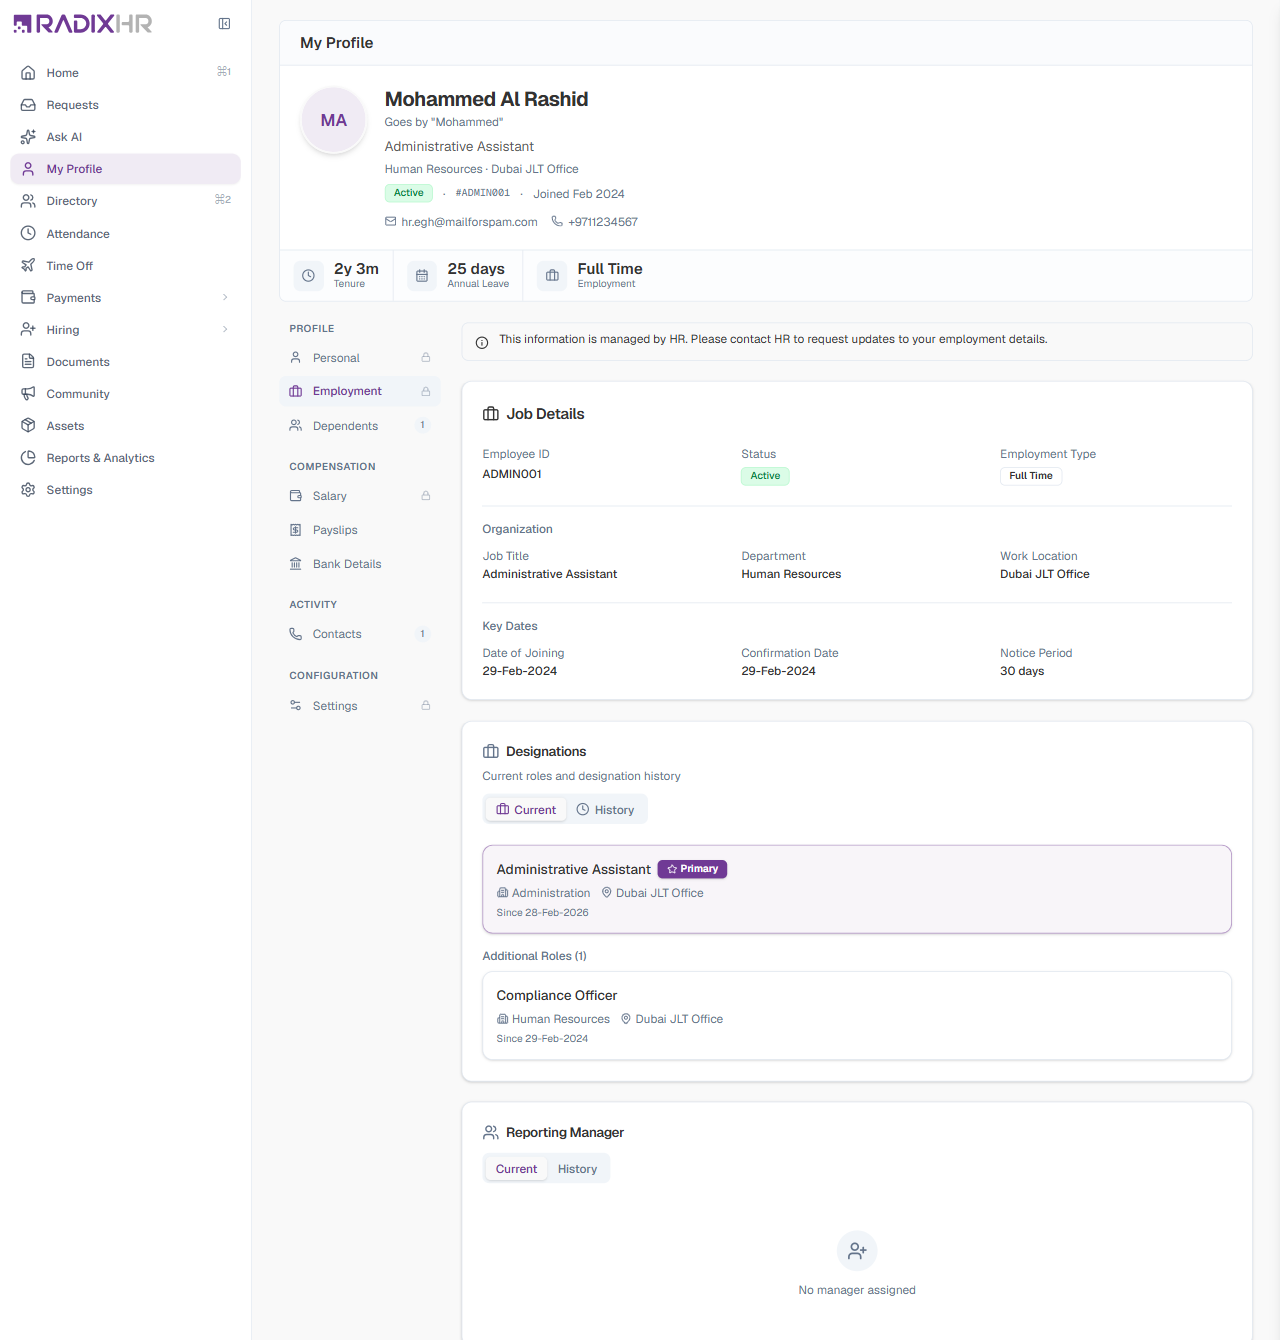
This information is managed by HR. Please contact HR to request updates to your employment details.
Job Details
| Field | Description |
|---|---|
| Employee ID | Your unique employee identifier (for example, ADMIN001). |
| Status | Your current employment status — Active, On Leave, Probation, Notice Period, Resigned, Retired, or Terminated. |
| Employment Type | Your type of employment — Full Time, Part Time, Contract, Intern, or Consultant. |
Organization
| Field | Description |
|---|---|
| Job Title | Your current designation or role title. |
| Department | The department you belong to. |
| Work Location | Your assigned office or work location. |
Key Dates
| Field | Description |
|---|---|
| Date of Joining | The date you officially joined the organization. |
| Confirmation Date | The date your employment was confirmed. If you are still on probation, this shows “Pending confirmation (on probation)”. |
| Notice Period | Your required notice period in days, if configured. |
Designations
A designation is a job role assigned to you. This section shows your current role(s) and your designation history. It has two tabs:
- Current — Shows your primary designation and any additional roles you hold. Your Primary designation is marked with a “Primary” badge. Each role displays the designation name, its grade, department, location, and the date it became effective. Additional roles appear under an “Additional Roles” heading.
- History — Shows a timeline of all designation changes, including promotions, demotions, lateral moves, transfers, and department or location changes, along with dates and any remarks added by HR.
Reporting Manager
Shows your current reporting manager with their name, designation, and department. If no manager is assigned, this shows “No manager assigned”. The History tab displays a timeline of all manager changes, including the reason for each change (for example, promotion, transfer, or leave coverage).
Dependents Section
The Dependents section lets you manage information about your family members or dependents. This is important for benefits, insurance, and emergency purposes.
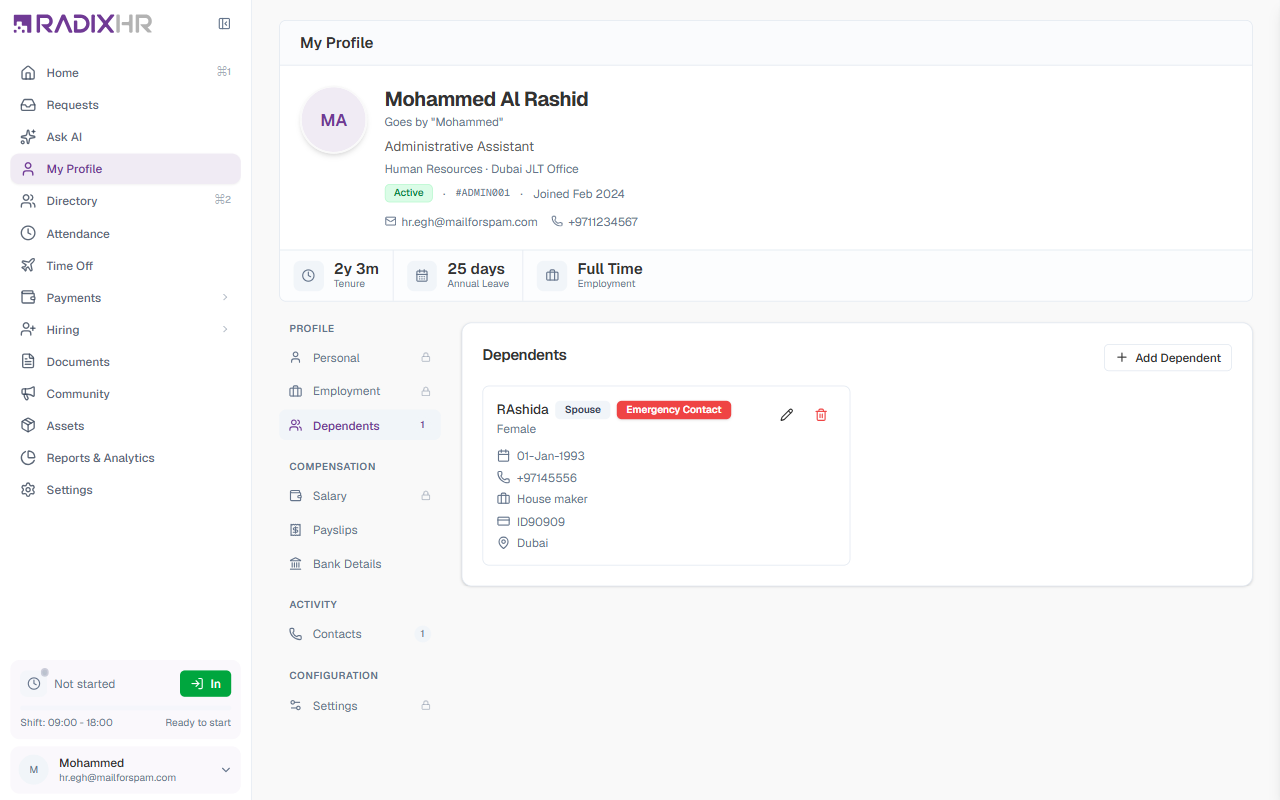
Each dependent card displays the following details:
| Field | Description |
|---|---|
| Name | The dependent’s name. |
| Relationship | The relationship to you — Spouse, Child, Parent, Sibling, etc. |
| Emergency Contact | A badge shown if this dependent is also listed as an emergency contact. |
| Gender | The dependent’s gender. |
| Date of Birth | The dependent’s date of birth. |
| Phone | The dependent’s contact phone number. |
| Occupation | The dependent’s occupation. |
| ID Number | National ID or passport number. |
| Address | The dependent’s address. |
How to Add a Dependent
- Open the Dependents section
- Click Add Dependent
- Fill in the dependent’s details
- Click Add Dependent to save
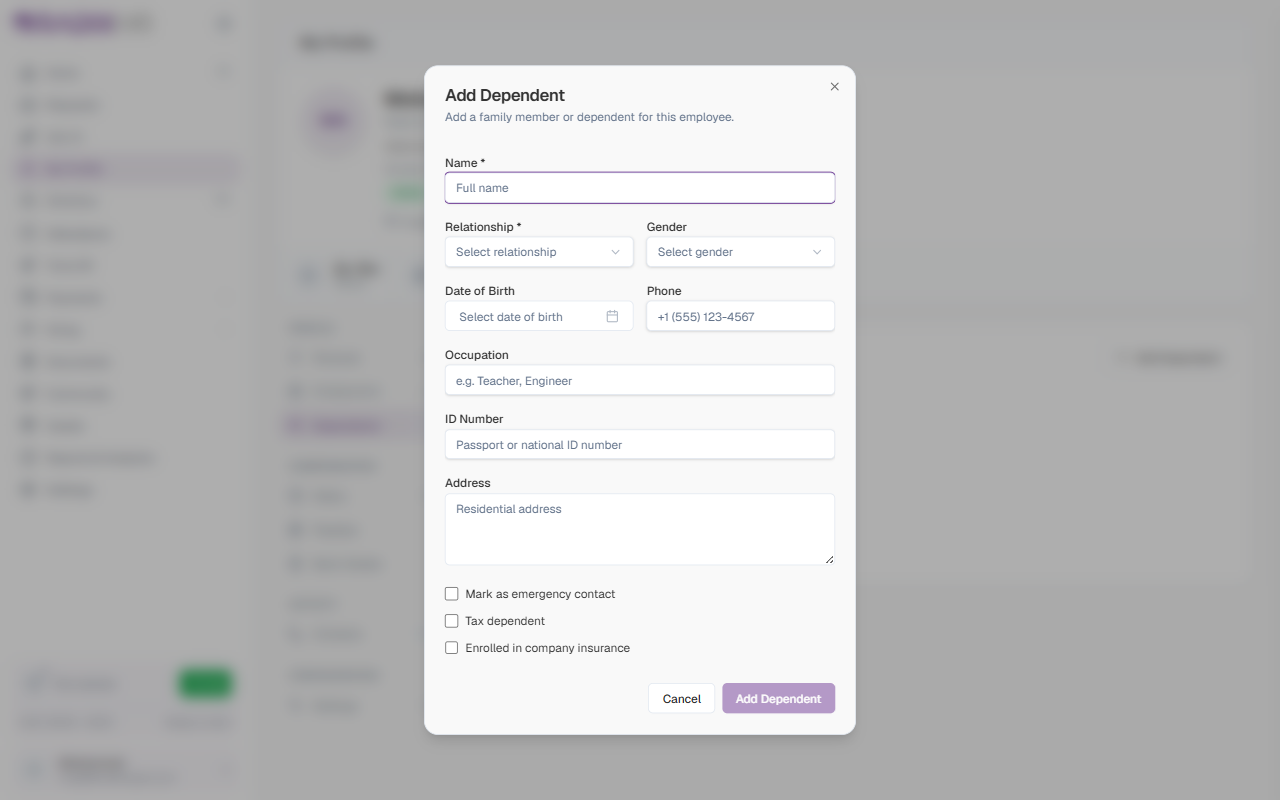
| Field | Description | Required |
|---|---|---|
| Name | The dependent’s full name. | Yes |
| Relationship | The dependent’s relationship to you. Choose from the dropdown (Spouse, Child, Parent, etc.). | Yes |
| Gender | The dependent’s gender. | No |
| Date of Birth | The dependent’s date of birth, selected from the calendar. | No |
| Phone | A contact phone number for the dependent. | No |
| Occupation | The dependent’s occupation (for example, Teacher, Engineer). | No |
| ID Number | The dependent’s passport or national ID number. | No |
| Address | The dependent’s residential address. | No |
| Mark as emergency contact | When turned on, this dependent is also added to your emergency contacts. | No |
| Tax dependent | When turned on, this dependent is flagged as a tax dependent for payroll purposes. | No |
| Enrolled in company insurance | When turned on, this dependent is marked as covered under the company’s insurance plan. | No |
You can edit or delete an existing dependent using the edit (pencil) and delete (trash) icons on each dependent card.
Salary Section
The Salary section shows your current salary breakdown and the individual components that make up your pay. This information is read-only and managed by HR and Payroll.
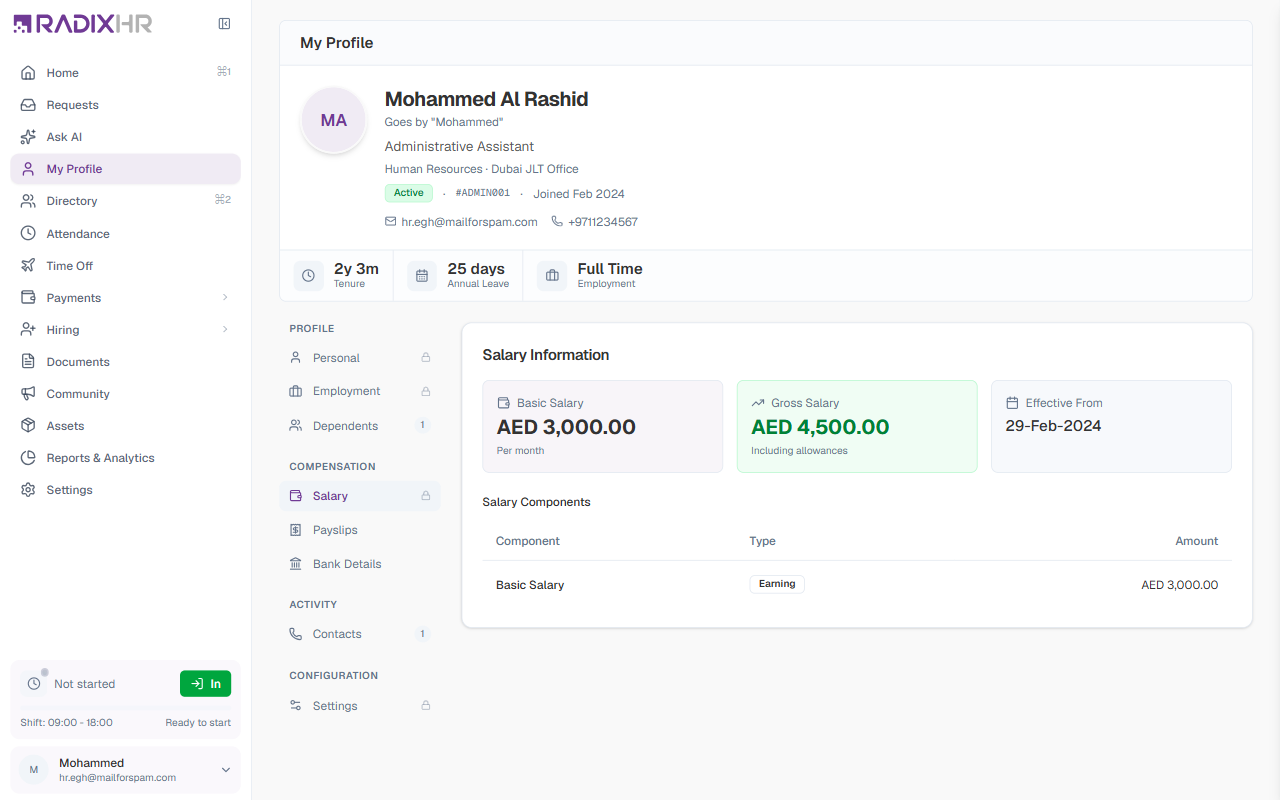
Salary Information
At the top, three summary cards show your salary at a glance:
| Card | Description |
|---|---|
| Basic Salary | Your fixed base pay per month, before any allowances are added. |
| Gross Salary | Your total monthly pay including all allowances. This is your salary before any deductions. |
| Effective From | The date your current salary became effective. |
Salary Components
A salary component is a single building block of your pay — for example, basic pay, a housing allowance, or a deduction. The Salary Components table lists each component that makes up your salary:
| Column | Description |
|---|---|
| Component | The name of the pay component (for example, Basic Salary, Housing Allowance). |
| Type | Whether the component is an earning (adds to your pay) or a deduction (subtracts from your pay). |
| Amount | The value of that component. |
Salary details are maintained by HR and Payroll. If anything looks incorrect, contact your HR or Payroll team.
Bank Details Section
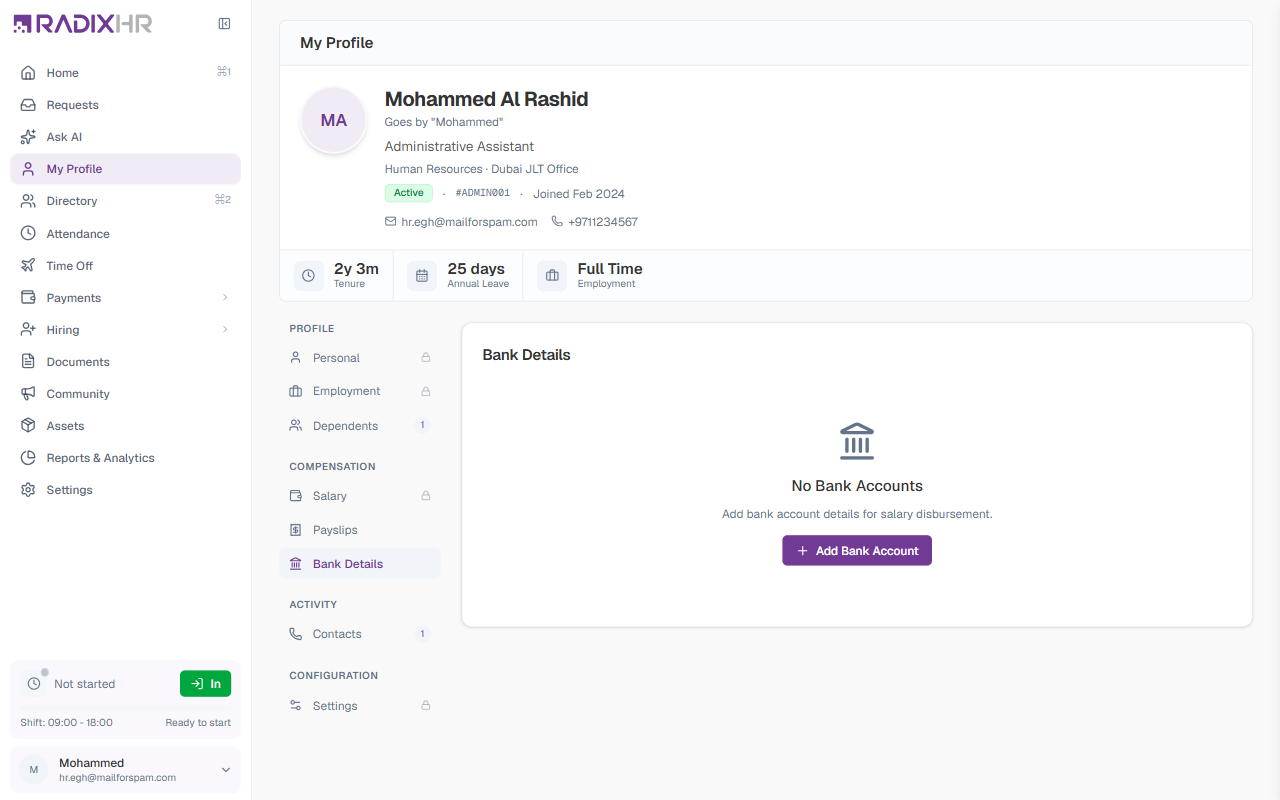
The Bank Details section lets you manage the bank account information used for your salary payments.
How to Add a Bank Account
- Open the Bank Details section
- Click Add Account (the button reads Add Bank Account when you have no accounts yet)
- Enter your bank account details in the Add Bank Account dialog
- Click Add Account to save
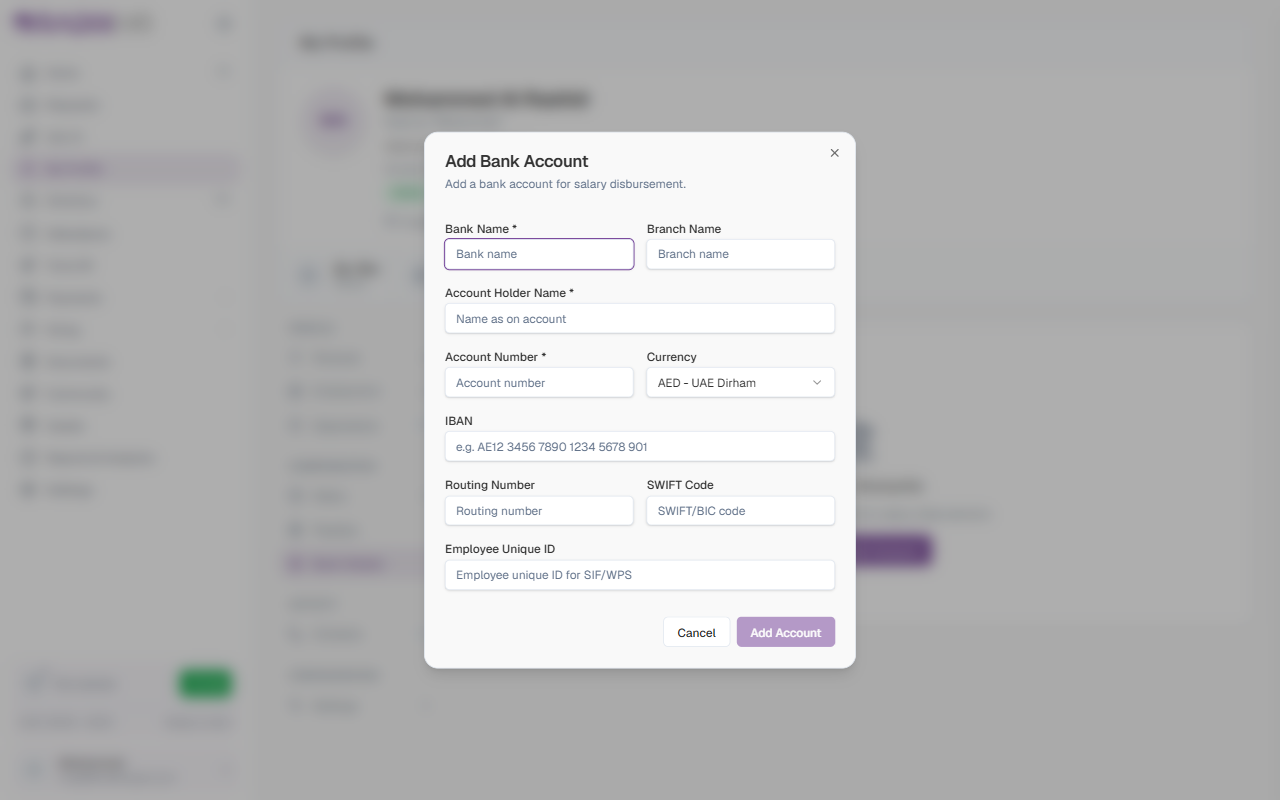
| Field | Description | Required |
|---|---|---|
| Bank Name | The name of your bank. | Yes |
| Branch Name | The branch where your account is held. | No |
| Account Holder Name | The name exactly as it appears on the bank account. | Yes |
| Account Number | Your bank account number. | Yes |
| Currency | The currency of the account. Defaults to AED – UAE Dirham; choose another currency if your account is held in a different one. | No |
| IBAN | Your International Bank Account Number — a standardized number used for bank transfers. | No |
| Routing Number | The bank routing number, used to identify the bank in some countries. | No |
| SWIFT Code | The SWIFT/BIC code that identifies your bank internationally, used for cross-border transfers. | No |
| Employee Unique ID | Your employee identifier used for SIF/WPS — the Salary Information File submitted under the UAE Wage Protection System for salary transfers. | No |
Each saved account appears as a card with the bank and branch name, a Primary badge on your main account, a status badge, the account holder, a masked account number (e.g., ••••5555), routing number, and currency. A newly added account shows Draft with the note “This account is awaiting approval” until HR approves it for payroll.
Keep your bank details up to date so your salary is deposited correctly. If you change banks, add the new account and notify HR.
Leave Section
The Leave section gives you the same view of your own leave that HR sees — balances, every request you’ve made, the transactions behind your balance, and a forecast of where you’ll end the year.
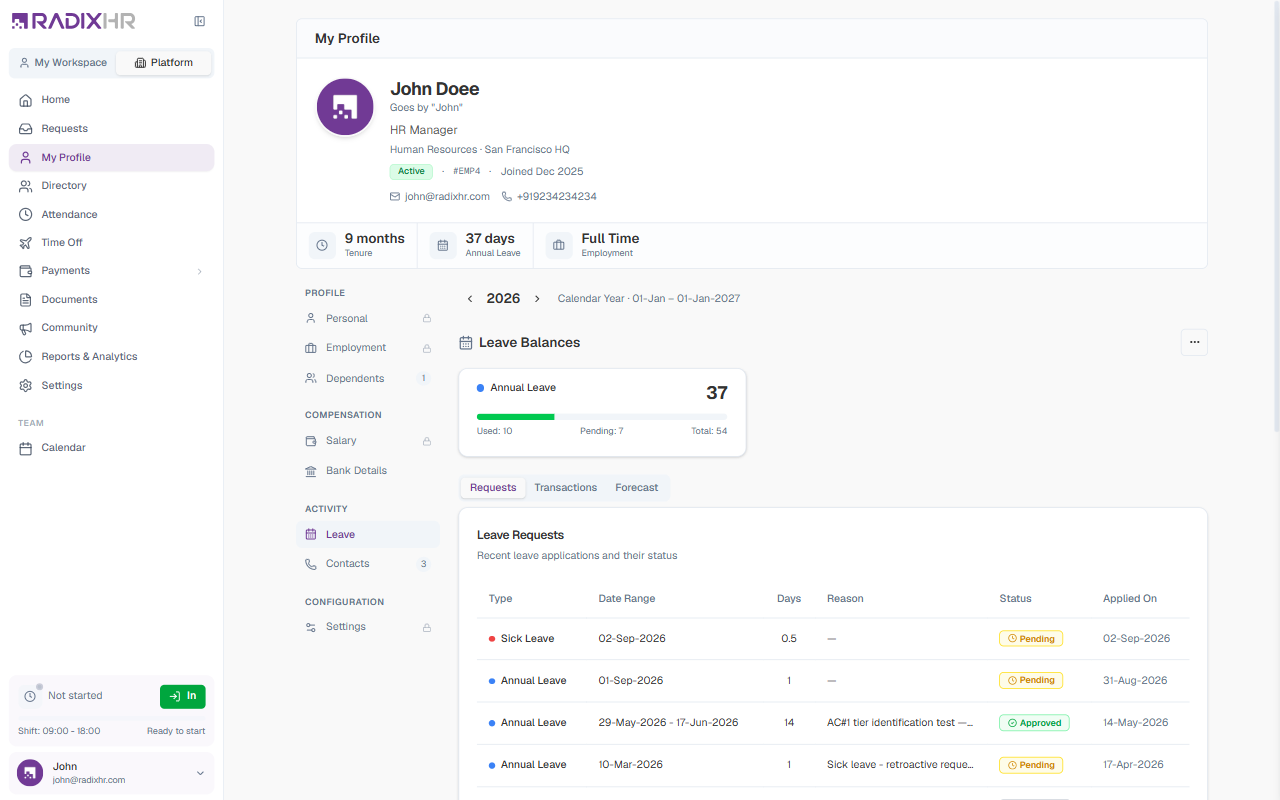
| Element | Description |
|---|---|
| Year selector | Use the ‹ › arrows beside the year to move between leave years. The label next to it shows the leave-year type and range (e.g., “Calendar Year · 01-Jan – 01-Jan-2027”). |
| Leave Balances | One card per leave type showing the days available (big number), a progress bar, and Used, Pending, and Total underneath. |
| ⋯ Leave actions | A menu on the Leave Balances card with Adjust Balance and Request Leave on Behalf — these are HR/manager actions and only appear if your role allows them. |
Below the balances, three tabs break the year down:
| Tab | What it shows |
|---|---|
| Requests | Every leave application — Type, Date Range, Days, Reason, Status (Pending / Approved / Cancelled / Rejected), and Applied On |
| Transactions | The ledger behind your balance — each accrual, leave taken, or cancellation with its Change (e.g., +2.5, −14) and the running Balance |
| Forecast | Current Balance, Monthly Accrual, and Scheduled Leave cards, a month-by-month Monthly Projections table (Opening / Accrual / Scheduled / Projected) through year end, and a Year-End Summary with the projected balance, the Maximum Carry Forward, and any Days to Forfeit |
Check the Forecast tab a few months before year end — if it warns that days will be forfeited (they exceed your carry-forward limit), plan some leave before the year closes.
Contacts Section
The Contacts section lets you manage your emergency contacts — the people who should be contacted if there is an emergency at work.
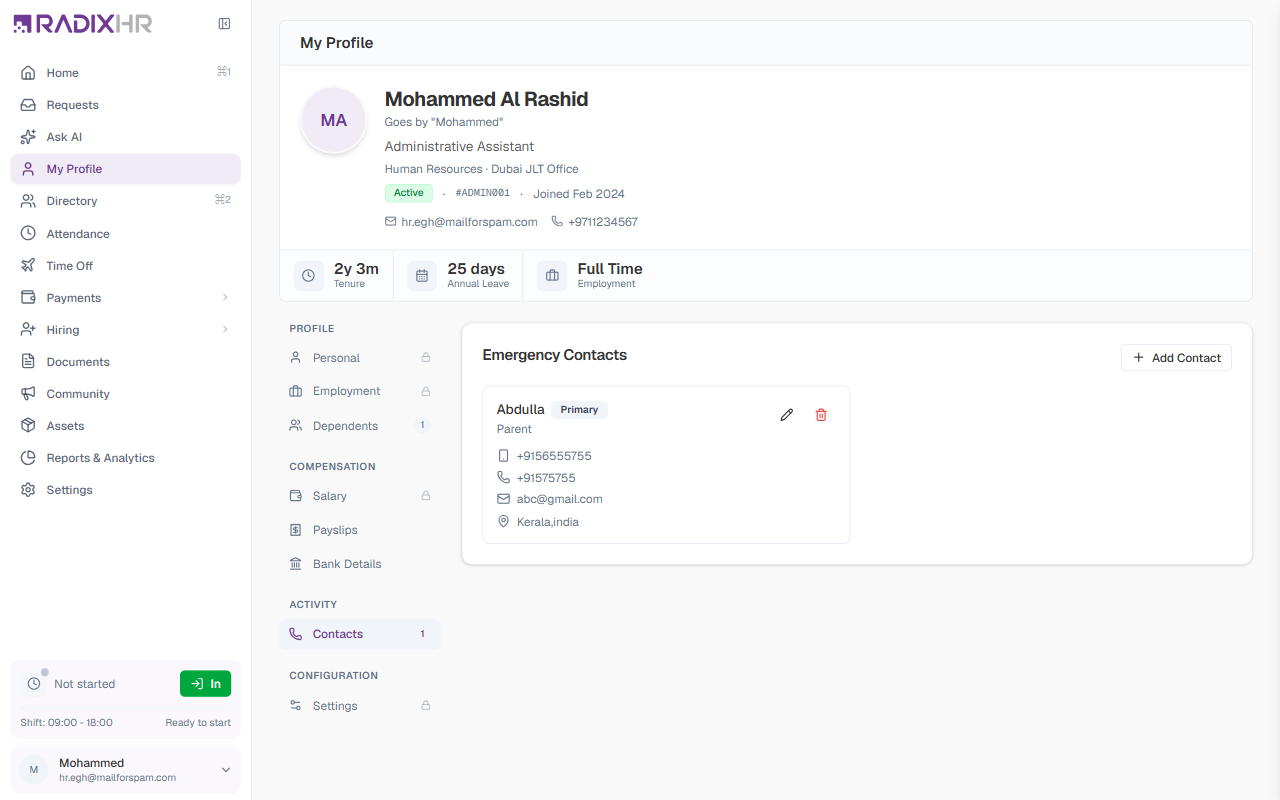
Each contact card displays the following details:
| Field | Description |
|---|---|
| Name | The contact’s name. |
| Primary | A badge shown if this is your primary emergency contact. |
| Relationship | The relationship to you — Parent, Spouse, Sibling, Friend, etc. |
| Mobile | The contact’s primary mobile number. |
| Phone | An additional phone number for the contact, if provided. |
| The contact’s email address. | |
| Address | The contact’s address. |
How to Add an Emergency Contact
- Open the Contacts section
- Click Add Contact
- Fill in the contact’s details
- Click Add Contact to save
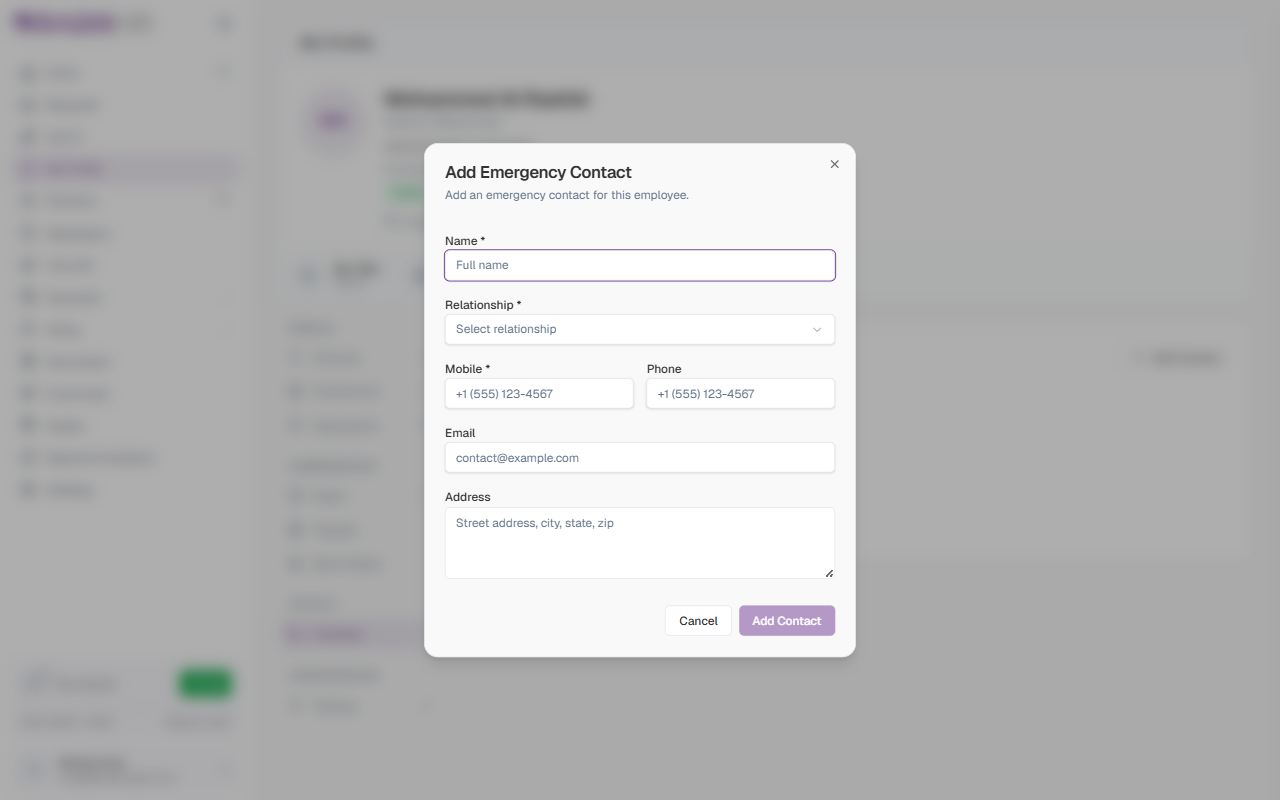
| Field | Description | Required |
|---|---|---|
| Name | The contact’s full name. | Yes |
| Relationship | The contact’s relationship to you. Choose from the dropdown. | Yes |
| Mobile | The contact’s primary mobile number. | Yes |
| Phone | An additional phone number, if available. | No |
| The contact’s email address. | No | |
| Address | The contact’s address (street, city, state, zip). | No |
You can edit or delete an existing contact using the edit (pencil) and delete (trash) icons on each contact card.
Always keep at least one emergency contact on file. This ensures your organization can reach someone on your behalf in case of a workplace emergency.
Settings Section
The Settings section shows your attendance and leave configurations. These settings are managed by HR and are read-only. The section has two tabs: Attendance and Leave.
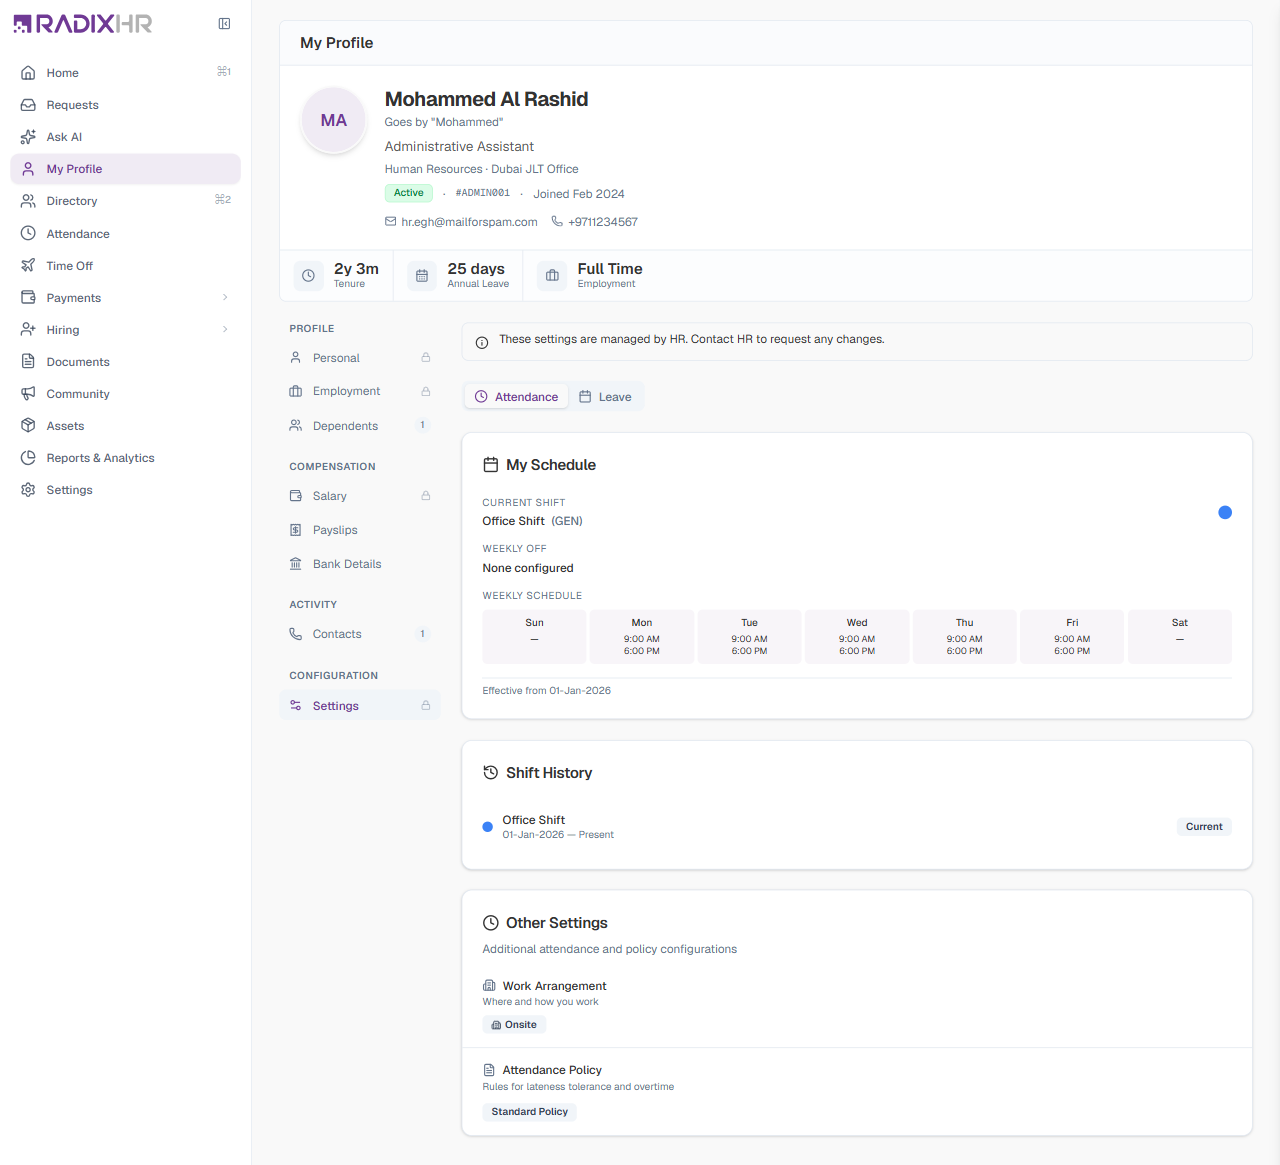
These settings are managed by HR. Contact HR to request any changes.
Attendance Tab
The Attendance tab shows your work schedule and attendance-related settings.
My Schedule
| Item | Description |
|---|---|
| Current Shift | Your assigned shift name and code (for example, “Morning Shift (MORNING)”), with a color indicator. |
| Weekly Off | Your weekly off days. Shows “None configured” if no weekly off is set. |
| Weekly Schedule | A 7-day grid showing your scheduled start and end times for each day of the week. Days marked with ”—” are off days. |
| Effective From | The date from which your current shift assignment is effective. |
Shift History — Shows a list of all shift assignments you have had, with the current one marked as “Current”.
Other Settings
| Setting | Description |
|---|---|
| Work Arrangement | Where and how you work — Onsite, Hybrid, or Remote. |
| Attendance Policy | The attendance policy assigned to you, which governs rules for lateness tolerance, overtime, and deductions. |
Leave Tab
The Leave tab shows your leave-related settings:
| Item | Description |
|---|---|
| Holiday Calendar | The holiday calendar assigned to you, which determines your public holidays. |
| Leave Policy | The leave policy assigned to you, which governs your leave entitlements and rules. |
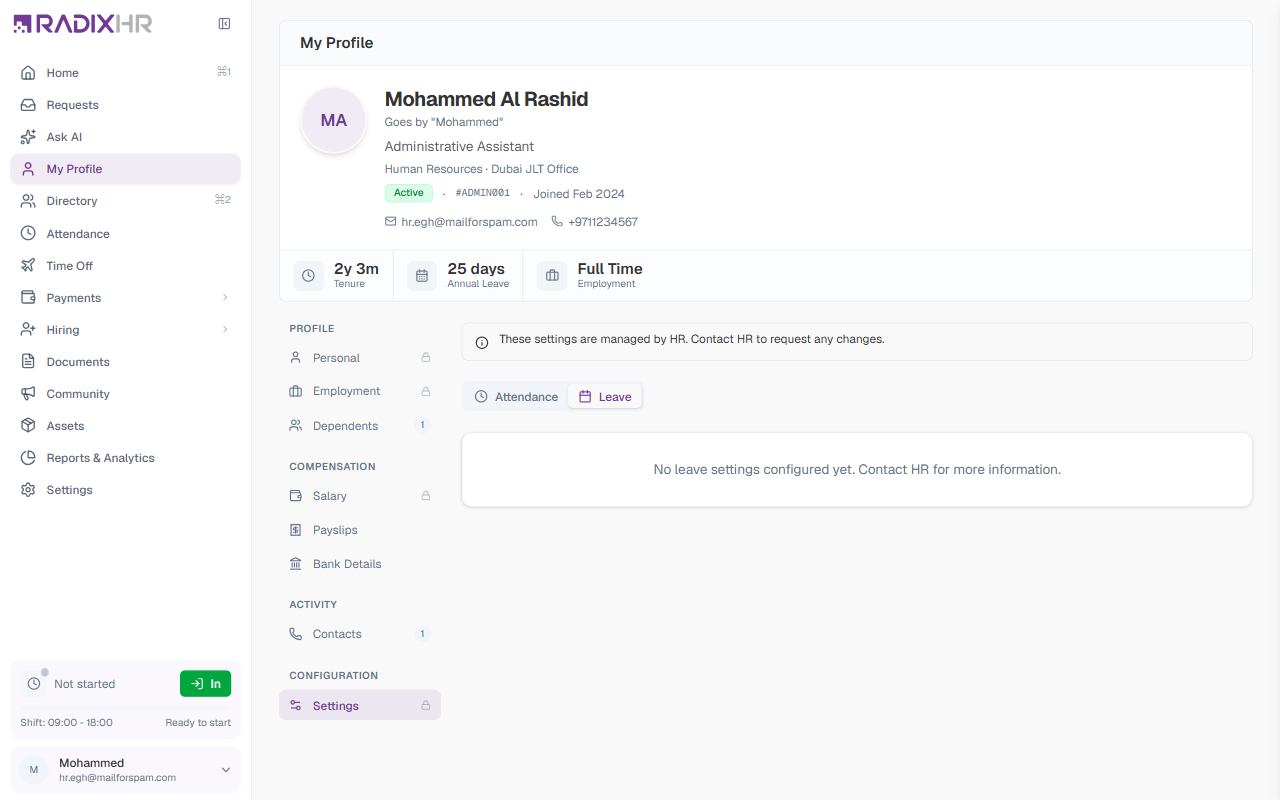
If your leave settings have not been set up yet, this tab shows “No leave settings configured yet”. Contact HR to have your holiday calendar and leave policy assigned.