My Pay
Pay is where you see how you’re paid. Open your payslips, understand your salary breakdown, check the bank account your salary goes to, claim back money you spent for work, and ask for a salary advance — all from one page. Open it from Pay in the sidebar.
What you can do here:
- View and download your monthly payslips
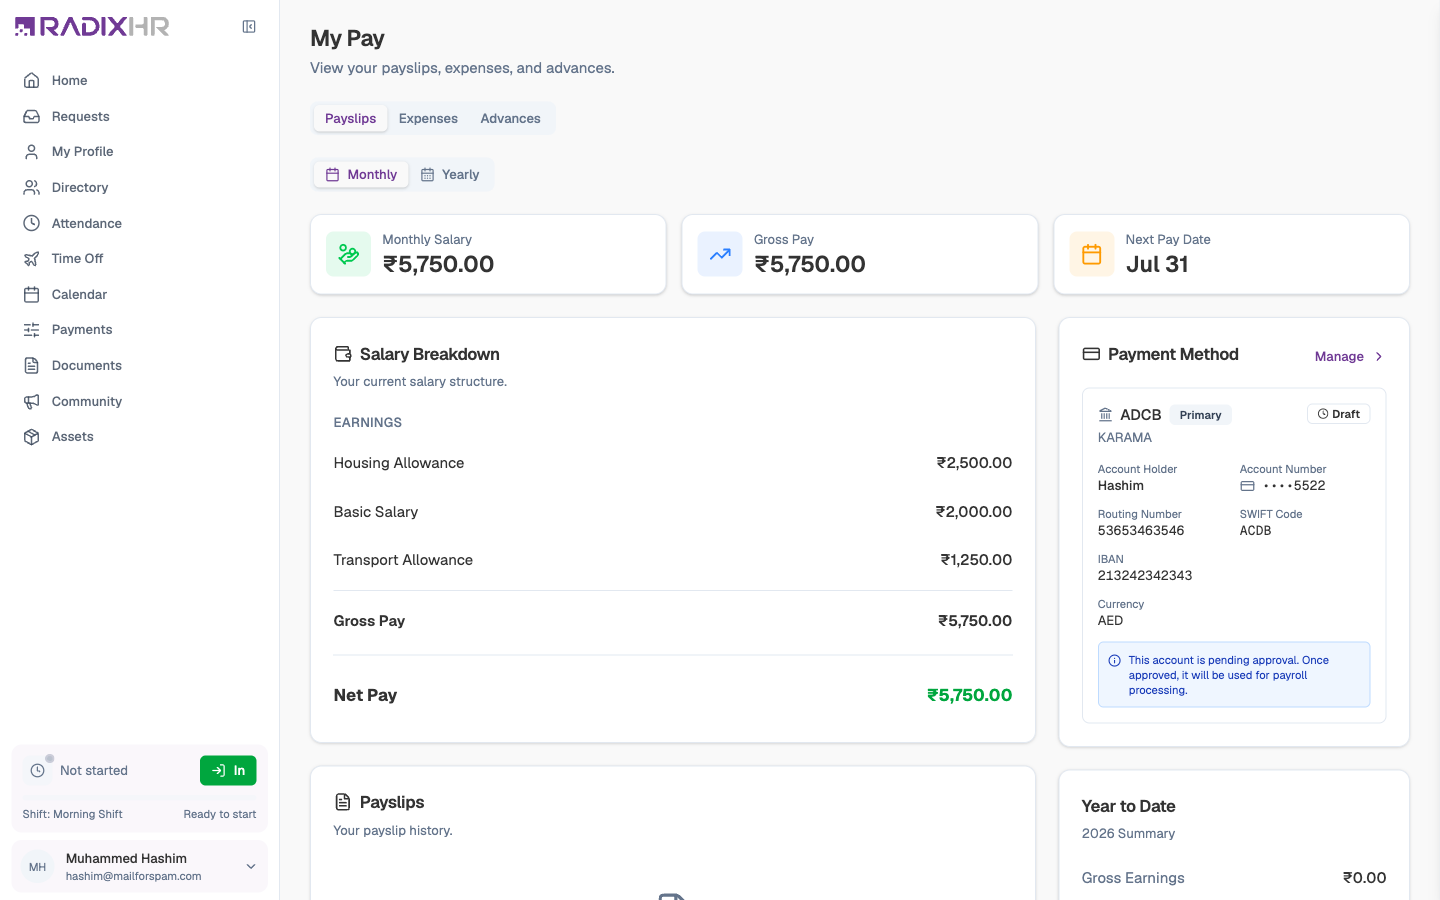
- See your salary breakdown — each earning, gross pay, and net pay — and your year-to-date totals
- Check your salary components and bank details
- Submit an expense claim and follow it through approval
- Request a salary advance, loan, or other payroll adjustment and follow its recovery
A Few Terms
- Gross pay — your salary before anything is taken off.
- Net pay — what actually reaches your bank after deductions.
- Salary component — one line of your salary, for example Basic Salary or Housing Allowance.
- Payroll run — the monthly process HR runs to calculate and pay everyone. Your payslip appears once the run is paid.
- Recovery — how an advance or loan is paid back: taken out of future salaries in one go or in instalments.
The Three Tabs
| Tab | What it shows |
|---|---|
| Payslips | Three headline cards (Monthly Salary, Gross Pay, Next Pay Date), your Salary Breakdown, your Payslips list, the Payment Method card, and a Year to Date summary |
| Payment Details | Salary Information (Basic Salary, Gross Salary, Effective From), the full Salary Components table, and your Bank Details |
| Requests | Two sub-tabs — Expenses (reimbursement claims) and Claims & Deductions (advances, loans, and other payroll adjustments) |
Your company can switch off expenses, advances, or payslips for your role. If a tab or sub-tab isn’t there, it hasn’t been enabled for you.
Payslips Tab
Headline Cards
| Card | What it shows |
|---|---|
| Monthly Salary | The net amount of your most recent payslip |
| Gross Pay | The gross amount of that payslip |
| Next Pay Date | When the next salary is due |
Salary Breakdown
The Salary Breakdown panel lists your current salary structure line by line:
| Row | Description |
|---|---|
| Earnings | Each component you’re paid — for example Basic Salary, Housing Allowance, Transport Allowance |
| Gross Pay | The total of all earnings before deductions |
| Net Pay | What you take home after deductions (shown in green) |
Viewing and Downloading a Payslip
The Payslips card lists each pay period (for example September 2026 · Sep 1 – Sep 30, 2026) with its net pay and a status badge such as paid. Two icon buttons sit on every row:
- The eye icon opens the payslip in a new tab.
- The download icon saves it as a PDF — handy for a visa or loan application.
Until your first payroll has been processed the card reads “No payslips available yet. Your payslips will appear here once processed.”
Payment Method and Year to Date
The Payment Method card shows the bank account your salary is paid into — bank and branch, a Primary badge, an Approved badge, the account holder, masked account number, routing number, SWIFT code, IBAN, and currency. Click Manage to add or change accounts (this opens the Bank Details section of your profile).
The Year to Date panel totals your Gross Earnings, Total Deductions, and Net Paid for the current year. It only counts payroll runs that have actually been paid, so it can lag behind the salary shown at the top.
Payment Details Tab
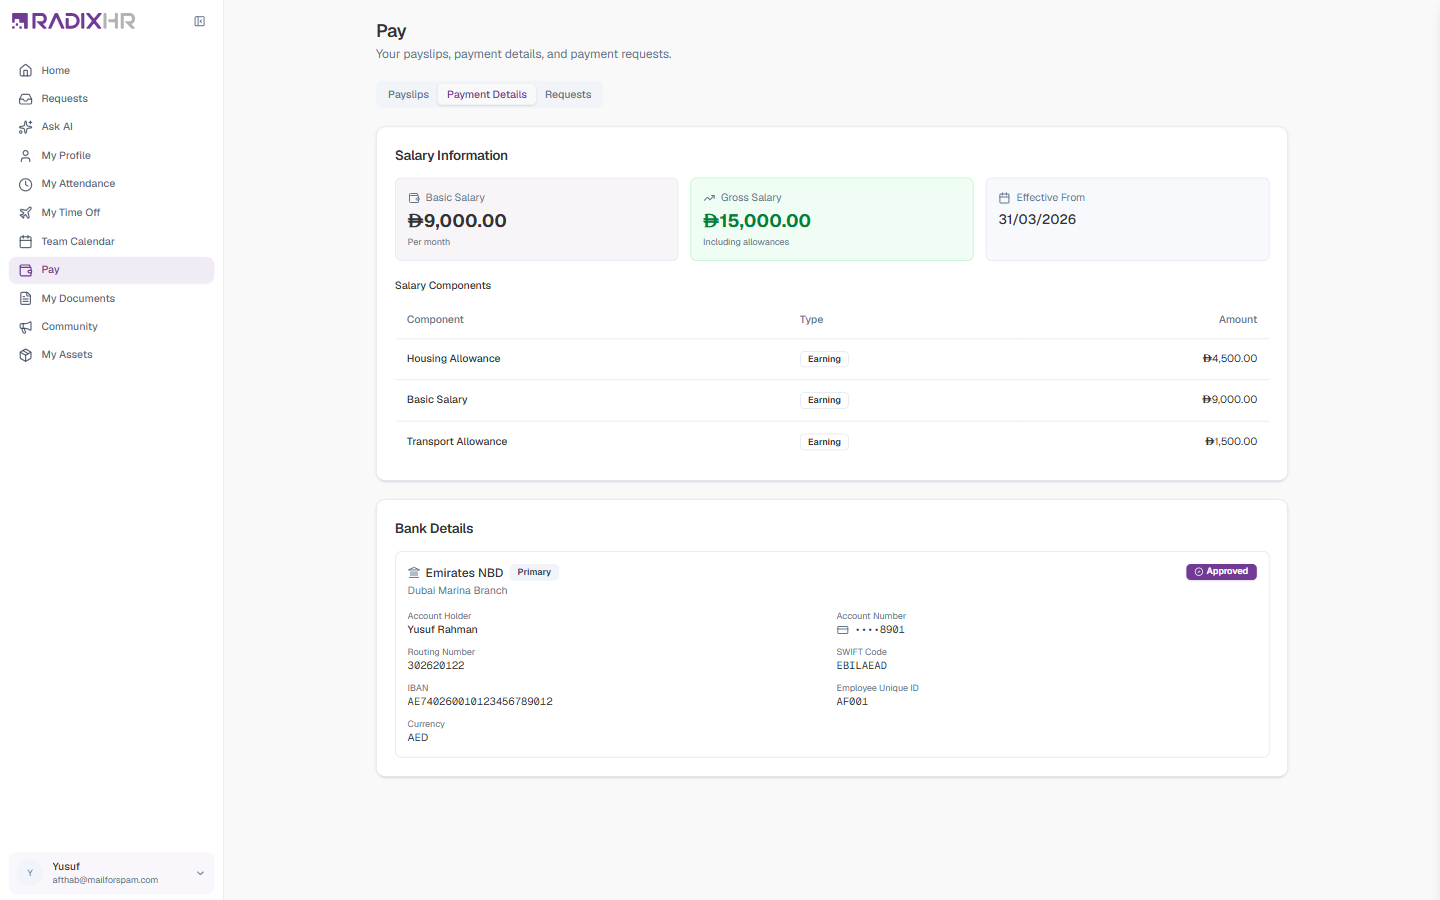
| Card | What it shows |
|---|---|
| Salary Information | Basic Salary per month, Gross Salary including allowances, and the Effective From date of your current package |
| Salary Components | Every component with its Type (Earning or Deduction) and Amount |
| Bank Details | The same account card as on the Payslips tab |
Submitting an Expense Claim
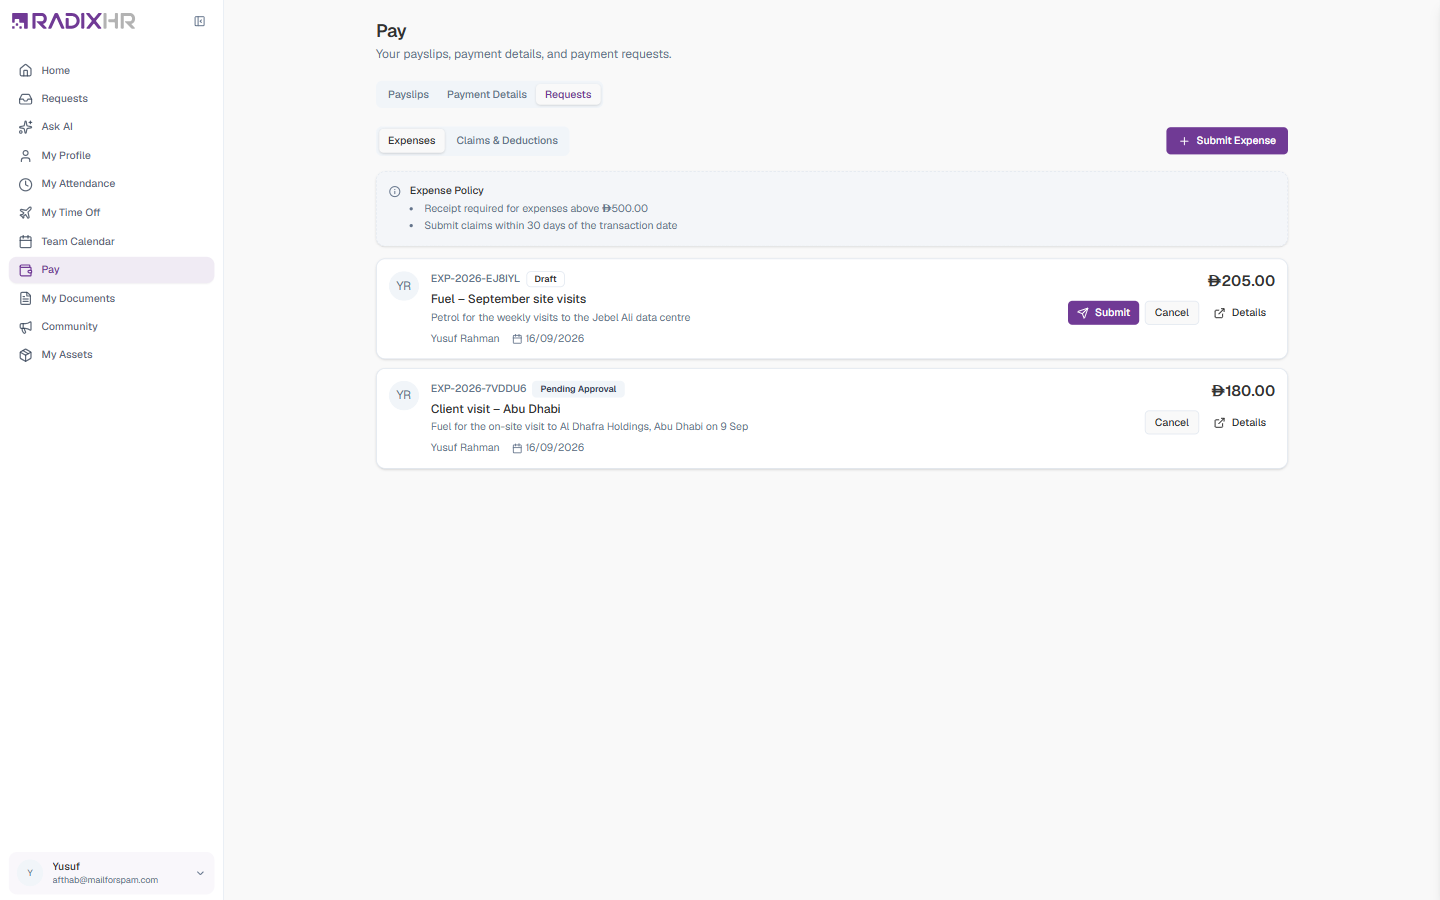
An expense claim is how you get paid back for something you bought for the company — fuel, a taxi, a client lunch. A claim is made up of one or more items; each item is a single receipt. Your company’s rules are shown under Expense Policy at the top of the tab (for example “Receipt required for expenses above AED 500” and “Submit claims within 30 days of the transaction date”).
Step 1 — Create the Claim
- Go to the Requests tab, stay on the Expenses sub-tab, and click Submit Expense. This opens a full New Expense Claim page.
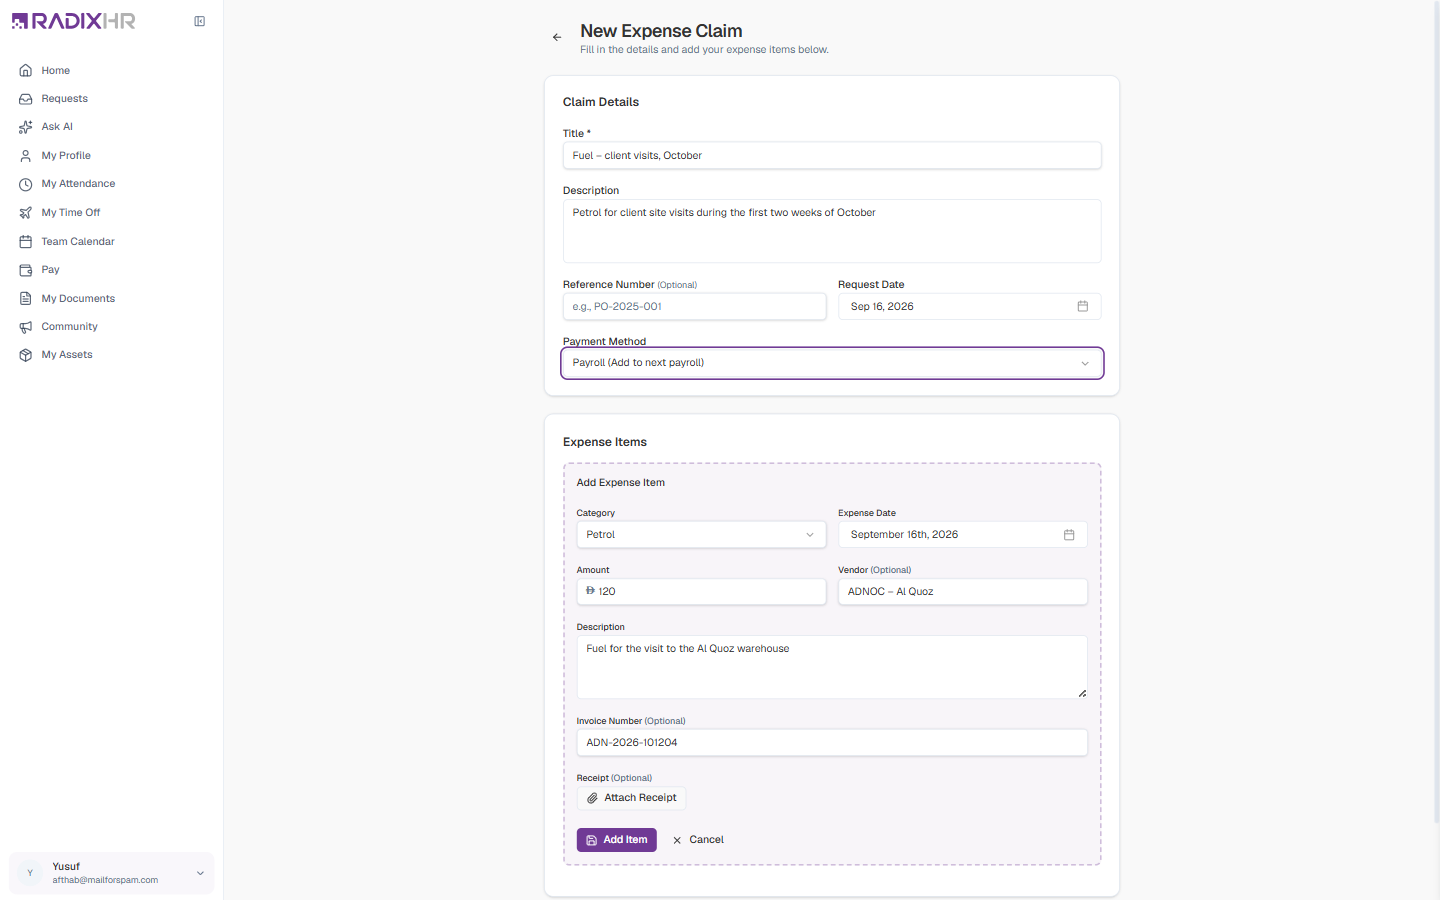
- Fill in the Claim Details.
- Click Add First Item and fill in the first receipt; click Add Item to save it. Repeat Add Item for each further receipt — the running Total updates as you go.
- Click Create Expense Claim.
Claim Details
| Field | Description | Required |
|---|---|---|
| Title | A short name for the claim, for example “Fuel – client visits, October” | Yes |
| Description | What the expenses were for | No |
| Reference Number | A purchase order or trip reference, if you have one | No |
| Request Date | Defaults to today | Yes |
| Payment Method | How you’d like to be paid back: Payroll (Add to next payroll) — the default — Direct Bank Transfer, Cash, or Cheque | Yes |
Expense Item
| Field | Description | Required |
|---|---|---|
| Category | The kind of expense (for example Petrol). The list is set up by your company. | Yes |
| Expense Date | The date on the receipt — it can’t be in the future | Yes |
| Amount | What you paid, in AED — must be more than zero | Yes |
| Vendor | Who you paid, for example ADNOC – Al Quoz | No |
| Description | What this item was for | No |
| Invoice Number | The receipt or invoice number | No |
| Receipt | Attach a photo or PDF of the receipt, up to 10 MB. Your policy may make this compulsory above a certain amount. | Sometimes |
Step 2 — Submit It
Creating a claim saves it as a Draft on its own page (reference number such as EXP-2026-7VDDU6). You can still Add Item, Edit, or Remove items here. When it’s complete, click Submit — the status changes to Pending Approval and the claim goes to your manager. Cancel Claim withdraws it.
Back on the Expenses sub-tab, each claim shows as a card with its reference, status, title, description, date, and amount, plus Submit, Cancel, and Details buttons where they apply.
A Draft claim hasn’t been sent to anyone. If a claim is sitting in Draft, open it and click Submit — otherwise it will never be paid.
Requesting an Advance, Loan, or Other Adjustment
Advances and loans are money paid to you ahead of your normal pay date and recovered from future salaries. They live on the Claims & Deductions sub-tab of Requests, alongside any deductions HR has set up against you (for example a uniform recovery).
- Go to Requests → Claims & Deductions and click New Request.
- Give it a Title (for example “Advance for school fees”).
- Pick a Category. The rest of the form appears once you do, and adapts to that category’s rules.
- Fill in the amount and how it should be recovered.
- Click Create. The request is saved as a Draft — open it and click Submit to send it for approval.
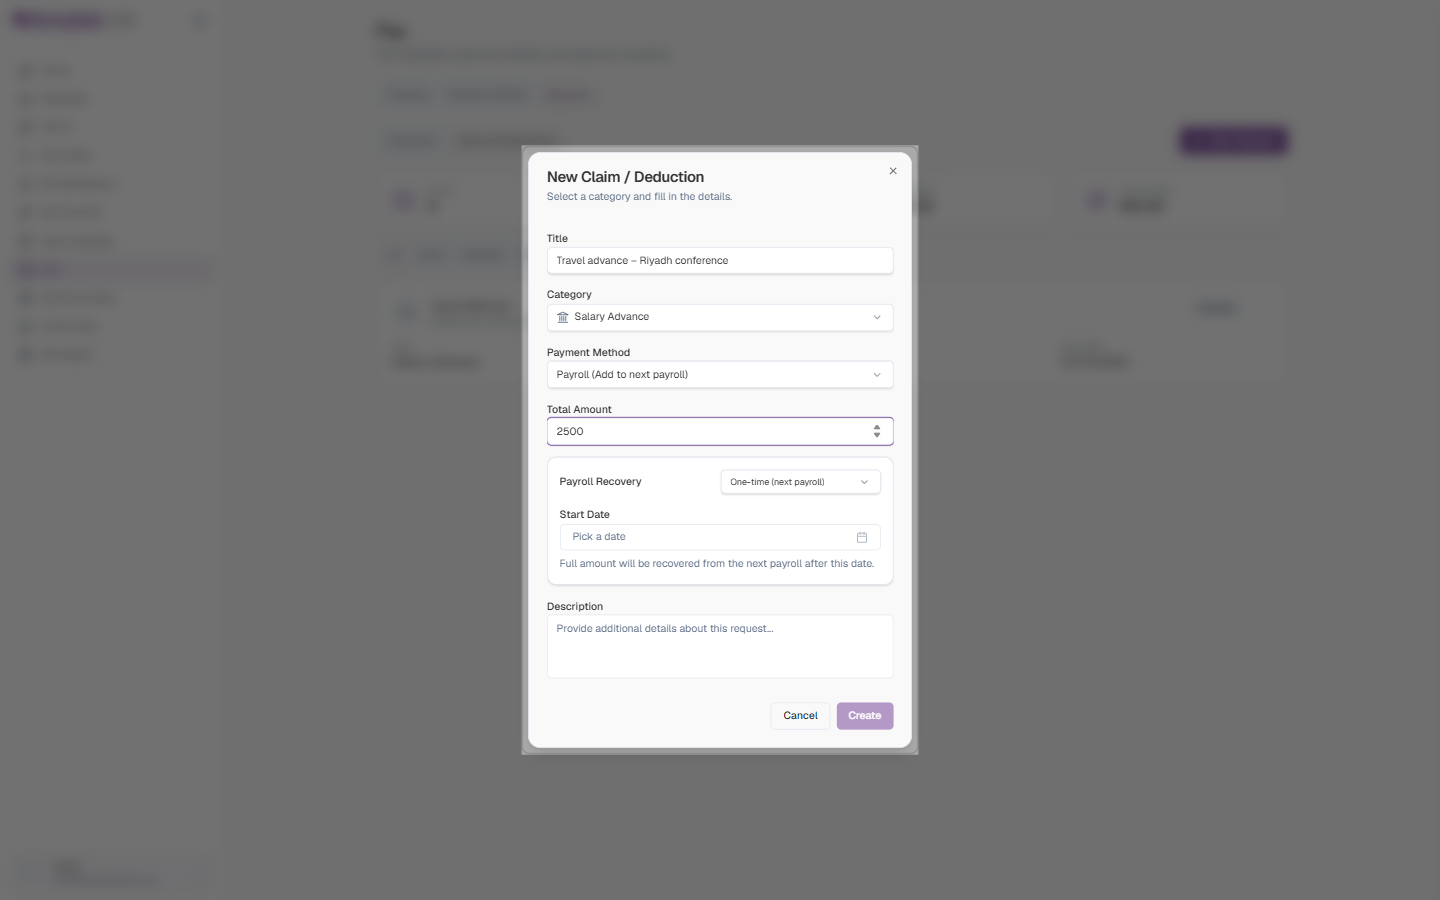
Field Descriptions
| Field | Description | Required |
|---|---|---|
| Title | A short name for the request | Yes |
| Category | Grouped into Disbursements (employee receives) — for example Salary Advance, Loan, Expense Reimbursement, Extra Amount — and Deductions (from payroll) — for example Disciplinary Fine, Uniform Recovery. The exact list is set up by your company. | Yes |
| Payment Method | How the money is paid to you: Payroll (Add to next payroll) by default | Yes |
| Total Amount | How much you’re asking for. Your company’s policy sets a maximum. | Yes |
| Payroll Recovery | One-time (next payroll) — the full amount comes out of your next salary — or Installments | Yes |
| Frequency | For instalments: Monthly | Yes, for instalments |
| Installments | How many instalments. The Recovery per installment is calculated for you (for example AED 3,000 over 3 = AED 1,000). Your policy may limit how much of your salary can be recovered each month. | Yes, for instalments |
| Start Date / End Date | When recovery starts; the end date is worked out from the number of instalments | Yes |
| Description | Why you need it | No |
Click any item in the list to open its detail page, which shows the Installment Schedule (due date, amount, and status of each instalment), the amounts Processed and Balance so far, a progress bar, and buttons to Download PDF, Edit (while Draft), and Submit.
The four cards at the top of the sub-tab (Active, Pending, Processed, Outstanding) summarise your items, and the status tabs (All / Draft / Pending / Active / Paused / Completed / Cancelled) filter the list.
Statuses at a Glance
| Status | Meaning |
|---|---|
| Draft | Created but not sent — open it and click Submit |
| Pending / Pending Approval | Waiting on your manager or HR |
| Approved | Signed off, not yet paid |
| Rejected | Turned down |
| Paid | The money has been sent (expense claims and payslips) |
| Active | Being paid out or recovered through payroll (claims & deductions) |
| Paused | HR has temporarily stopped the instalments |
| Completed | Fully paid out or recovered |
| Cancelled | Stopped before completion |
Approved advances move to Active while instalments are recovered from your salary, and finish as Completed. If a month is tight, ask HR — they can Pause an item or defer an instalment.