Work Schedules
Work schedules define when employees are expected to work and when they have days off. This section allows you to create shifts with specific working hours and configure weekly off patterns that determine rest days for different employee groups.
What you can do here:
- Create and manage work shifts with specific start/end times
- Configure different shift types (regular, flexible, split, night, open)
- Set up break schedules within shifts
- Define weekly off rules for days off patterns
- Configure fixed, alternating, or rotating off-day schedules
Understanding Work Schedules
Work schedules consist of two main components:
| Component | Description |
|---|---|
| Shifts | Define the working hours for each day - when employees should clock in, take breaks, and clock out |
| Weekly Off Rules | Define which days of the week are off days and how they rotate or alternate |
Together, these components create a complete work schedule that can be assigned to employees.
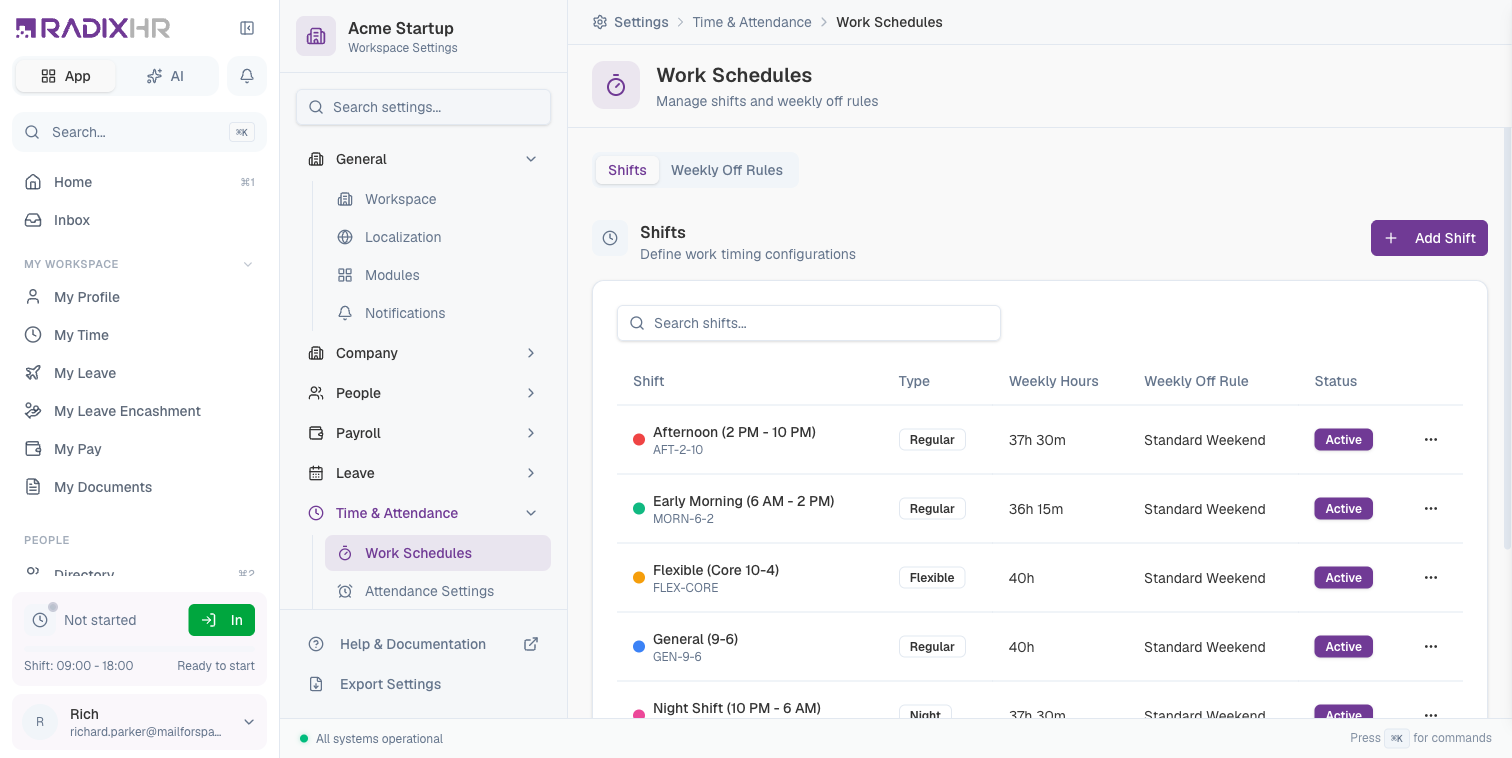
Shifts
A shift defines the working hours for a workday, including start time, end time, and any breaks. You can create multiple shifts to accommodate different working patterns in your organization.
Understanding the Shifts Table
| Column | Description |
|---|---|
| Color | Visual indicator to easily identify shifts in calendars and reports |
| Name | The shift name and code |
| Type | The shift type (Regular, Flexible, Split, Night, or Open) |
| Work Hours | Total working hours per day (excluding breaks) |
| Status | Active or Inactive - only active shifts can be assigned |
Shift Types Explained
| Type | Description | Best For |
|---|---|---|
| Regular | Fixed start and end times with defined working hours | Standard office jobs with consistent schedules |
| Flexible | Employees can start within a time window, with required core hours | Roles that allow flexibility in arrival times |
| Split | Working hours divided into two or more segments with a gap | Jobs with long breaks (e.g., restaurant staff) |
| Night | Shifts that span across midnight (e.g., 10 PM to 6 AM) | Night shift workers, security, healthcare |
| Open | No fixed times - any clock in/out is accepted | Field workers, sales representatives |
How to Create a Shift
- Go to Settings > Time & Attendance > Work Schedules
- Click the Shifts tab (if not already selected)
- Click Add Shift
- Configure the shift settings
- Click Save
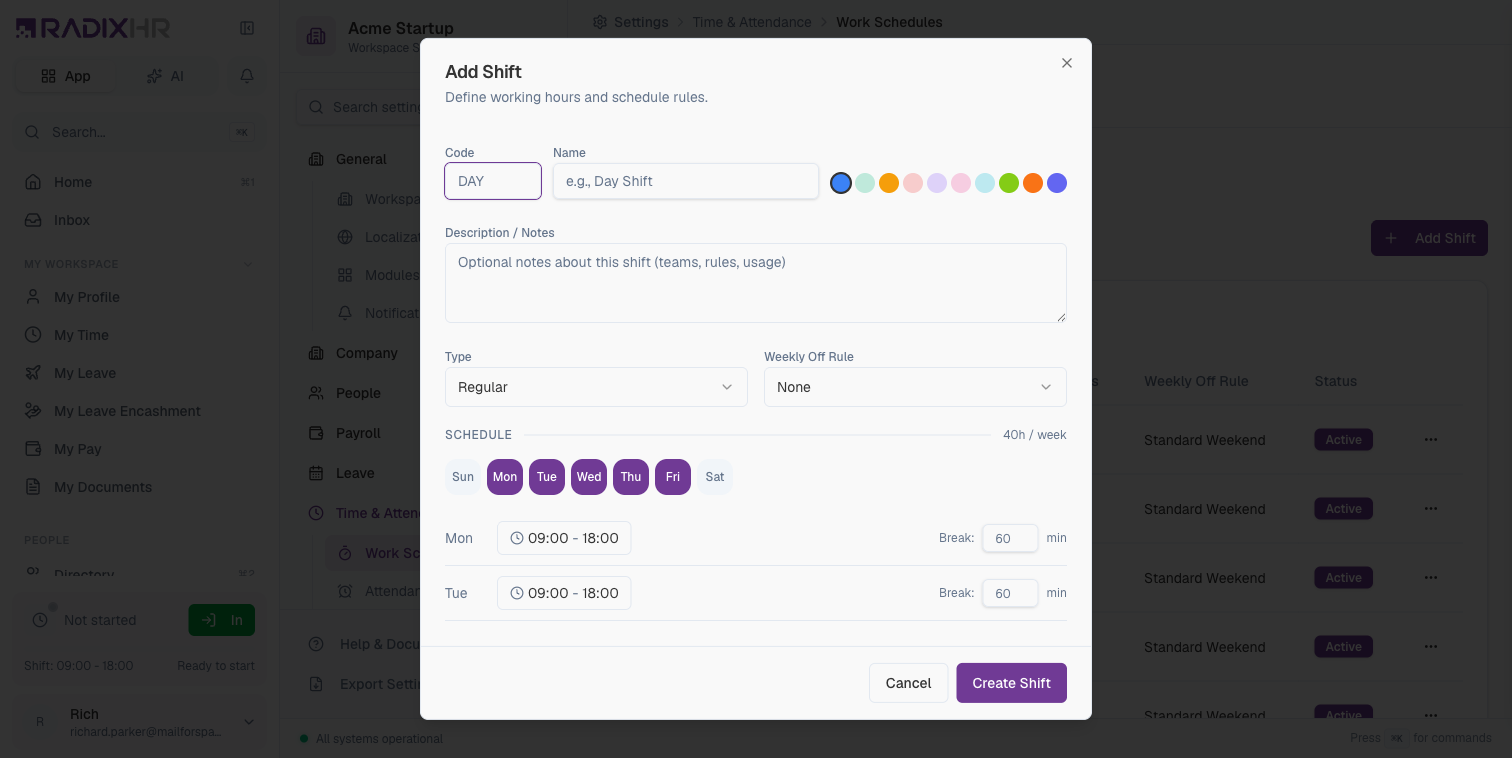
Basic Information
| Field | Description | Required |
|---|---|---|
| Shift Code | A short, unique identifier for the shift (e.g., MORN-9-6, NIGHT-A). Used in reports and integrations. Maximum 20 characters. | Yes |
| Shift Name | A descriptive name for the shift (e.g., “Morning Shift”, “Night Shift A”). Maximum 100 characters. | Yes |
| Description | Optional details about when this shift should be used or which teams it’s for. | No |
| Color | Select a color to visually identify this shift in calendars and schedules. Choose from 10 available colors. | Yes |
| Shift Type | Select the type that best matches your working pattern: Regular, Flexible, Split, Night, or Open. | Yes |
| Active | Toggle ON to make this shift available for assignment. Toggle OFF to disable without deleting. | Yes |
Schedule Configuration
The schedule configuration varies based on the shift type selected:
Regular Shift Schedule
| Field | Description |
|---|---|
| Start Time | The time employees should clock in (e.g., 9:00 AM) |
| End Time | The time employees should clock out (e.g., 6:00 PM) |
| Work Days | Select which days of the week this shift applies to |
Flexible Shift Schedule
| Field | Description |
|---|---|
| Earliest Start | The earliest time employees can clock in (e.g., 7:00 AM) |
| Latest Start | The latest time employees can clock in (e.g., 10:00 AM) |
| Core Hours Start | Required presence starts (e.g., 10:00 AM) |
| Core Hours End | Required presence ends (e.g., 4:00 PM) |
| Minimum Hours | Required working hours per day |
Split Shift Schedule
| Field | Description |
|---|---|
| First Segment Start | Start time of the first work period |
| First Segment End | End time of the first work period |
| Second Segment Start | Start time of the second work period |
| Second Segment End | End time of the second work period |
Night Shift Schedule
| Field | Description |
|---|---|
| Start Time | The time the shift begins (e.g., 10:00 PM) |
| End Time | The time the shift ends the next day (e.g., 6:00 AM) |
| Overnight | Automatically enabled for night shifts spanning midnight |
Open Shift Schedule
| Field | Description |
|---|---|
| Minimum Hours | Optional minimum hours expected per day |
| Maximum Hours | Optional maximum hours allowed per day |
Break Configuration
Add breaks to any shift type:
| Field | Description |
|---|---|
| Break Name | Identifier for the break (e.g., “Lunch”, “Tea Break”) |
| Start Time | When the break begins |
| Duration | Length of the break in minutes |
| Paid Break | Toggle ON if the break counts as working time |
| Deduct from Hours | Toggle ON to subtract break time from total worked hours |
For most organizations, create 2-3 standard shifts that cover your main working patterns. You can always add more specific shifts later as needed.
Tolerance Settings
Tolerances define acceptable variations from the scheduled times:
| Field | Description |
|---|---|
| Early Clock-In Tolerance | Minutes before shift start that clock-in is allowed |
| Late Clock-In Tolerance | Minutes after shift start before marking as late |
| Early Clock-Out Tolerance | Minutes before shift end that clock-out is allowed without penalty |
| Late Clock-Out Tolerance | Minutes after shift end before flagging as overtime |
Weekly Off Rules
Weekly Off Rules define which days employees have off from work. Different rules support various scheduling needs, from simple fixed weekends to complex rotating patterns.
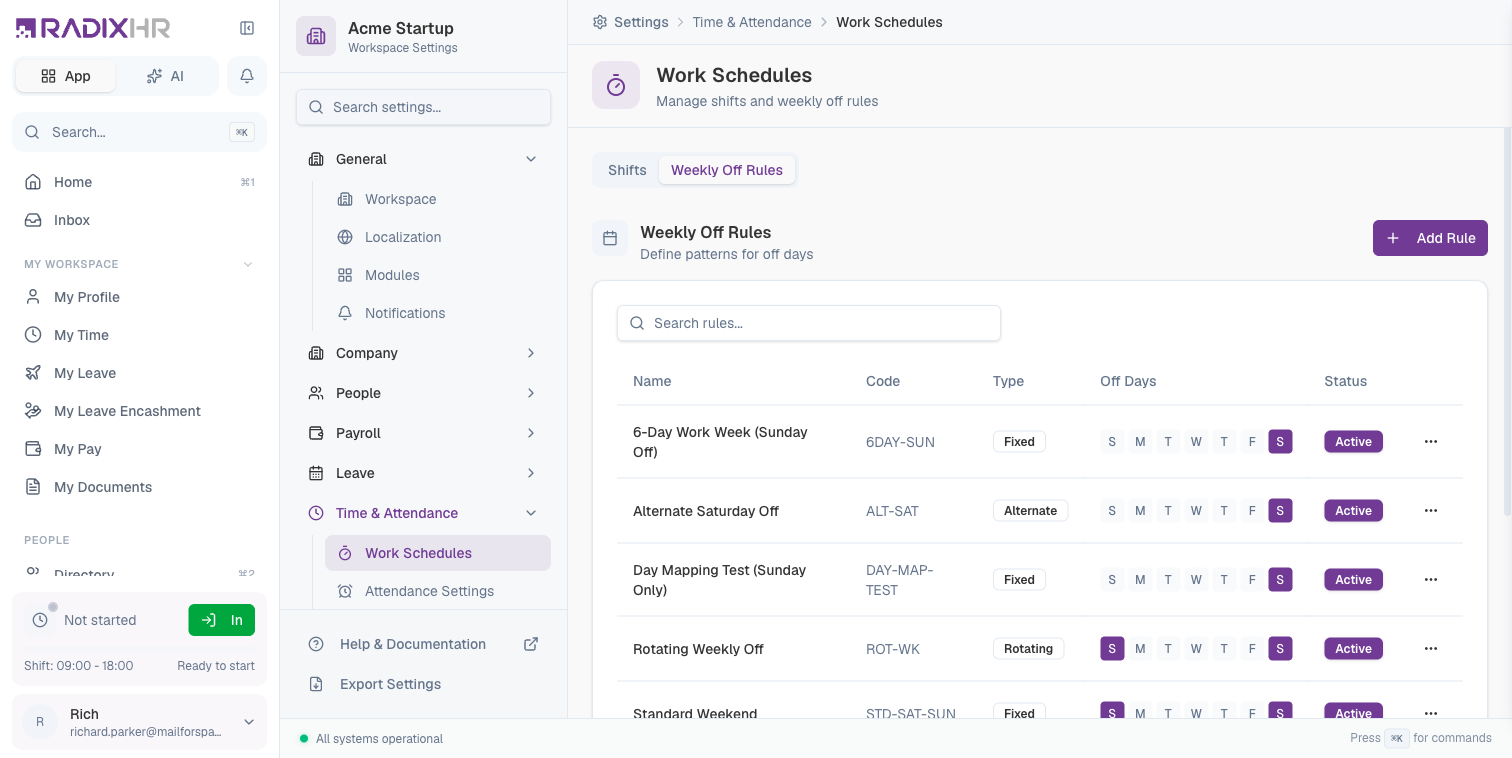
Understanding the Weekly Off Rules Table
| Column | Description |
|---|---|
| Name | The rule name and code |
| Type | Fixed, Alternate, or Rotating |
| Pattern | Summary of the off-day pattern |
| Status | Active or Inactive |
Rule Types Explained
| Type | Description | Example |
|---|---|---|
| Fixed | Same days off every week | Every Saturday and Sunday off |
| Alternate | Different pattern every other week | Week 1: Saturday off; Week 2: Saturday and Sunday off |
| Rotating | Pattern cycles through multiple weeks | 4-week rotation where off days shift each week |
How to Create a Weekly Off Rule
- Go to Settings > Time & Attendance > Work Schedules
- Click the Weekly Off Rules tab
- Click Add Rule
- Configure the rule settings
- Click Save
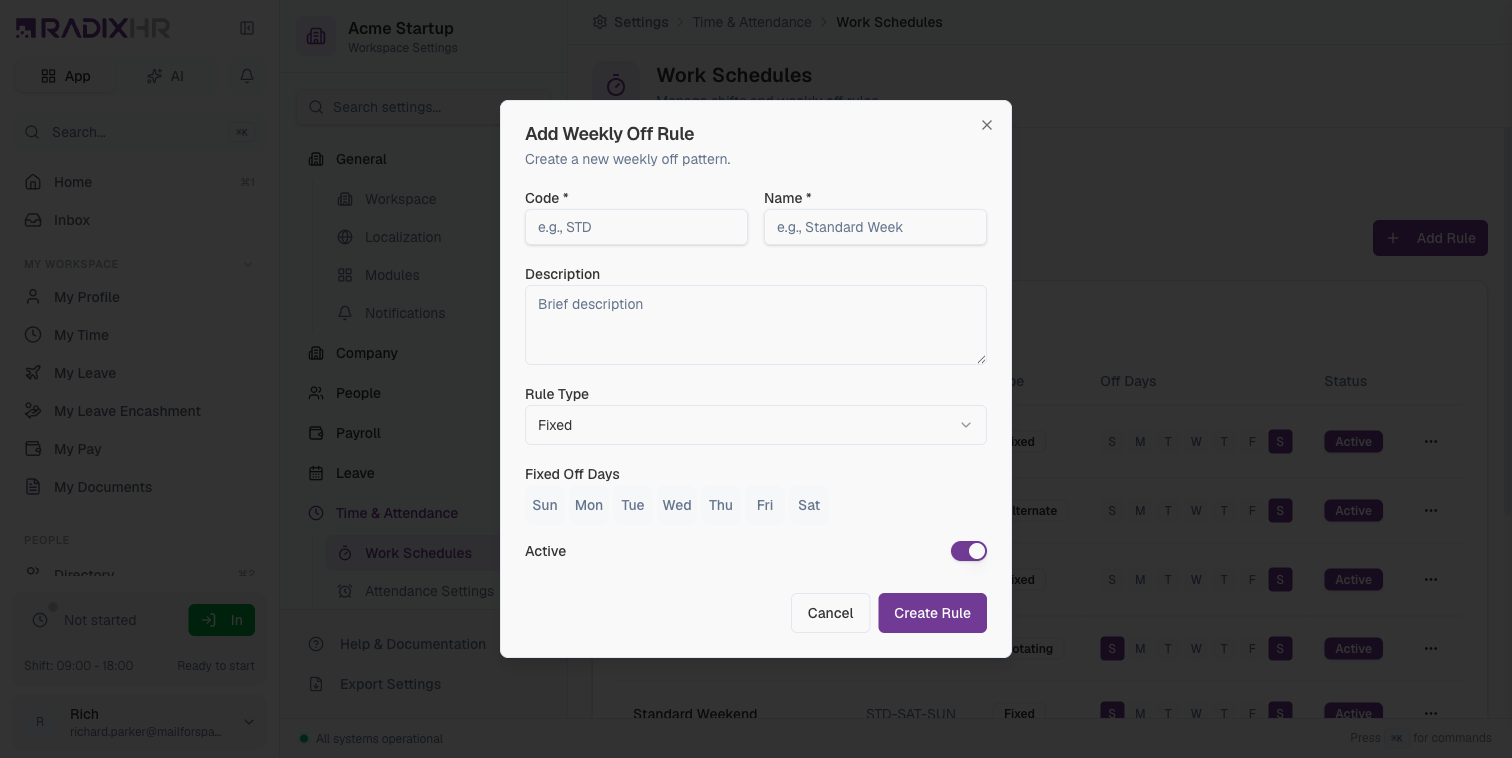
Basic Information
| Field | Description | Required |
|---|---|---|
| Rule Code | A short, unique identifier (e.g., WO-SAT-SUN, WO-ROTATE). Maximum 20 characters. | Yes |
| Rule Name | A descriptive name (e.g., “Weekend Off”, “Rotating Saturday”). Maximum 100 characters. | Yes |
| Description | Optional details about which teams or roles use this rule. | No |
| Rule Type | Select Fixed, Alternate, or Rotating based on your scheduling needs. | Yes |
| Active | Toggle ON to make this rule available for assignment. | Yes |
Fixed Weekly Off Configuration
For Fixed rules, select which days are always off:
| Field | Description |
|---|---|
| Off Days | Select one or more days that are always off (e.g., Saturday, Sunday) |
Fixed weekly off is the most common pattern. Most office-based organizations use this with Saturday and Sunday selected as off days.
Alternate Weekly Off Configuration
For Alternate rules, define two different weekly patterns that alternate:
| Field | Description |
|---|---|
| Week 1 Off Days | Days off in odd weeks (1st, 3rd, 5th week of the month, etc.) |
| Week 2 Off Days | Days off in even weeks (2nd, 4th week of the month, etc.) |
| Reference Date | The date to start counting from for determining odd/even weeks |
Example:
- Week 1: Sunday off (1 day)
- Week 2: Saturday and Sunday off (2 days)
This is common in industries where Saturday is a working day on alternate weeks.
Rotating Weekly Off Configuration
For Rotating rules, define a multi-week cycle:
| Field | Description |
|---|---|
| Cycle Length | Number of weeks in the rotation (2-8 weeks) |
| Week 1 Off Days | Days off in the first week of the cycle |
| Week 2 Off Days | Days off in the second week of the cycle |
| … | Continue for each week in the cycle |
| Reference Date | The date to start the rotation cycle from |
Example (4-week rotation):
- Week 1: Sunday, Monday off
- Week 2: Sunday, Tuesday off
- Week 3: Sunday, Wednesday off
- Week 4: Sunday, Thursday off
This pattern is common in 24/7 operations like manufacturing or healthcare.
When setting up rotating schedules, choose a reference date that aligns with your payroll or roster planning cycle for easier management.
Assigning Schedules to Employees
Once you’ve created shifts and weekly off rules, you can assign them to employees:
- Go to an employee’s profile
- Navigate to Work Schedule section
- Select the appropriate shift and weekly off rule
- Set the effective date
- Save the assignment
Schedule changes are effective from the date you specify. Historical attendance records are not affected by schedule changes.
Best Practices
For Shifts
-
Use clear naming conventions: Include key information in shift names (e.g., “Morning 9AM-6PM” rather than “Shift A”)
-
Set realistic tolerances: Allow 5-10 minutes tolerance for clock-in to account for minor delays
-
Review break settings: Ensure break times align with your attendance policy’s “Include Breaks in Worked Time” setting
-
Color code by department or type: Use consistent colors to make schedule views easier to understand
For Weekly Off Rules
-
Start simple: Begin with fixed weekly off rules and add complexity only when needed
-
Document rotating patterns: Keep notes on why specific rotation patterns were chosen
-
Align reference dates: Use consistent reference dates across rotating rules for easier management
-
Consider public holidays: Weekly off rules work alongside your holiday calendar - make sure they complement each other
Changing a weekly off rule affects all employees assigned to it. Test changes with a small group first, or create a new rule rather than modifying an existing one.
Troubleshooting
”Employee shows as absent but they worked”
- Check if the employee has the correct shift assigned
- Verify the shift’s working days include the day in question
- Ensure the weekly off rule doesn’t mark that day as off
”Overtime not calculating correctly”
- Review the shift end time and tolerance settings
- Check if the attendance policy has overtime enabled
- Verify the “Overtime Starts After” setting in the policy
”Shift assignment not taking effect”
- Check the effective date of the assignment
- Ensure the shift status is Active
- Verify no conflicting schedule assignments exist