Job Titles & Grades
Job titles define the roles and designations within your organization — such as Software Engineer, Manager, or CFO. Setting them up lets you categorize employees by their roles, define salary bands for compensation planning, and set grade levels for career progression.
What you can do here:
- Create and manage job titles and designations
- Define salary bands (min and max) for each role
- Assign a grade or level for career laddering
- See how many employees hold each title
- Activate or deactivate titles as needed
Understanding the Job Titles Table
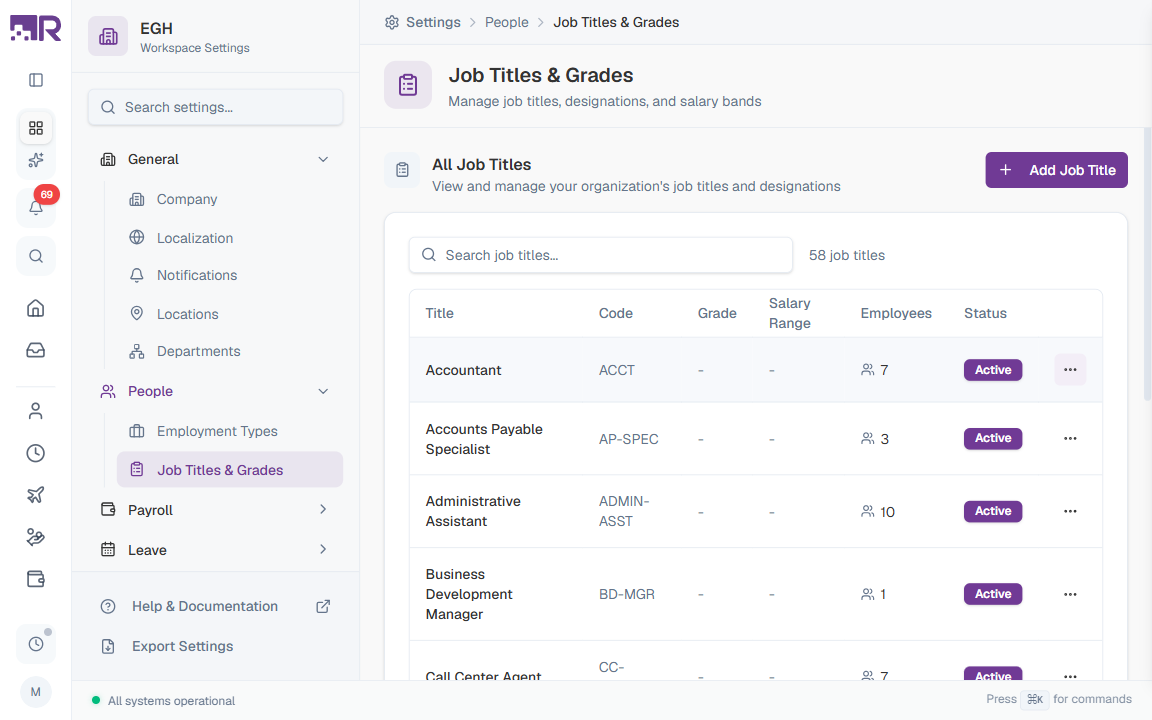
The job titles table lists every role defined in your organization. The total count is shown next to the search box (e.g., “58 job titles”). Use the Previous / Next controls below the table to page through long lists.
| Column | Description |
|---|---|
| Title | The display name of the role (e.g., “Accountant”, “Business Development Manager”) |
| Code | A short identifier used in reports and integrations (e.g., “ACCT”, “BD-MGR”) |
| Grade | The grade or level for this role (shows ”-” if not set) |
| Salary Range | The min–max salary band (shows ”-” if not set) |
| Employees | The number of employees currently holding this title |
| Status | Active — the title can be assigned to employees. Inactive — it cannot be assigned to new employees, but existing assignments remain. |
Use the Search job titles… box above the table to filter by title or code.
How to Add a Job Title
- Go to Settings > People > Job Titles & Grades
- Click the Add Job Title button in the top-right of the All Job Titles card
- Fill in the title details
- Click Create Job Title
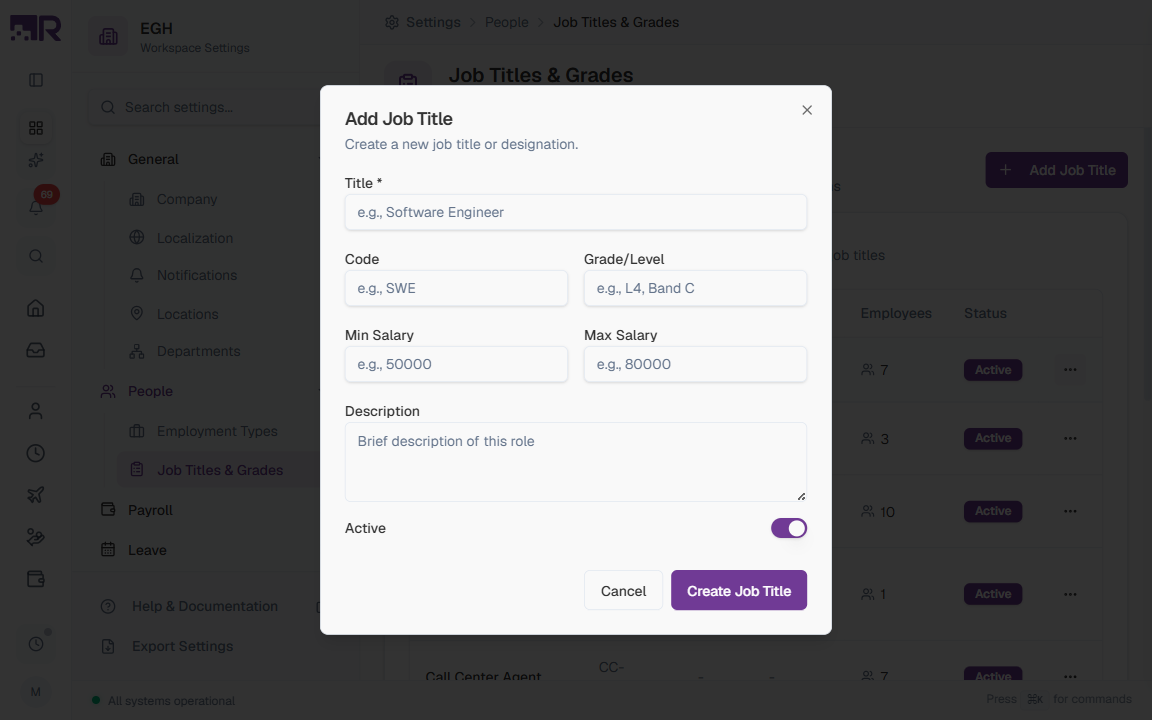
Job Title Form Fields
| Field | Description | Required |
|---|---|---|
| Title | The name of the job title employees will see on their profiles. Examples: “Software Engineer”, “Marketing Manager”, “Accountant”. | Yes |
| Code | A short, unique identifier used in reports, exports, and integrations. Keep it short and memorable. Examples: “SWE”, “MKT-MGR”, “ACCT”. | No |
| Grade/Level | The grade or level for this role in your career ladder. Examples: “L4”, “Band C”, “M1”. | No |
| Min Salary | The minimum salary for this role, in your workspace’s default currency. Used for compensation planning and pay equity checks. | No |
| Max Salary | The maximum salary for this role. Together with Min Salary, this defines the salary band for the position. | No |
| Description | A brief description of the role’s responsibilities and expectations. Helps employees and managers understand what the role entails. | No |
| Active | ON: The title can be assigned to employees. OFF: It cannot be assigned to new employees, but existing assignments remain. Default: ON. | No |
Understanding Grades and Career Levels
A grade (or level) is a label that places a role on your career ladder. Grades let you compare seniority across different functions and design promotion paths. Common patterns include:
| Grade | Level Type | Example Titles |
|---|---|---|
| L1 / IC1 | Entry-level individual contributor | Junior Engineer, Assistant, Analyst |
| L2 / IC2 | Mid-level individual contributor | Engineer, Associate, Specialist |
| L3 / S1 | Senior individual contributor | Senior Engineer, Senior Associate |
| M1 | Manager | Manager, Team Lead |
| D1 | Director | Director, Vice President |
| E1 | Executive | CEO, CFO, COO |
Pick a single grading system (numeric levels, bands, or letters) and use it consistently. Mixing systems makes career conversations and benchmarking harder later.
Understanding Salary Bands
A salary band is the min-to-max range you’d pay someone in this role. It’s useful for:
- Compensation planning: keeping new-hire offers within a fair range
- Pay equity: spotting employees who are below the band for their role
- Budget forecasting: estimating payroll cost for future hires
- Promotion decisions: understanding the pay impact of a role change
Salary ranges are stored in your workspace’s default currency (configured in Settings > General > Localization). If you have employees in multiple countries, consider creating separate job titles per region with locally-appropriate bands.
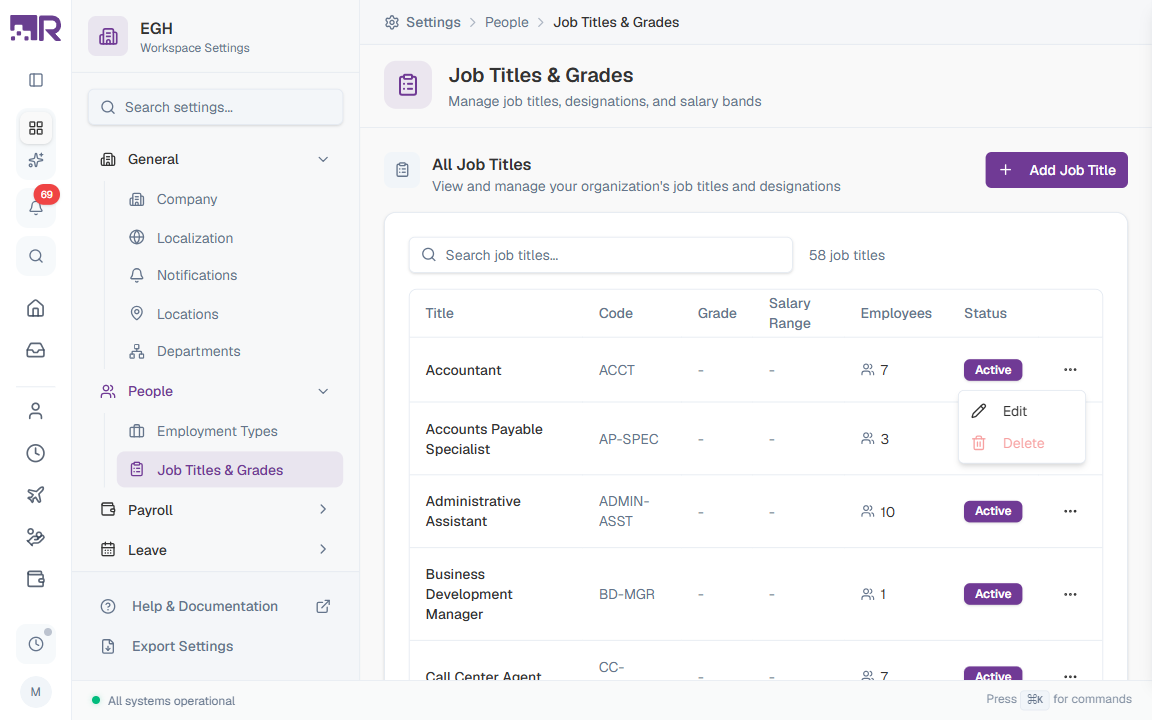
How to Edit a Job Title
- In the Job Titles table, find the title you want to modify
- Click the three-dot menu (⋯) at the end of the row
- Select Edit
- Update the title details
- Click Save Changes
Editing a job title updates it for all employees currently holding that title. Changes to Min Salary / Max Salary do not automatically adjust employee salaries — those must be updated in each employee’s compensation record.
How to Delete a Job Title
- In the Job Titles table, find the title you want to remove
- Click the three-dot menu (⋯) at the end of the row
- Select Delete
- Confirm the deletion in the dialog
You cannot delete a job title that has employees assigned to it. First reassign those employees to another title, then delete.
How to Deactivate a Job Title
If you want to stop using a title but preserve historical records:
- Click the three-dot menu (⋯) on the title’s row and select Edit
- Toggle the Active switch to OFF
- Click Save Changes
When a job title is Inactive:
- It cannot be assigned to new employees
- Existing employee assignments remain unchanged
- The title still appears in historical reports
- It shows an Inactive badge in the job titles table
This is useful when phasing out a role or restructuring while keeping past assignments visible.
Best Practices
-
Use clear, standard titles: Industry-standard titles help with recruiting, benchmarking, and internal mobility.
-
Define your grading system first: Pick one pattern (e.g., L1–L7, IC/M tracks) and document what each grade means before adding titles.
-
Set salary bands thoughtfully: Research market rates and review bands annually so they stay competitive.
-
Use meaningful codes: Short codes like
SWE,PM,ACCTare easier to scan in reports than1,2,3. -
Add descriptions: Use the Description field to clarify expectations — it helps during hiring and performance reviews.
-
Review periodically: Audit job titles regularly. Deactivate roles that are no longer needed; the historical data stays intact.
-
Plan career paths: Think about how someone moves between titles (e.g., Junior Engineer → Engineer → Senior Engineer → Staff Engineer) when designing your ladder.