Your Profile
Your profile is your personal record in RadixHR — the details HR, payroll, and your manager rely on. Some of it is maintained by HR (your job, salary, and shift), but a lot of it is yours to keep up to date: your contact details, family members, emergency contacts, and the bank account your salary goes to. Open it from My Profile in the sidebar.
What you can do here:
- Update your personal details and change your profile photo
- Add family members (Dependents) and Emergency Contacts
- Add or change the bank account your salary is paid into
- Read your employment details, designation history, and reporting line
- Check your salary breakdown and your leave balances, requests, and forecast
- See your shift schedule, weekly off, and the policies that apply to you
What’s on the Page
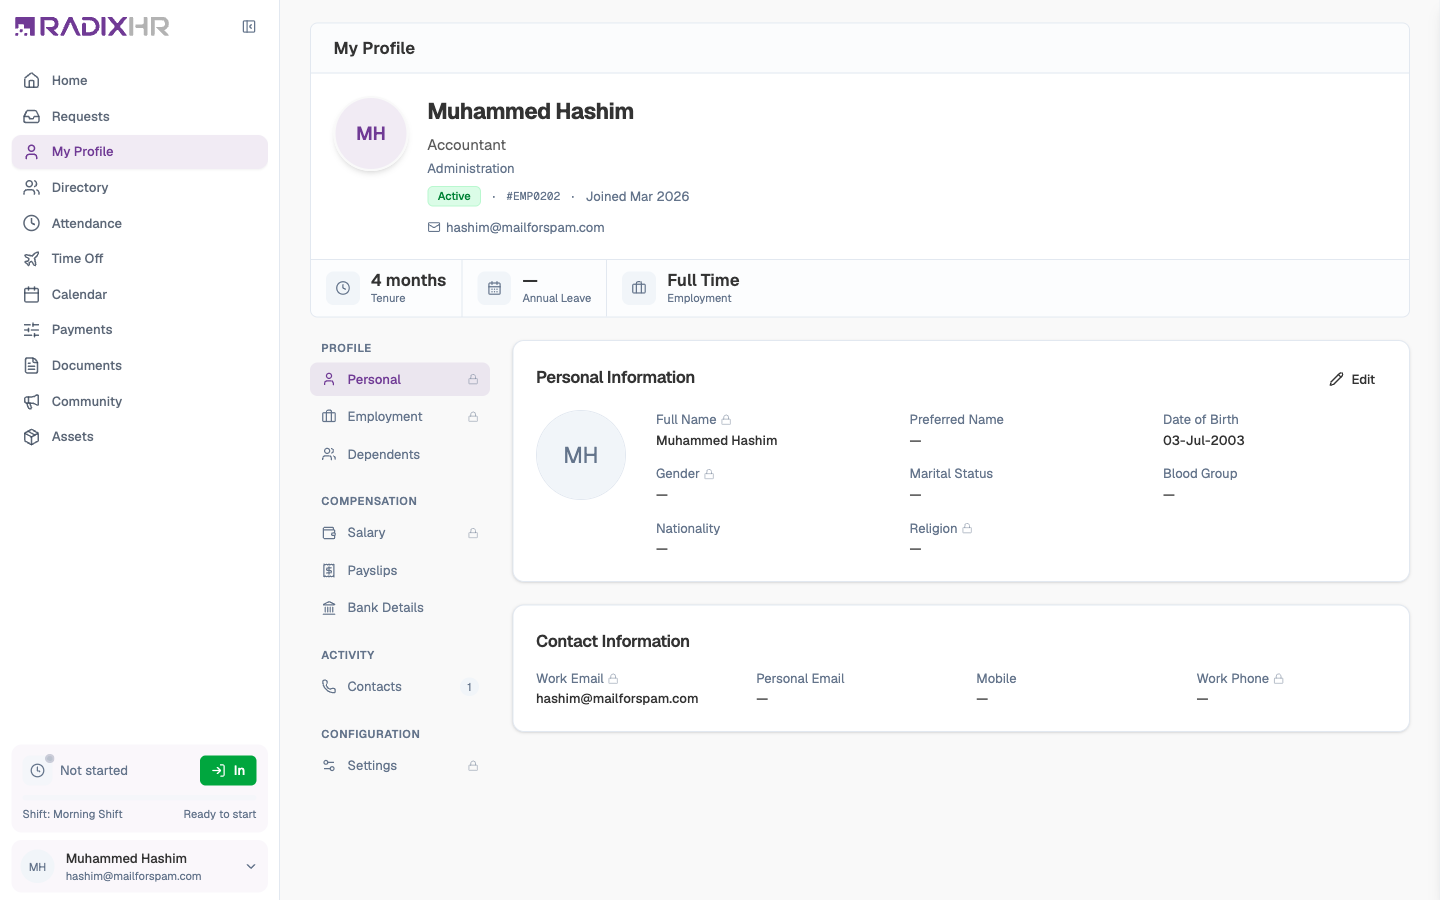
The header shows your name, preferred name (“Goes by …”), job title, department and work location, an Active badge, your employee code (for example #AF001), and the month you joined, plus your work email and mobile. Under it, three quick figures: Tenure (how long you’ve been with the company), Annual Leave (days available right now), and Employment type.
The section list on the left is grouped into four blocks. A padlock means HR maintains that section — you can read it but not change it. A number badge shows how many entries you have.
| Group | Section | What it holds | Can you edit it? |
|---|---|---|---|
| Profile | Personal | Name, date of birth, marital status, nationality, contact details, addresses | Partly — see Editing Your Personal Information |
| Profile | Employment | Employee ID, status, job title, department, location, key dates, reporting manager, designation history | No — contact HR |
| Profile | Dependents | Spouse, children, parents | Yes — add, edit, delete |
| Compensation | Salary | Basic and gross salary and every salary component | No — contact HR |
| Compensation | Bank Details | The account your salary is paid into | Yes — new accounts need HR approval |
| Activity | Leave | Leave balances, requests, transactions, and year-end forecast | View only — request leave from Time Off |
| Activity | Contacts | Emergency contacts | Yes — add, edit, delete |
| Configuration | Settings | Your shift, weekly schedule, work arrangement, and attendance policy | No — contact HR |
Three things are worth checking the day you join: your Bank Details (so your first salary goes to the right place), your Emergency Contacts, and the required documents on My Documents.
Changing Your Profile Photo
- Open the Personal section.
- Hover over your avatar (the circle with your initials) — a camera icon appears.
- Click it and choose an image from your computer. It uploads straight away; there’s no Save button.
Accepted formats are JPG, PNG, and WebP, up to 2 MB.
Editing Your Personal Information
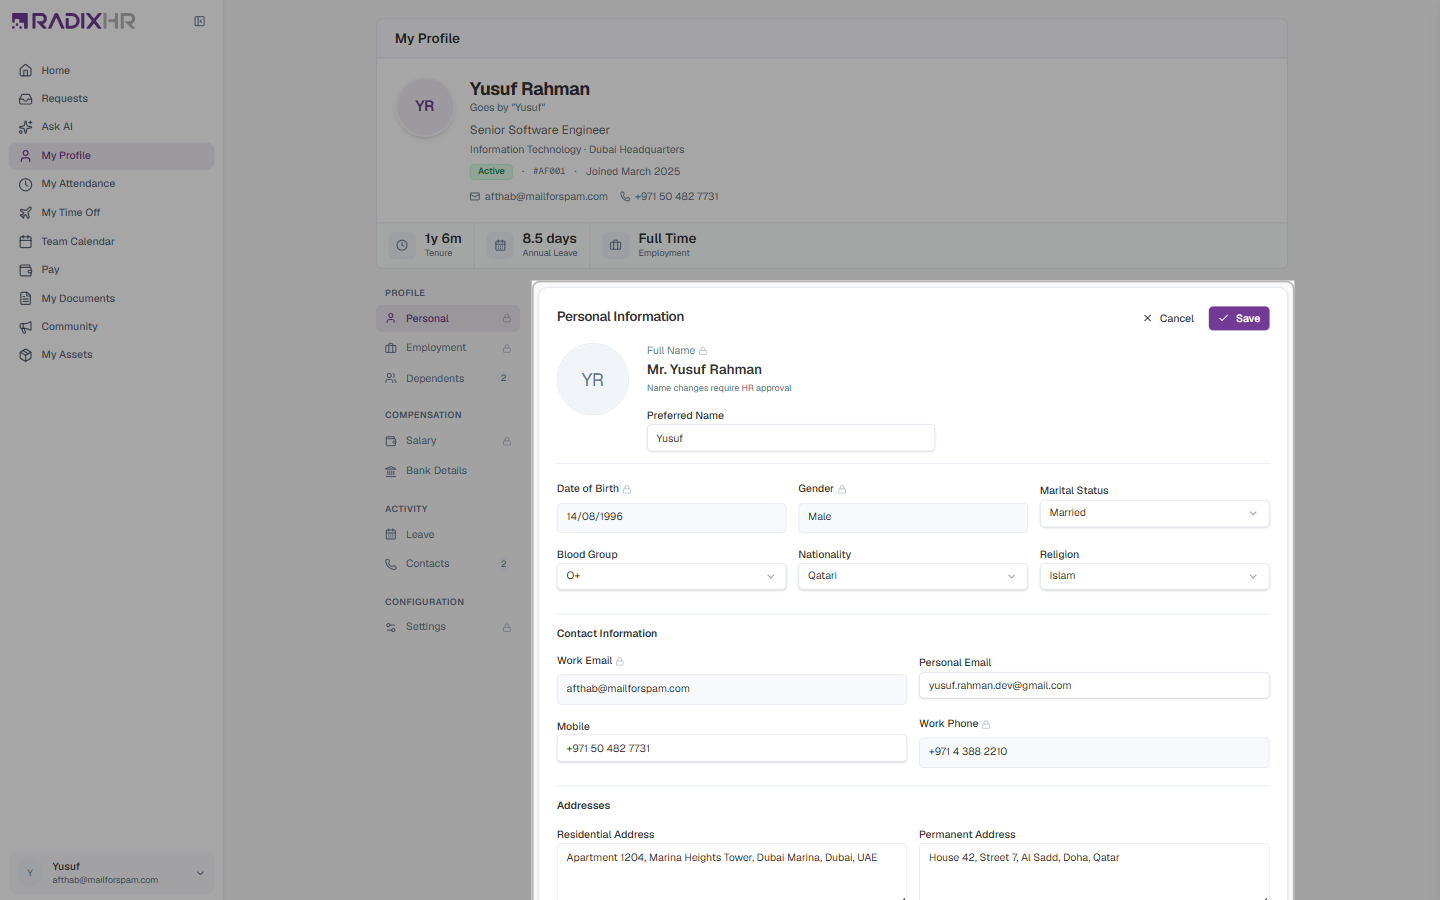
The Personal section has two cards: Personal Information and Contact Information, with your Addresses underneath.
- Click Edit at the top-right of the Personal Information card. The card switches to edit mode in place — no pop-up.
- Change what you need. Locked fields stay greyed out with a small padlock.
- Click Save to apply your changes, or Cancel to throw them away.
Fields You Can Edit
| Field | Description | Required |
|---|---|---|
| Preferred Name | What you’d like to be called — shown as “Goes by …” in the header and used on your Home page greeting | No |
| Marital Status | Single, Married, Divorced, or Widowed | No |
| Blood Group | A+, A−, B+, B−, AB+, AB−, O+, O− | No |
| Nationality | Pick from a searchable list of countries | No |
| Religion | Islam, Christianity, Hinduism, Buddhism, Sikhism, Judaism, Other, or Prefer not to say | No |
| Personal Email | Your own email address, separate from your work email | No |
| Mobile | Your personal mobile number — HR uses this to reach you outside work | No |
| Residential Address | Where you live now | No |
| Permanent Address | Your permanent home address (for many people, in their home country) | No |
Fields Only HR Can Change
Full Name, Date of Birth, Gender, Work Email, and Work Phone are managed by HR and appear greyed out. The form reminds you that “Name changes require HR approval” — raise those with your HR team.
Your Employment Details
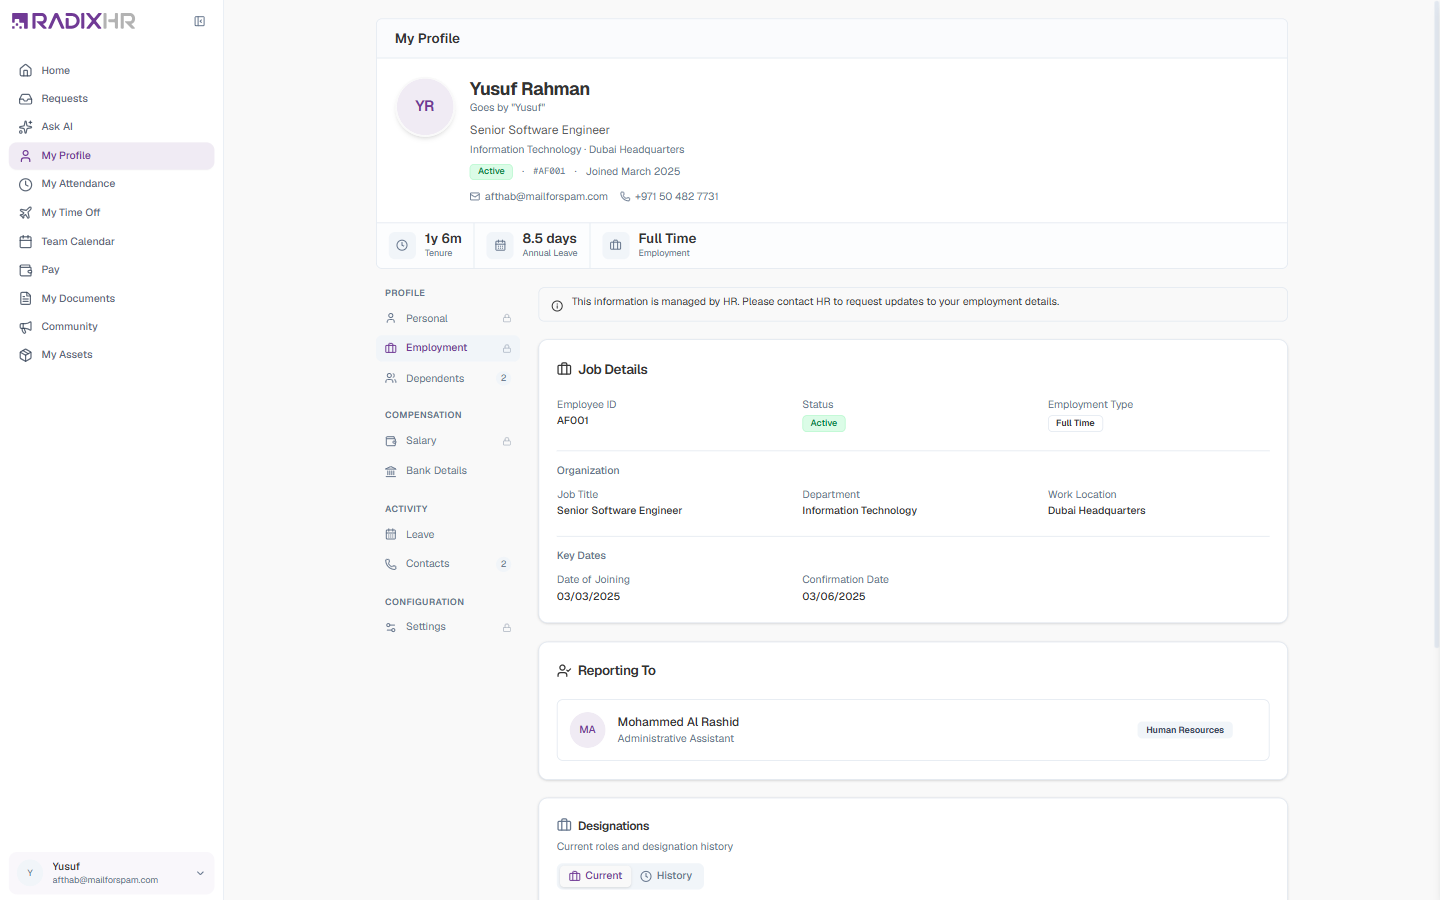
The Employment section is read-only (the banner says “This information is managed by HR”). It’s the place to check what the company has on record for you:
| Card | What it shows |
|---|---|
| Job Details | Employee ID, Status (Active), and Employment Type (for example Full Time) |
| Organization | Job Title, Department, and Work Location |
| Key Dates | Date of Joining and Confirmation Date (the end of your probation) |
| Reporting To | Your manager, with their title and department |
| Designations | Your current role (marked Primary) with the date it started — switch to History to see earlier roles, which is handy for promotions |
| Reporting Manager | Your current manager and, under History, anyone you reported to before |
Adding a Dependent
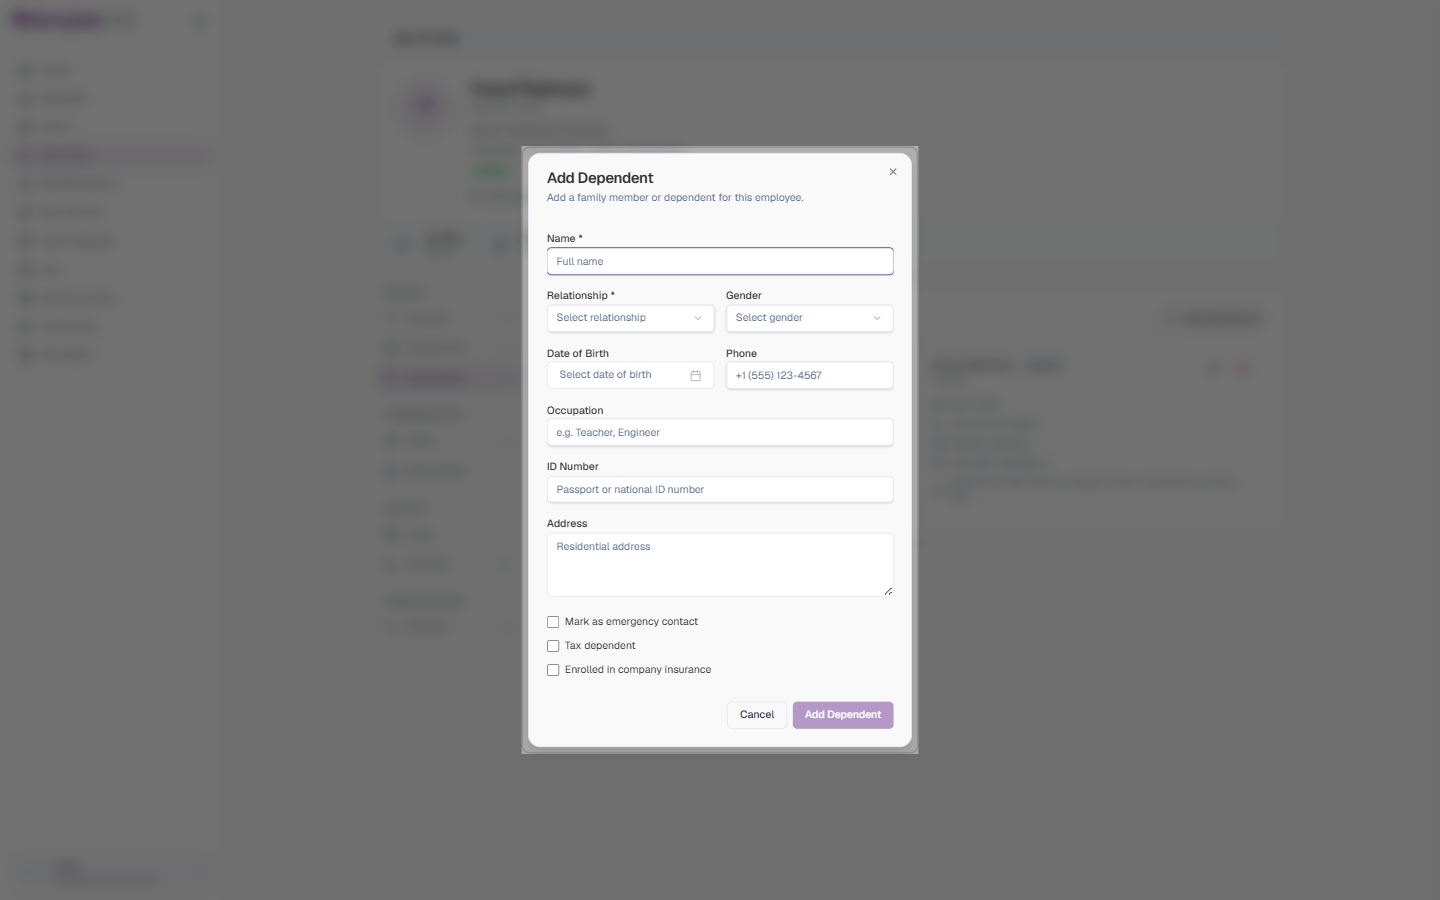
Dependents are family members — a spouse, children, or parents. Companies often need them for medical insurance, visas, or benefits. Each dependent appears as a card showing their relationship, gender, date of birth, phone, occupation, ID number, and address.
- Open the Dependents section.
- Click Add Dependent.
- Fill in the form. Only Name and Relationship are required.
- Click Add Dependent to save.
| Field | Description | Required |
|---|---|---|
| Name | The dependent’s full name | Yes |
| Relationship | Spouse, Child, Father, Mother, Parent (Other), Sibling, or Other | Yes |
| Gender | Male, Female, or Other | No |
| Date of Birth | Pick from the calendar — it can’t be a future date | No |
| Phone | A contact number for them | No |
| Occupation | For example Teacher or Student | No |
| ID Number | Passport or national ID number (for example an Emirates ID) | No |
| Address | Where they live | No |
| Mark as emergency contact | Tick to also list this person as an emergency contact | No |
| Tax dependent | Tick if they count as your dependent for tax purposes | No |
| Enrolled in company insurance | Tick if they’re covered by the company medical plan | No |
The three tick boxes show as badges on the dependent’s card. To change a dependent later, click the pencil icon on their card; to remove one, click the trash icon and confirm. Removed records are archived rather than deleted, so HR can restore them if needed.
Adding an Emergency Contact
Emergency contacts are the people HR should call if something happens to you at work. You can have several; the one with the star is your Primary contact and is called first.
- Open the Contacts section.
- Click Add Contact.
- Fill in the form — Name, Relationship, and Mobile are required.
- Click Add Contact to save.
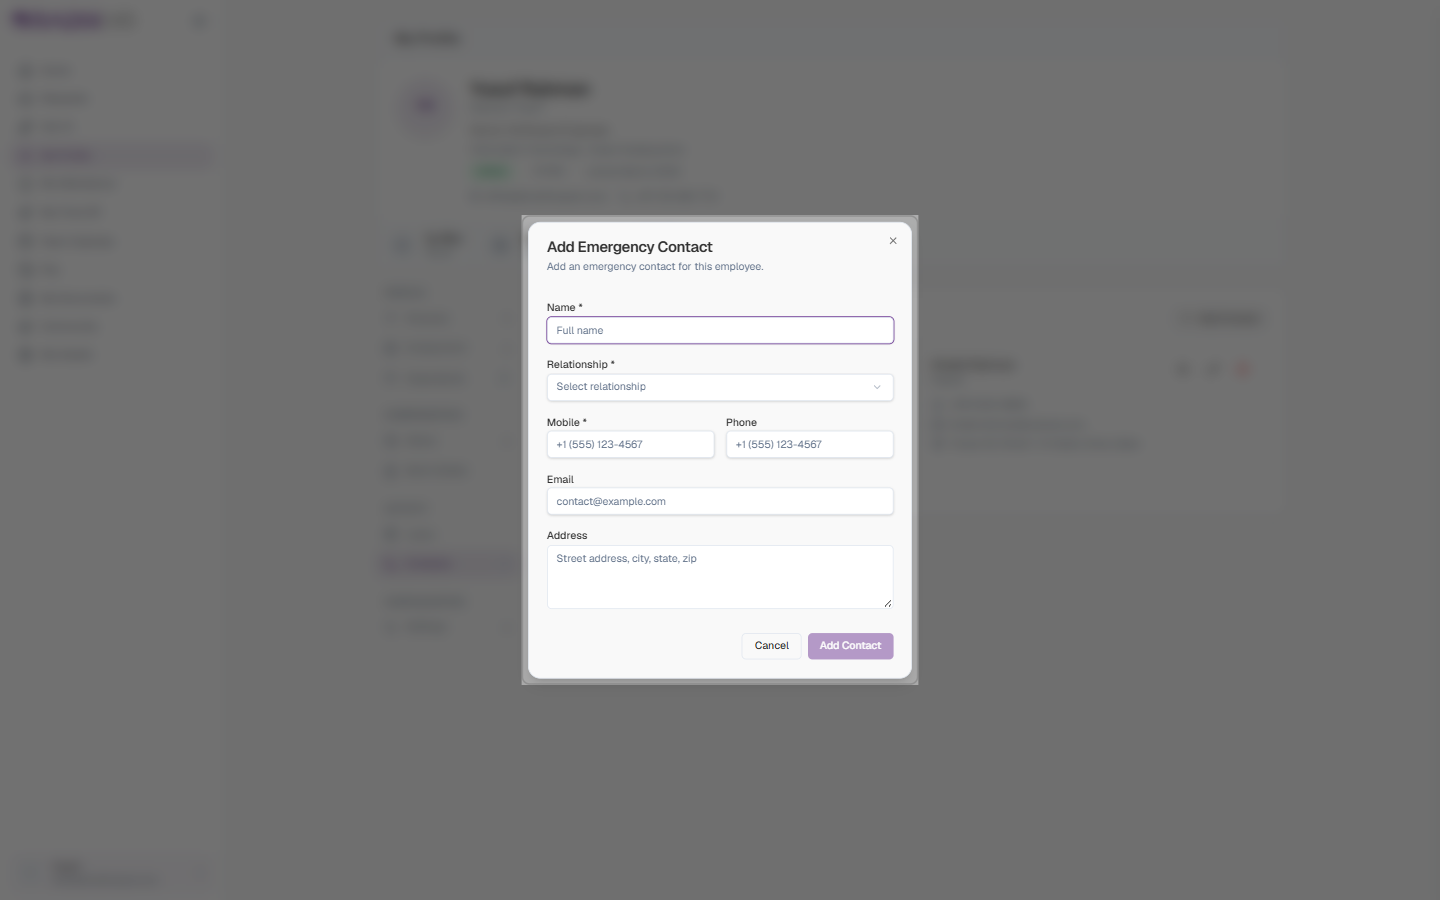
| Field | Description | Required |
|---|---|---|
| Name | The contact’s full name | Yes |
| Relationship | How they’re related to you (Spouse, Parent, Sibling, Friend, …) | Yes |
| Mobile | The number to call first | Yes |
| Phone | A second number, for example a landline | No |
| Their email address | No | |
| Address | Where they live | No |
To make someone your main contact, click the star on their card. Use the pencil to edit or the trash icon to remove a contact.
Adding Your Bank Account
This is the account your salary is paid into, so it goes through an approval check before payroll uses it. Each saved account shows as a card with the bank and branch, a Primary badge on your main account, a status badge (Draft or Approved), the account holder, a masked account number, routing number, SWIFT code, IBAN, employee unique ID, and currency.
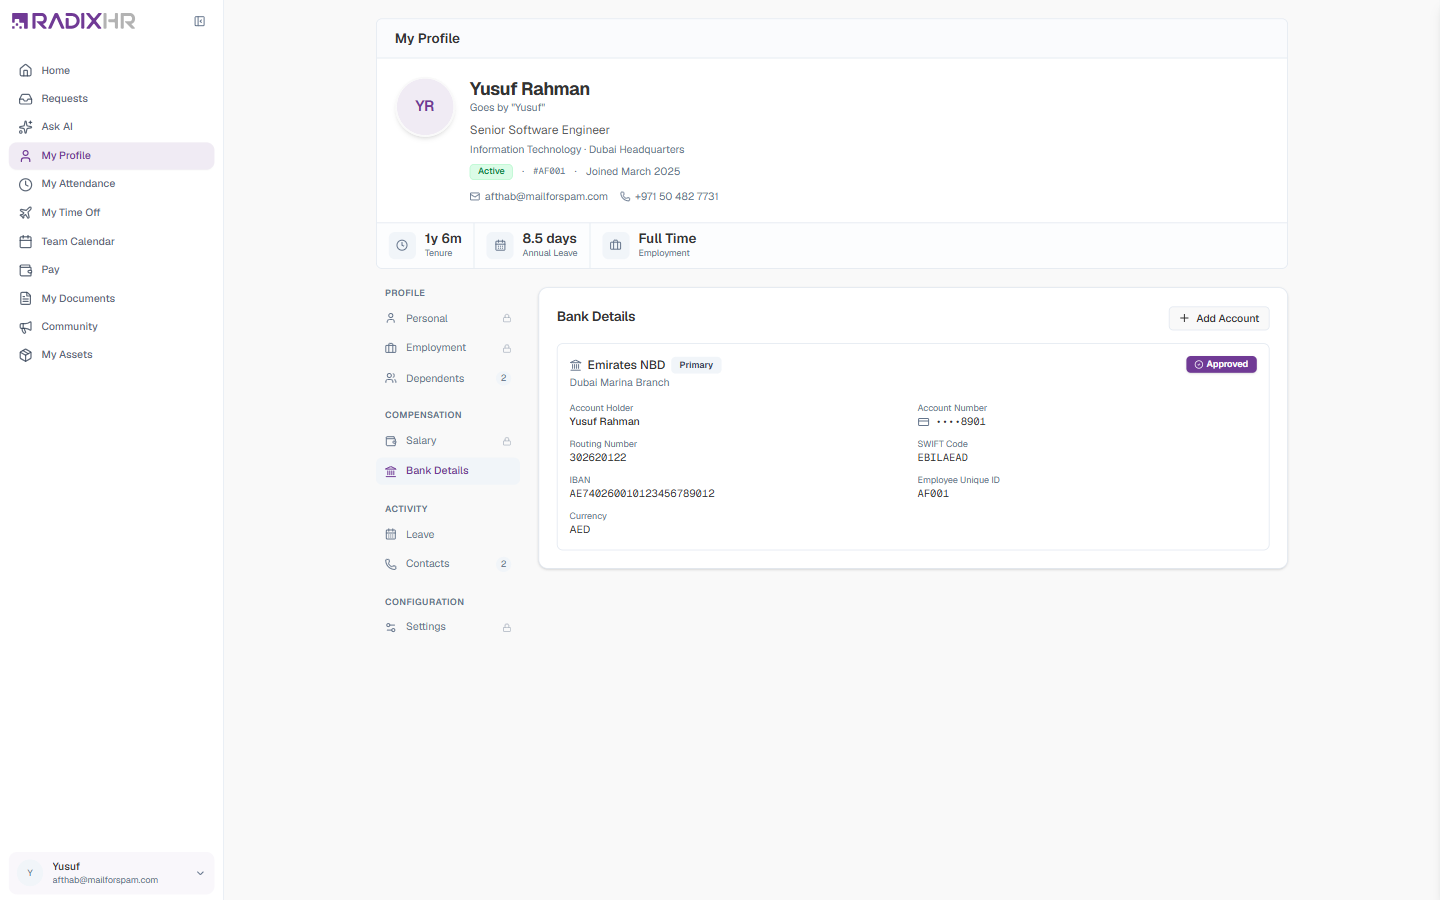
- Open the Bank Details section.
- Click Add Account.
- Fill in the details from your bank statement or app. Take care with the account number and IBAN — payroll will pay exactly what you type.
- Click Add Account.
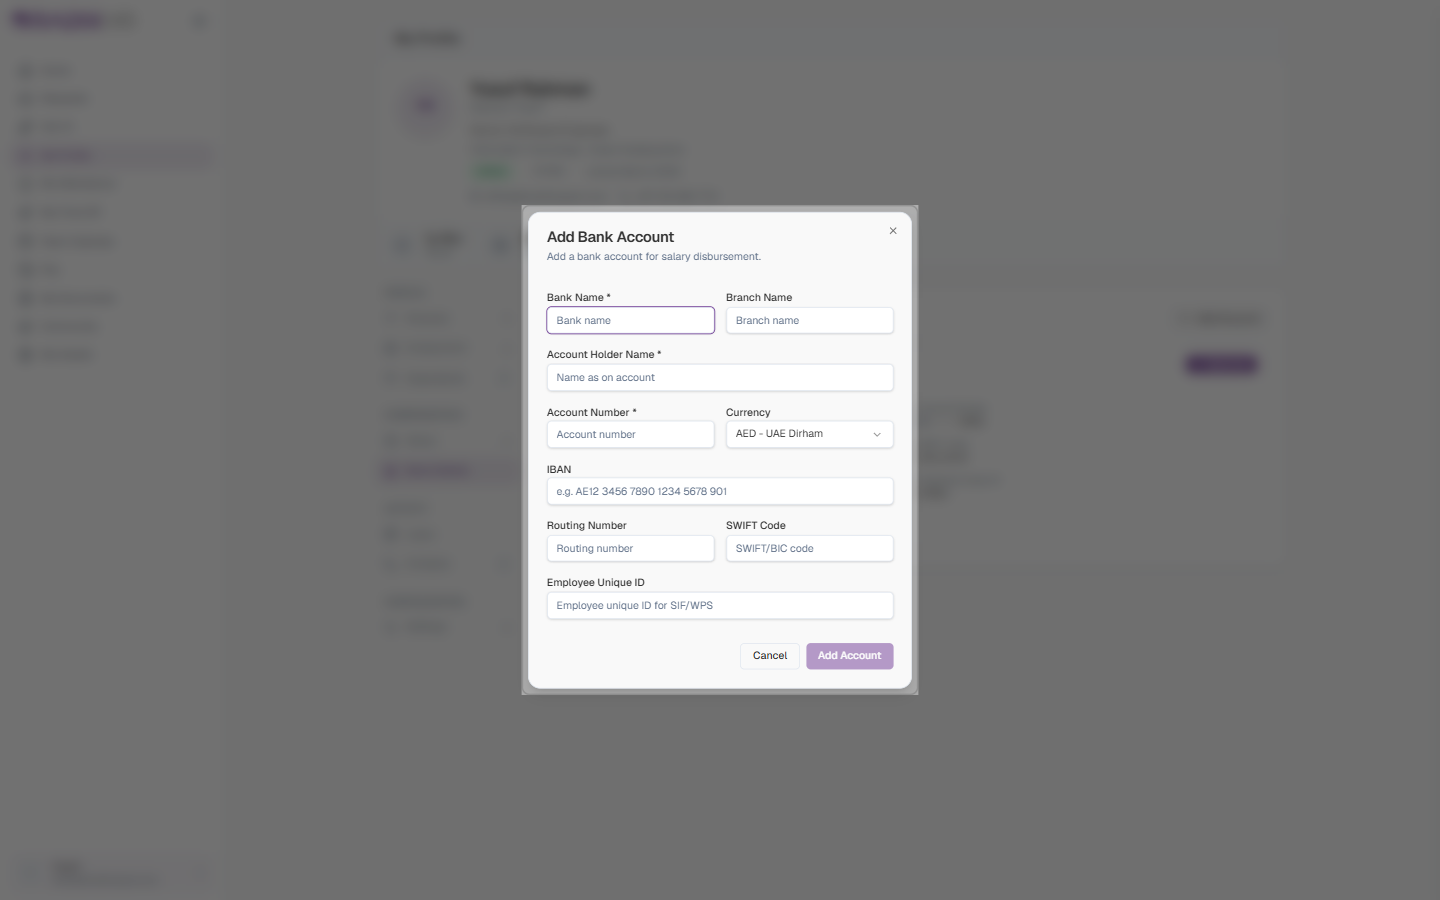
| Field | Description | Required |
|---|---|---|
| Bank Name | The name of your bank (for example Emirates NBD) | Yes |
| Branch Name | The branch that holds the account | No |
| Account Holder Name | Your name exactly as it appears on the account | Yes |
| Account Number | Your account number | Yes |
| Currency | Defaults to AED – UAE Dirham | No |
| IBAN | The international account number (UAE IBANs start with AE and are 23 characters). It’s checked for validity when you save. | No |
| Routing Number | The bank’s routing code, used for salary transfers | No |
| SWIFT Code | The bank’s SWIFT/BIC code, needed for international transfers | No |
| Employee Unique ID | Your identifier for SIF/WPS — the Salary Information File that UAE companies submit under the Wage Protection System. Usually your employee code. | No |
A new account starts as Draft with the note “This account is awaiting approval”. HR or your manager must approve it before payroll uses it — you can’t approve your own. Until then your salary keeps going to your previously approved account.
Once an account is Approved it locks and the edit and delete buttons disappear. If the details change later, ask HR to unlock it first.
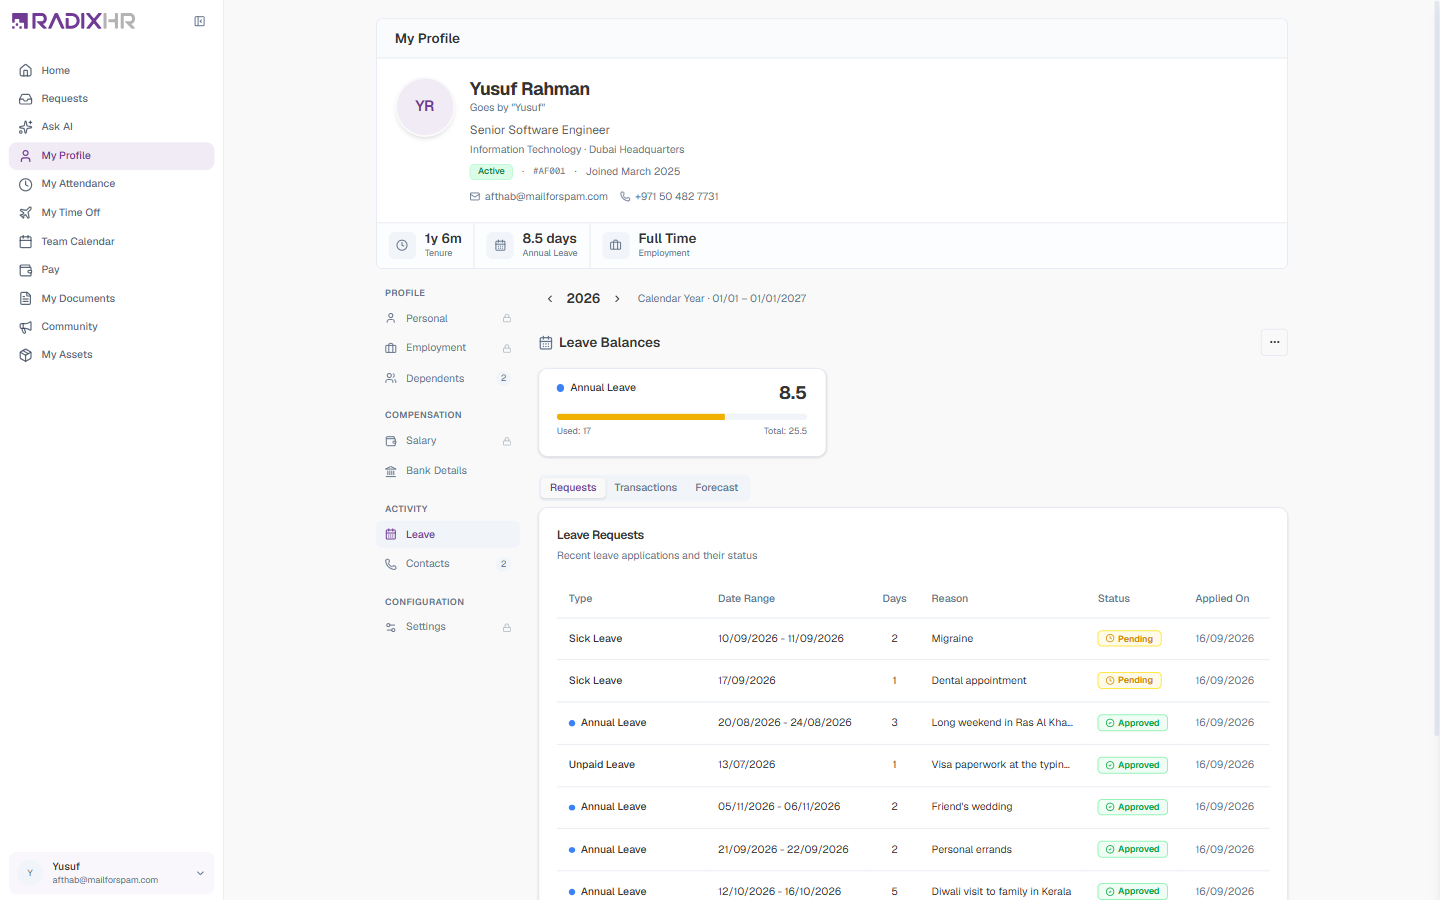
Checking Your Leave
The Leave section shows the same information as Time Off & Leave without leaving your profile: a balance card per leave type (available days, a progress bar, and Used / Total), plus Requests, Transactions, and Forecast tabs. Use the ‹ › arrows beside the year to look at a previous leave year.
Salary and Settings (Read-Only)
Salary shows your Basic Salary (per month), Gross Salary (including allowances), the Effective From date of your current package, and a Salary Components table listing each earning (for example Basic Salary, Housing Allowance, Transport Allowance) with its type and amount. Payslips live under Pay.
Settings has two tabs. Attendance shows My Schedule — your Current Shift (name and code), Weekly Off, the Weekly Schedule with start and end times per day, when it took effect, and a Shift History of earlier shifts — plus Other Settings such as your Work Arrangement (Onsite, Remote, Hybrid) and Attendance Policy. Leave shows your leave group and policies.
Employment, Salary, and Settings each show a banner saying they’re managed by HR. That’s expected — if something there is wrong, contact your HR team rather than looking for an edit button.