Clock In & Attendance
My Attendance is your own attendance record: when you arrived, when you left, how many hours counted, and whether a day was marked present, late, or absent. Use it to clock in and out (if your company allows clocking in from the web), to check your week or month, and to put things right when a day looks wrong.
What you can do here:
- See each day’s status, clock-in and clock-out times, and worked hours — by week or by month
- Check your totals for a date range: attendance rate, total hours, average per day, overtime
- Review any overtime recorded for you
- Raise an attendance request to fix a missing punch, excuse a late arrival, or record a business trip, outdoor duty, work-from-home day, or overtime
- Track those requests and cancel one that hasn’t been approved yet
The Four Tabs
| Tab | What it shows |
|---|---|
| Timeline | A day-by-day view of your attendance for a week or a month |
| Summary | Totals for a date range — attendance rate, hours, overtime, and a day-by-day table |
| Overtime | Overtime entries recorded for you and whether they were approved |
| Requests | The attendance requests you’ve raised and their status |
The New Request button in the top-right works from any tab.
Clocking In and Out
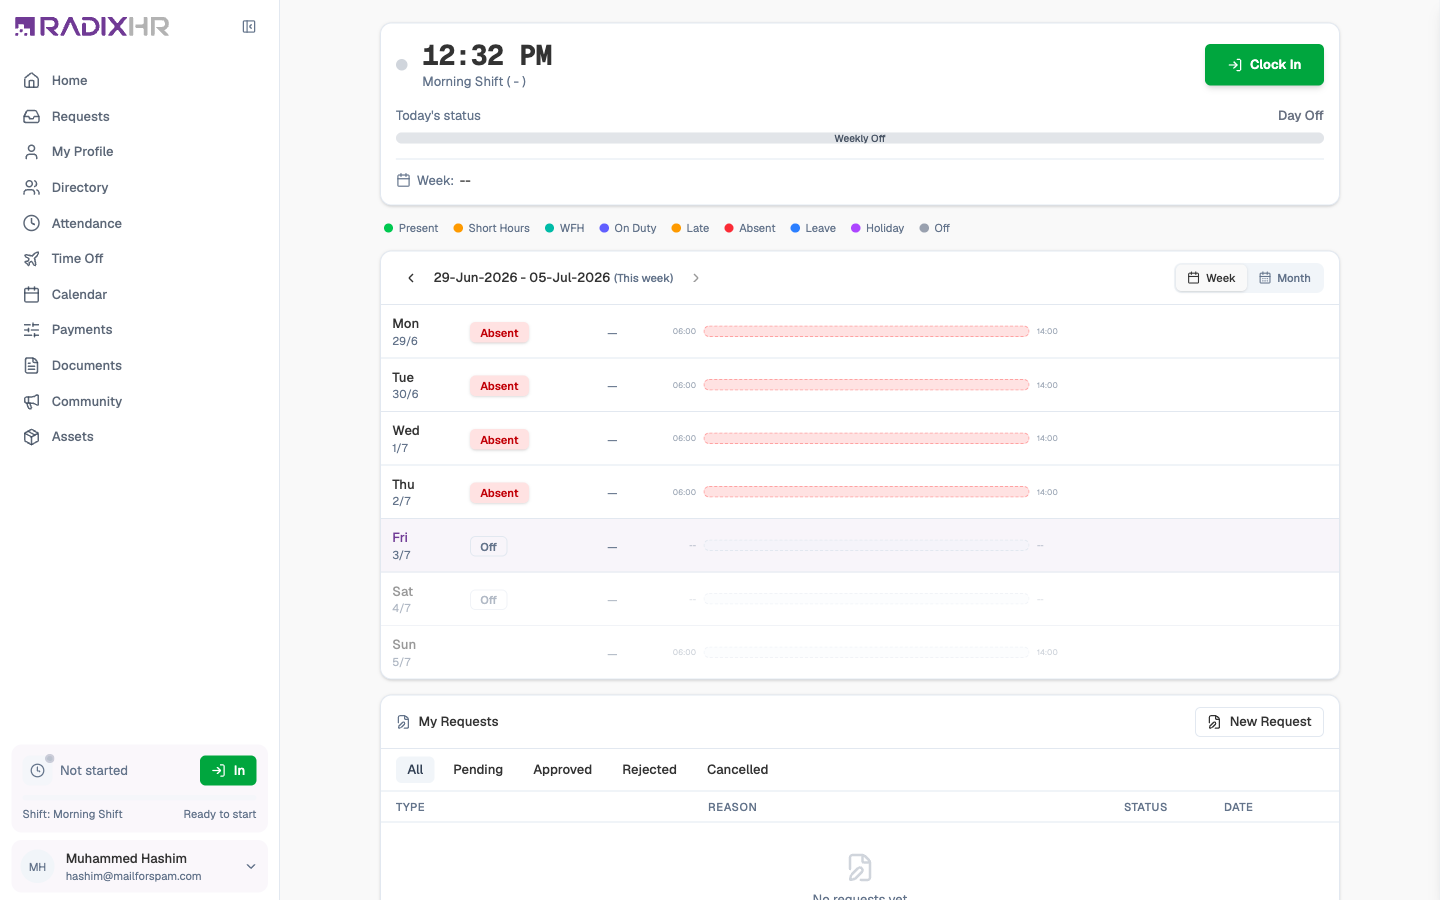
If your company allows clocking in from the web, you’ll see a Clock In card at the top of the Timeline tab and a small clock widget at the bottom of your sidebar (visible on every page).
- When you start work, click Clock In (in the sidebar the button simply reads In).
- A live timer counts your hours and a progress bar tracks you against your shift.
- When you finish, click Clock Out (or Out in the sidebar).
There’s no confirmation step — one click does it. If you clock out and later start again the same day, the sidebar button reads Resume and each stretch shows as a separate session. There are no separate break buttons: breaks are worked out from the gap between clocking out and clocking back in.
Don’t see a clock-in card or the sidebar widget? Your company records attendance another way — typically a biometric punch device at the office — and has turned off web clock-in. Your punches still appear here; you just don’t clock in from this page.
If web clock-in is restricted to the office network you may see “Clock in is restricted to allowed network IP addresses”. Other messages you might meet are “Already clocked in. Please clock out first.” and “Not clocked in. Please clock in first.”
Reading the Timeline
Use Week or Month (top-right of the card) to switch views, and the ‹ › arrows beside the date range to move backwards and forwards. A colour legend sits under the date range.
Week View
Each row is one day and shows:
| Column | What it means |
|---|---|
| Day | Weekday and date |
| Status badge | Present, Late, Short Hours, WFH, On Duty, Absent, Leave, Holiday, or Off |
| In → Out | Your first clock-in and last clock-out |
| Timeline bar | When you were at work, drawn against your shift (the small 09:00 and 18:00 labels are your shift start and end). Green is on time, orange is late, red is an absent day, and a purple tip marks time after your shift ended. |
| Actual | Total time between first in and last out |
| Counted | The hours that count for attendance after breaks and policy rules — with a note such as +41m late or +30m OT where relevant |
Click the chevron at the end of a row to expand the day and see each session, break, and any extended work.
Month View
Month view lays the days out as a calendar with your in and out times and worked hours in each cell, and a summary strip at the top counting your Present, Leave, Late, and Absent days for the month.
Day Status Colours
| Status | Meaning |
|---|---|
| Present | Full day worked, on time |
| Short Hours | Worked, but fewer hours than your shift requires |
| WFH | Worked from home |
| On Duty | Outdoor or on-duty work away from the office |
| Late | Arrived after your shift started (beyond the tolerance your company allows) |
| Absent | No attendance on a working day — and no approved leave |
| Leave | On approved leave |
| Holiday | A public or company holiday |
| Off | Your weekly off or a non-working day |
A day shows Absent until something explains it — a punch, approved leave, or an approved attendance request. If you were genuinely at work, raise an attendance request rather than leaving it; absent days can affect pay.
Checking Your Totals (Summary Tab)
The Summary tab totals a date range — by default the last 30 days. Change the range with the date picker.
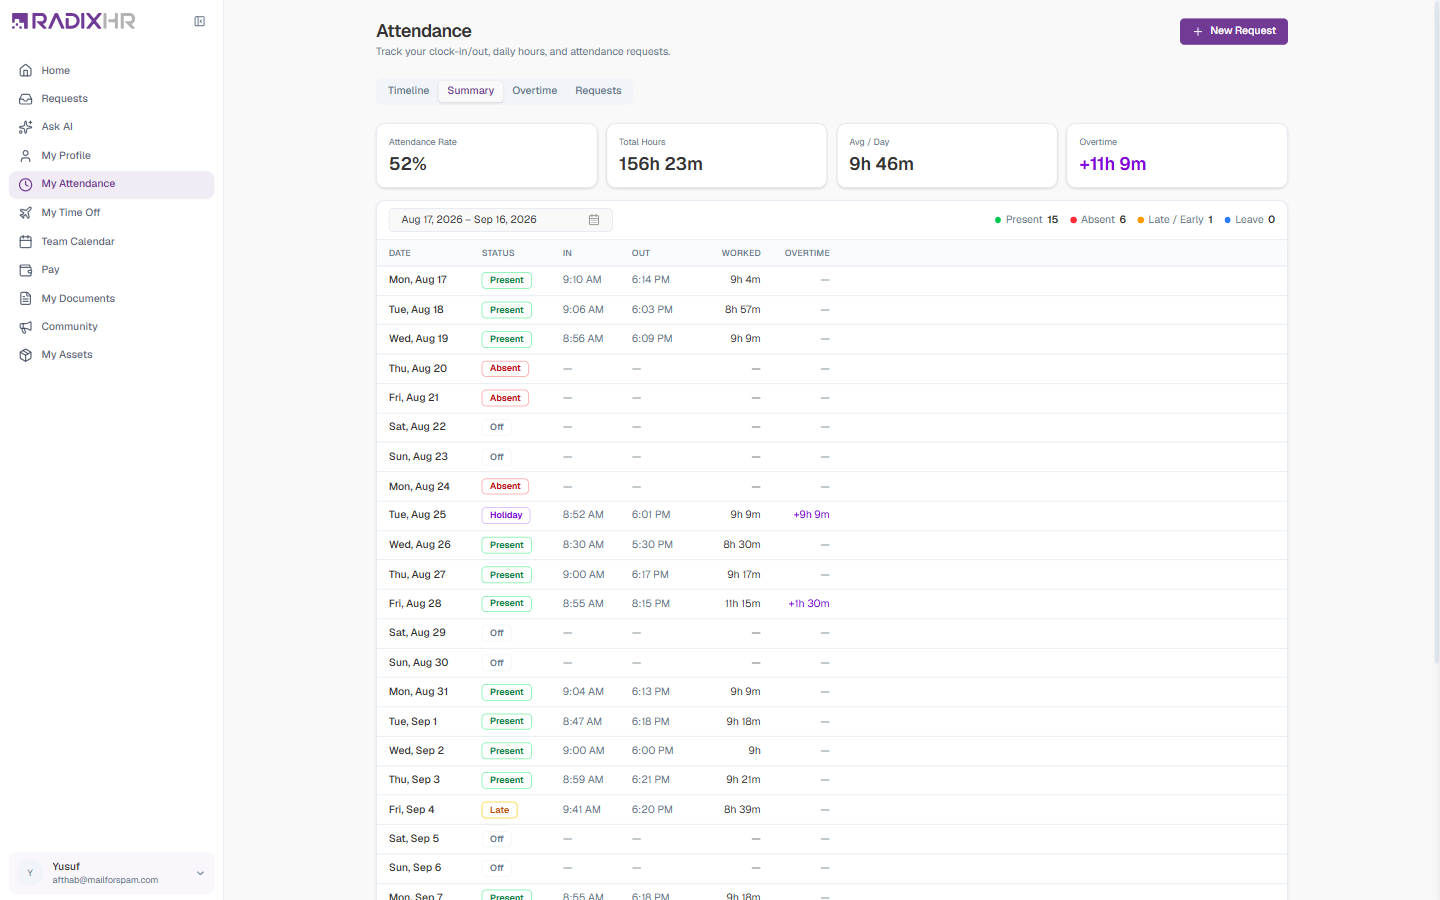
| Figure | What it means |
|---|---|
| Attendance Rate | Days you were present as a share of working days in the range |
| Total Hours | All counted hours in the range |
| Avg / Day | Total hours divided by the days you worked |
| Overtime | Hours beyond your shift that were recorded as overtime |
| Present / Absent / Late-Early / Leave | A count of days in each state |
Below the figures, a table lists every day with its Status, In, Out, Worked hours, and any Overtime.
Overtime Tab
The Overtime tab lists every overtime entry recorded for you in the selected range, with the date, shift, type, hours, how much was approved, and its status. The three cards at the top total your entries, total overtime, and approved overtime. If nothing has been recorded, it reads “No overtime records for the selected filters.”
Raising an Attendance Request
An attendance request asks your manager to correct or excuse something on your record. Nothing changes until it’s approved.
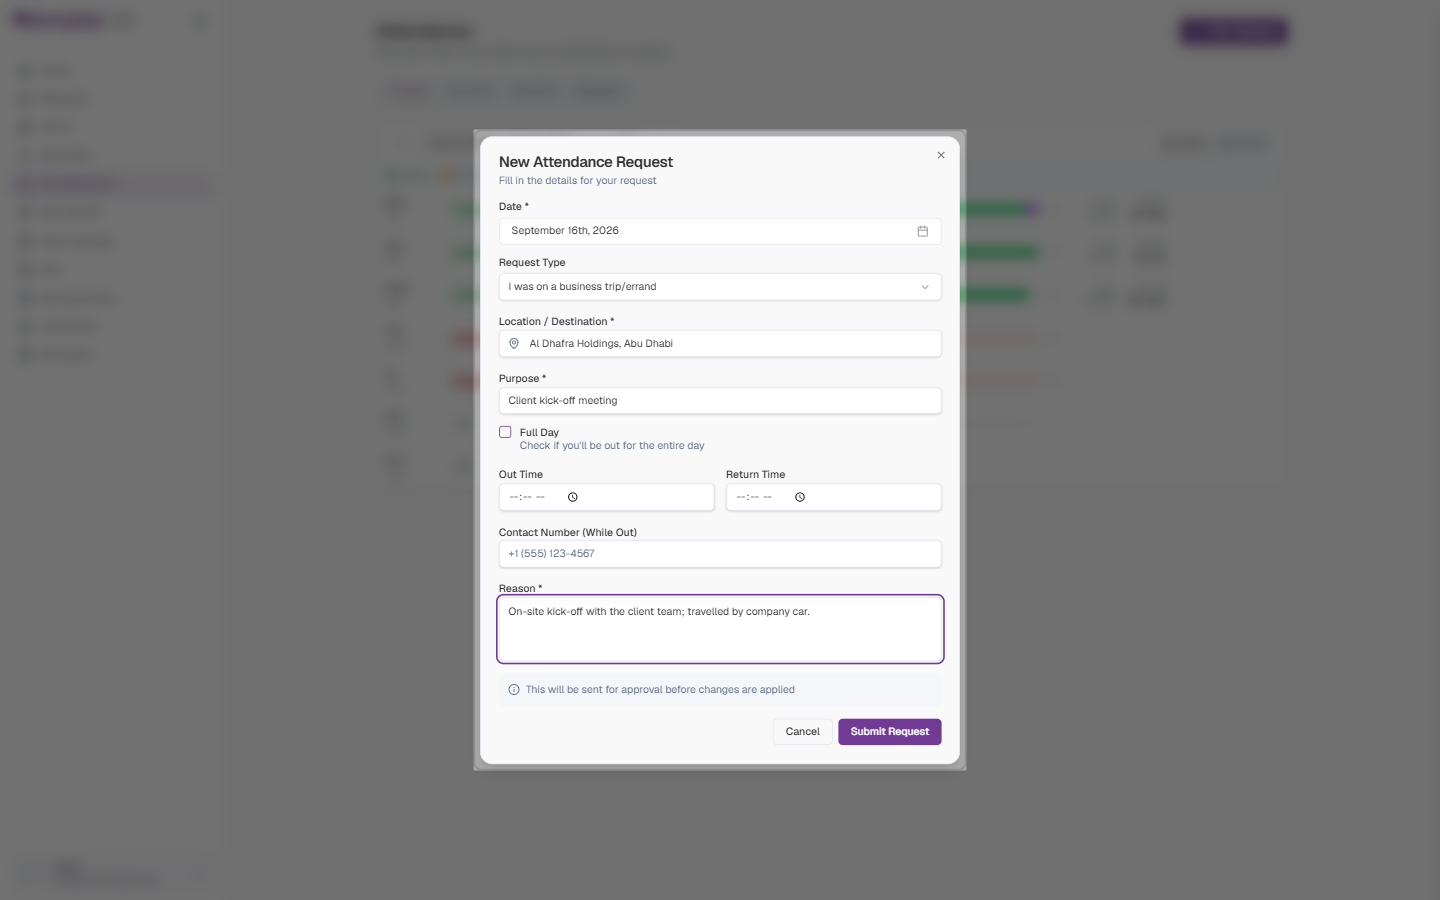
- Click New Request (top-right). You can also hover over a day in the Timeline and click the pencil icon to start a request with that date filled in.
- Pick the Date.
- Choose a Request Type from the list below. The form then shows the fields that type needs.
- Write a Reason — this is always required.
- Click Submit Request.
Request Types
The list uses plain language rather than jargon:
| Choose this | When | Extra fields it asks for |
|---|---|---|
| I forgot to punch in/out | A clock-in or clock-out is missing | Which punch (Clock In / Clock Out) and the Time |
| I made a wrong punch | Both punches exist but a time is wrong | The corrected Clock In and/or Clock Out |
| Excuse my late arrival | You arrived late and want it excused | — |
| Excuse my early departure | You left early and want it excused | — |
| Excuse my absence | You were marked absent but shouldn’t be | — (the form shows what was recorded for that day) |
| Out-Pass | You need to step out during the shift for a short while | — |
| I was on a business trip/errand | You were out on company business | Location / Destination, Purpose, Full Day or Out Time / Return Time, Contact Number (While Out) |
| I was on outdoor duty | You worked away from the office (site visit, field work) | Location / Destination, Purpose, Full Day or times |
| I worked from home | You worked remotely | Contact Number (optional) |
| I worked overtime after my shift | You stayed past your shift end and want it recorded | Start Time, End Time, Total Overtime Hours (minimum 0.5) |
Field Descriptions
| Field | Description | Required |
|---|---|---|
| Date | The day the request is about. Defaults to today. | Yes |
| Request Type | One of the ten types above | Yes |
| Location / Destination | Where you went — for example “Al Dhafra Holdings, Abu Dhabi” | Yes, for business trip and outdoor duty |
| Purpose | Why — for example “Client kick-off meeting” | Yes, for business trip and outdoor duty |
| Full Day | Tick if you were out for the whole day. Leave unticked and give Out Time and Return Time if you were only out for part of it. | No |
| Contact Number | Where you can be reached while out or working from home | No |
| Reason | A short explanation for your manager | Yes |
Timing Rules
- Business trip, outdoor duty, and work from home can be raised for future dates.
- The punch, late, early, absence, and overtime types are for today or earlier, and each has a submission window that the form tells you about — for example “You have 48 hour(s) after the shift ends to submit this request” or “You can submit this request up to 7 day(s) after the attendance date”. Miss the window and you’ll need to ask HR to record it for you.
- If the day is already marked Absent, choosing a punch type shows a hint suggesting Excuse my absence instead.
- If a request already exists for that date, an amber warning appears — check the Requests tab before raising a duplicate.
Every request type needs an approval workflow set up by HR. If you see “No approval workflow is configured for … requests”, that type can’t be submitted in your company yet — tell your HR team.
Tracking and Cancelling a Request
Open the Requests tab (titled My Requests) to see everything you’ve raised. Filter with the All / Pending / Approved / Rejected / Cancelled chips — each shows a count — and read the Type, Reason, Status, and Date of each request.
Click a request to open its details. While it’s still Pending and nobody has approved it yet, a Cancel Request button appears; confirm with Cancel Request or back out with Keep Request. Once it has passed the first approver you can no longer cancel it yourself — speak to your manager.
You can’t export your own attendance from this page. If you need a record, ask HR. The full Attendance guide explains the manager and HR views of the same data.